Please share your set up, that would be interesting for the future. Also how did you resolve the issue with the display? Do you think the X2 doesn't work with their controller at all or just in your case? Did you order with xt60/grease? I am trying to understand what to order from them and what to do myself...Tqfreak, you are crazy!
Thanks for excelent photos. Your build must have taken hundreads of hours. Kudos to the stickers. And also to your craftmanship.
Anyway have also Inno and also very bad experience. That company is a joke.
Motor came also not setup as I ordered, X2 display does not work with their controller ( Rico did not want to refund). I had faulty torque sensor from factory! Where is some qc testing? And also faulty throttle. I had to buy programming cable (I think it is intention to ignore your setup then u need to buy programmer also)
I can share a setup, been experimenting a while.
Navigation
Install the app
How to install the app on iOS
Follow along with the video below to see how to install our site as a web app on your home screen.
Note: This feature may not be available in some browsers.
More options
Style variation
You are using an out of date browser. It may not display this or other websites correctly.
You should upgrade or use an alternative browser.
You should upgrade or use an alternative browser.
TQFreak's Dengfu E55 Build Thread
- Thread starter TQFreak
- Start date

⚡ EMTB PRO
25% off e*thirteen, Peaty’s & more with PRO
Member-only deals from e*thirteen, Peaty’s, PEMBREE and Magicshine · ad-free browsing · PRO badge · Living Intelligence Reports
See the deals →
From £1.99/month
- Thread starter
- #62
I would like to get a programming cable for Innotrace X1 to be able to set it up for different batteries but it looks like it is out of stock and Innotrace does not respond.

 innotrace-shop.de
INNOTRACE | Programmieradapter X1 Handmade Edition
Programmieradapter zum Finetuning des X1 Controllers Endlich ist es möglich dein Bike noch weiter auf dich anzupassen um die perfekte Symbiose zwischen Mensch und ;aschine zu erreichen. Wenn du von unserem Controller begeistert bist wirst du den Programmieradapter lieben. Hiermit kannst du jede...
innotrace-shop.de
Dado
E*POWAH Master
- Jun 28, 2022
- 1,054
- 669
I would like to get a programming cable for Innotrace X1 to be able to set it up for different batteries but it looks like it is out of stock and Innotrace does not respond.
INNOTRACE | Programmieradapter X1 Handmade Edition
Programmieradapter zum Finetuning des X1 Controllers Endlich ist es möglich dein Bike noch weiter auf dich anzupassen um die perfekte Symbiose zwischen Mensch und ;aschine zu erreichen. Wenn du von unserem Controller begeistert bist wirst du den Programmieradapter lieben. Hiermit kannst du jede...
Hello. Should be just a normal Usb to Uart. Just you need a possword to log to software.
And for that X2 display. That display was not switching the level pass. Motor went still full power on each pass on display.
So I had to use normal old uart bafang display with 5 pass.
Innotrance and M620 CAN does have 10 pass levels (first 5 aka Eco, 6 to 10 Sport and that X2 somehow didnt switch levels)
How come X2 display which they selling with the motor is not compatible?!
I have reported this to Rico, he promised they will fix in next firmware release, but no new update of firmware when I have checked few months ago.
Will try it again and take some pictures, if some update. But I am not satisfied with this product.
Anyway, do not run it on 3kW, you will damage your kindernay very quickly. I had it on 2500W, chain and cassete was eat out really quickly (less then 500km) so now I am running 2200W.
- Thread starter
- #64
The next step is cable management.
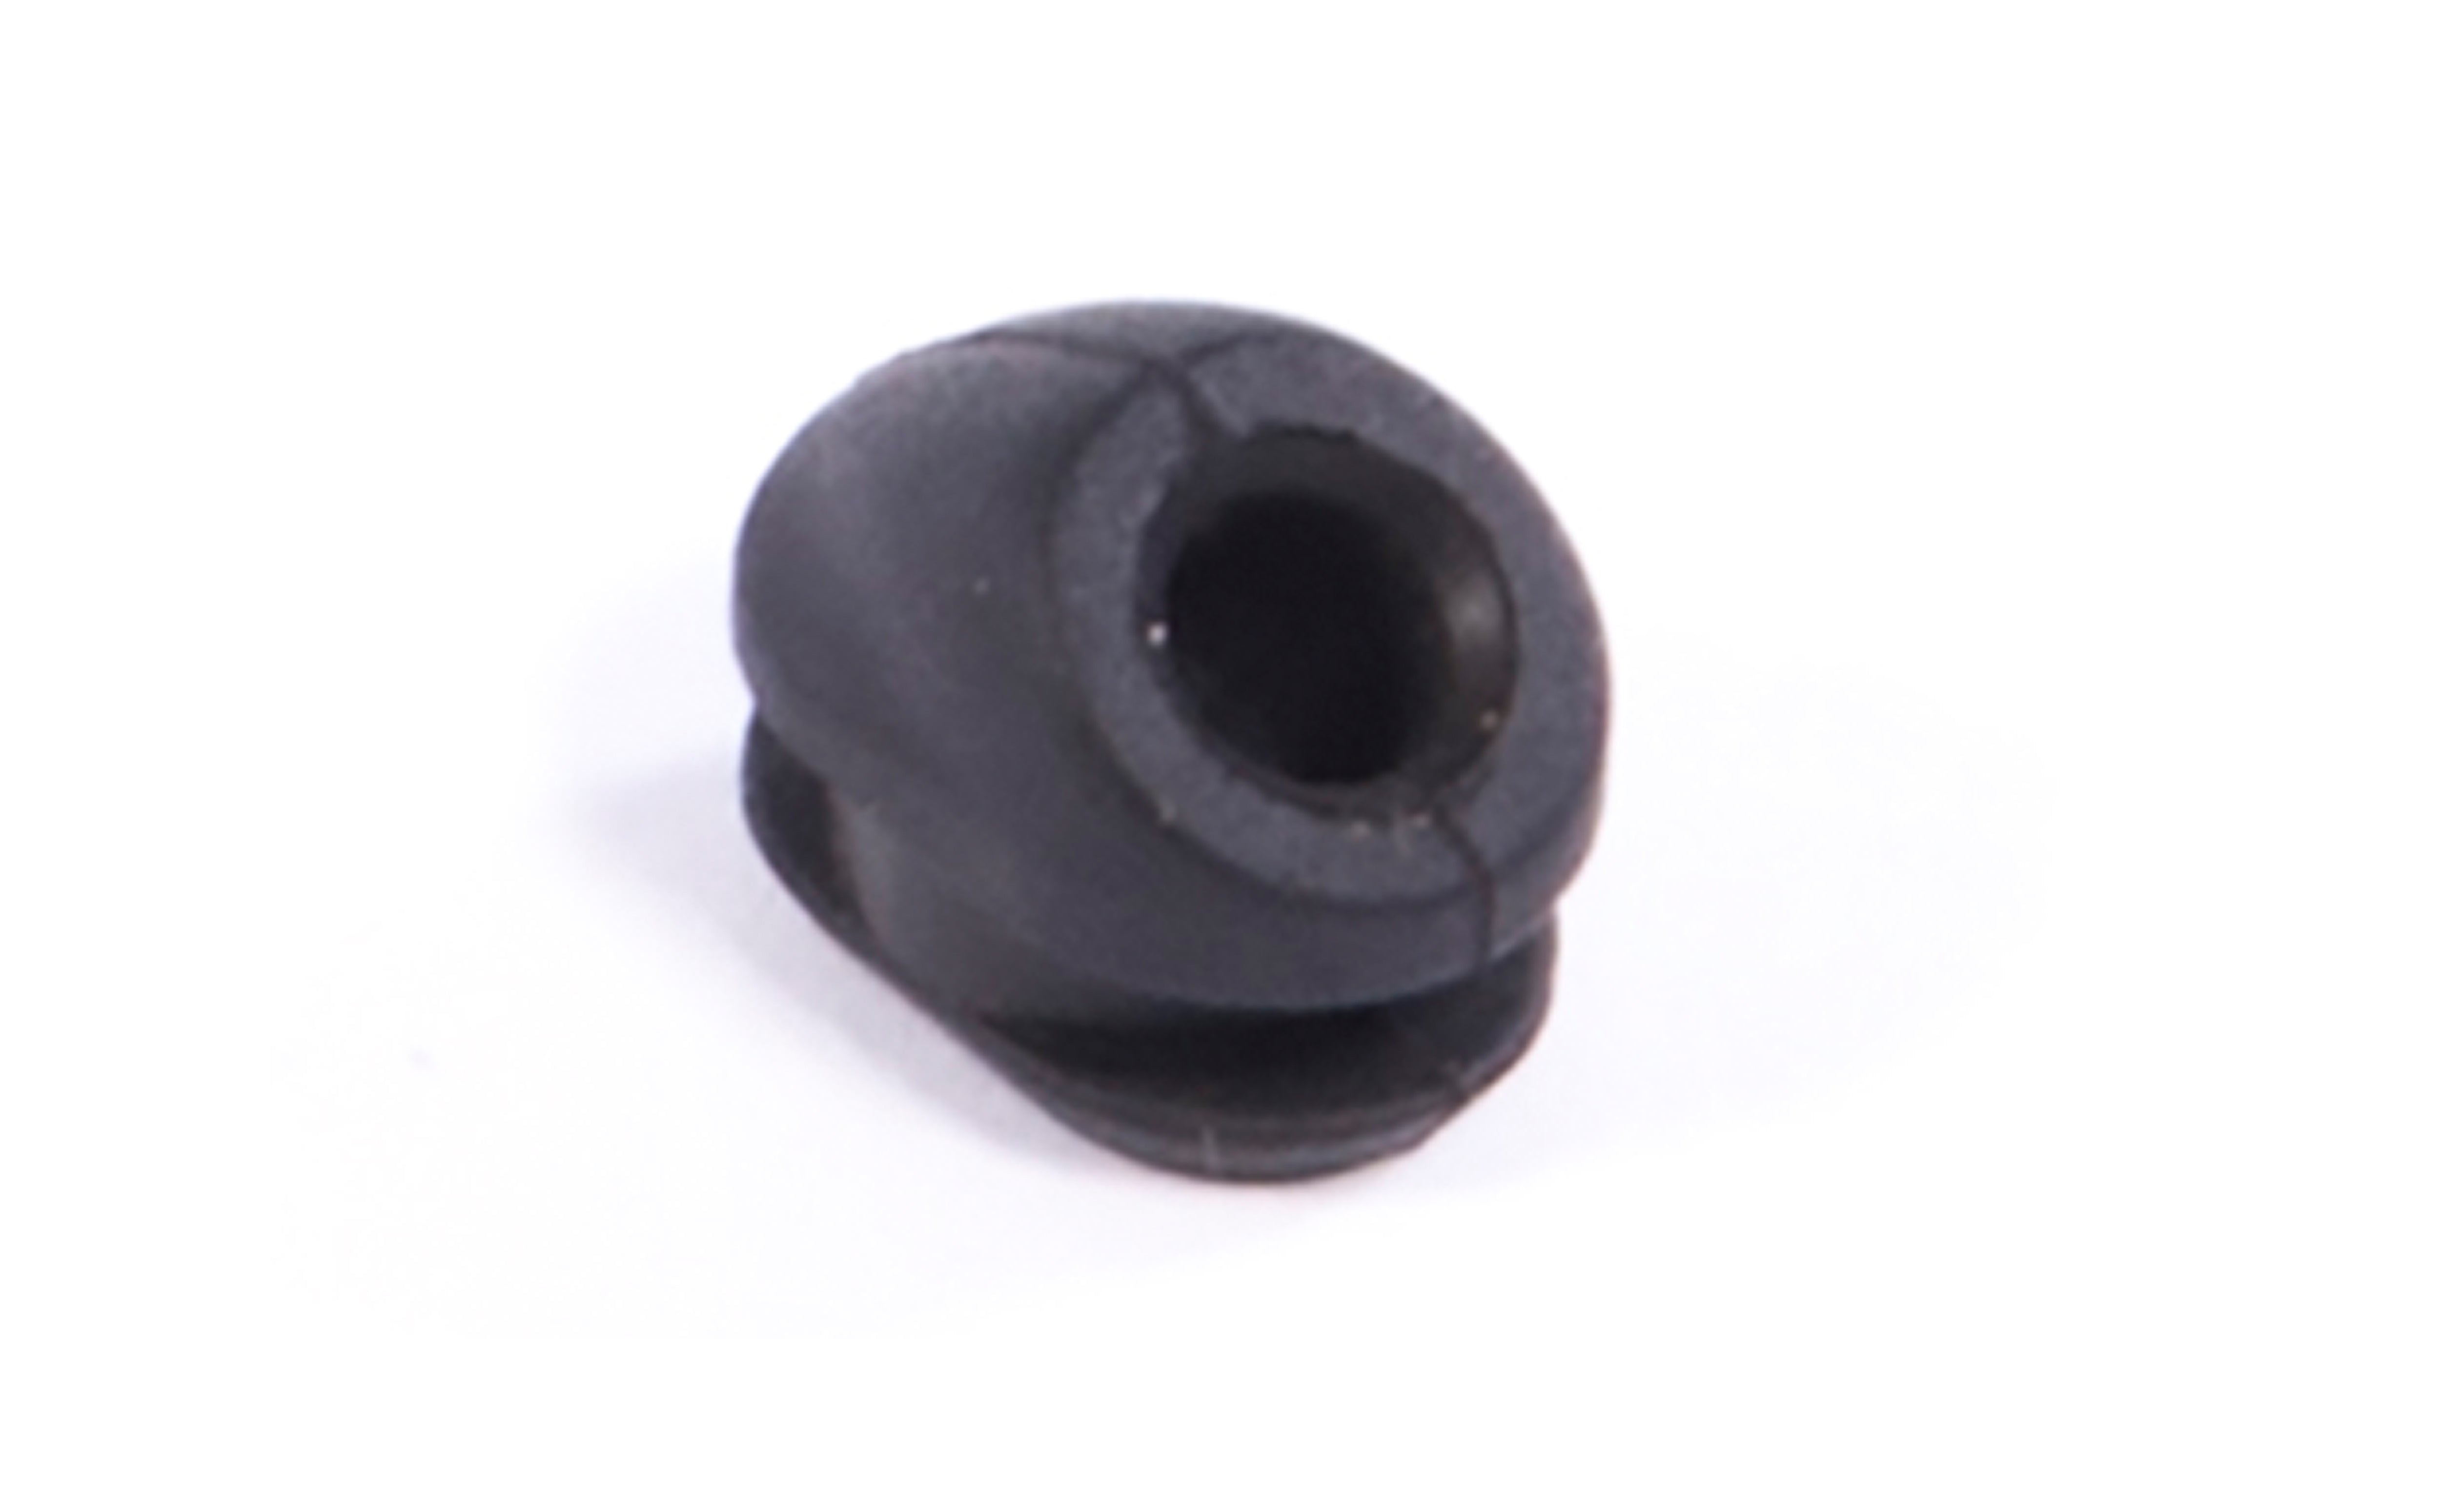
For the Kindernay hydraulic shifter cables outlet grommet I use the Whyte WHYICR07 rubber grommet
 whytebikes.com
They do not ship to the USA so I used the forward2me.com service

Inserted the hydraulic shifter cables into the grommet

Applied mixture of dishwasher solution and water to ease the friction

Installed the grommet

That was quite a struggle to install it but if you wiggle the cable while pushing the grommet down it should fit into the swingarm hole

Checked everything around the grommet perimeter sticking the stuck edges into the hole with a plastic card until it fits

in order to have better access to the hole I detached one pivot point of the swingarm to unfold it

For the Kindernay hydraulic shifter cables outlet grommet I use the Whyte WHYICR07 rubber grommet
Cable routing grommets
USE THIS GUIDE TO FIND THE CORRECT GROMMETS Pre 2016 model year bikes: WHYICR01 ICR Rubber Grommet 5mm, 8mm x 2.5mm Slot Length 25mm with 2.5mm channel: To fit 2016 to current model year alloy bikes (except 2018 600 series, Secta 29" bikes) WHYICR02 ICR Rubber Grommet, 5mm & 4mm holes WHYICR03...
They do not ship to the USA so I used the forward2me.com service
Inserted the hydraulic shifter cables into the grommet
Applied mixture of dishwasher solution and water to ease the friction
Installed the grommet
That was quite a struggle to install it but if you wiggle the cable while pushing the grommet down it should fit into the swingarm hole
Checked everything around the grommet perimeter sticking the stuck edges into the hole with a plastic card until it fits
in order to have better access to the hole I detached one pivot point of the swingarm to unfold it
- Thread starter
- #65
To protect the cables in the steering neck from rubbing and abrasion wear I installed plastic wire looms ( 3/8" Bentley Harris Convoshield Wire Loom )

Cut two pieces. Each is about 290 mm long

Spilt the cables on two branches (wiring harness + rear brake hose and 2 Kindernay shifter hoses + post dropper cable) and attached the looms to them

Moved the looms into the steering neck area

The idea is the steerer tube goes in between the looms

Installed the battery ON/OFF switch button supplied with the frame

The switch has a soft rubber o-ring so you have to push the switch down tightening the switch nut by your fingers from the inside of the frame so when you release the pressure from the switch the o-ring will be under compression and the switch nut will not get loose (you will not be able to use any tool to reach that nut inside the frame because of the hard to reach spot it is located it, only your fingers can get there from the inside of the frame).

Routed the cables and secured them with the brackets and screws supplied with the frame


Cut two pieces. Each is about 290 mm long
Spilt the cables on two branches (wiring harness + rear brake hose and 2 Kindernay shifter hoses + post dropper cable) and attached the looms to them
Moved the looms into the steering neck area
The idea is the steerer tube goes in between the looms
Installed the battery ON/OFF switch button supplied with the frame
The switch has a soft rubber o-ring so you have to push the switch down tightening the switch nut by your fingers from the inside of the frame so when you release the pressure from the switch the o-ring will be under compression and the switch nut will not get loose (you will not be able to use any tool to reach that nut inside the frame because of the hard to reach spot it is located it, only your fingers can get there from the inside of the frame).
Routed the cables and secured them with the brackets and screws supplied with the frame
- Thread starter
- #66
The upper mount of the battery interferes with the cables as is and has a pretty sharp edge can damage the cables, so I sanded a 45 deg chamfer on the top back edge of the upper mount.
Marked the chamfer line


Detached the aluminum frame from the plastic part

Sanded 45 deg chamfer

Removed the burrs with a file


Assembled it

Installed it on the frame

Installed the lower mount of the battery on the frame

Assembled the charging port supplied with the frame

Secured it the plug with two nuts


Attached the charging port to the frame

Marked the chamfer line
Detached the aluminum frame from the plastic part
Sanded 45 deg chamfer
Removed the burrs with a file
Assembled it
Installed it on the frame
Installed the lower mount of the battery on the frame
Assembled the charging port supplied with the frame
Secured it the plug with two nuts
Attached the charging port to the frame
- Thread starter
- #67
Purchased a set of Carbon Fiber Cranks 165 Q:8 Isis Standard (Black) for E-BIKE

 mirandabikestore.com

Purchased a 18-8 Stainless Steel Round Shim, 1.5mm Thick, 22mm ID to offset the left side crank arm (otherwise it interferes with the Bafang m620 motor case)
 www.mcmaster.com

Purchased a set of PNW Components Range Composite Pedals

Purchased a 46T aluminum chainring with integrated guard


Detached the spider from the chainring supplied with the Innotrace X1 motor

Attached the 46T chainring to the spider

Attached the spider with the chainring to the motor with the hardware supplied with the Innotrace X1 motor

Attached the 1.5mm shim to the left crank arm interface on the motor

Lubed the crank arms to motor interfaces with an assembly lube

Attached the crank arms

Attached the washers supplied with the pedals to the padals

Attached the pedals to the crank arms

Connected the battery leads from the battery lower mount, the electrical harness and the speed sensor to the motor

Secured the unused motor connectors wits electrical tape so it has low profile and does nto interfere with another cables and connectors


Attached the motor to the frame making sure the cables are free


Attached the 3 motor fasteners supplied with the Innotrace X1 motor


Attached the motor plastic shroud supplied with the Innotrace X1 motor and the screws supplied with the frame

There were no washers for the screws in the frame kit so I found 3 M3 washed with 7mm outside diameter


Attached the moor shroud to the frame

There is a M3x8mm countersink screw necessary to attach the motor bottom cover to the motor and I did not find such screw in my frame kit so I found one in another place

Attached the motor bottom cover to the frame and to the motor with 2 screws supplied with the frame and one M3x8mm countersink screw I got from different place


Carbon Fiber Cranks 165 Q:8 Isis Standard (Black) for E-BIKE
What's included: Right and left crank arms, installation bolts
Purchased a 18-8 Stainless Steel Round Shim, 1.5mm Thick, 22mm ID to offset the left side crank arm (otherwise it interferes with the Bafang m620 motor case)
McMaster-Carr
McMaster-Carr is the complete source for your plant with over 595,000 products. 98% of products ordered ship from stock and deliver same or next day.
www.mcmaster.com
Purchased a set of PNW Components Range Composite Pedals
Purchased a 46T aluminum chainring with integrated guard
Detached the spider from the chainring supplied with the Innotrace X1 motor
Attached the 46T chainring to the spider
Attached the spider with the chainring to the motor with the hardware supplied with the Innotrace X1 motor
Attached the 1.5mm shim to the left crank arm interface on the motor
Lubed the crank arms to motor interfaces with an assembly lube
Attached the crank arms
Attached the washers supplied with the pedals to the padals
Attached the pedals to the crank arms
Connected the battery leads from the battery lower mount, the electrical harness and the speed sensor to the motor
Secured the unused motor connectors wits electrical tape so it has low profile and does nto interfere with another cables and connectors
Attached the motor to the frame making sure the cables are free
Attached the 3 motor fasteners supplied with the Innotrace X1 motor
Attached the motor plastic shroud supplied with the Innotrace X1 motor and the screws supplied with the frame
There were no washers for the screws in the frame kit so I found 3 M3 washed with 7mm outside diameter
Attached the moor shroud to the frame
There is a M3x8mm countersink screw necessary to attach the motor bottom cover to the motor and I did not find such screw in my frame kit so I found one in another place
Attached the motor bottom cover to the frame and to the motor with 2 screws supplied with the frame and one M3x8mm countersink screw I got from different place
- Thread starter
- #69
Purchased 4 HAYES hydraulic brake inserts on eBay


Purchased some Saipe S-hooks cables clips

Purchased some Jagwire Tube Tops 5G Frame Protectors

Marked and trimmed the hydraulic shifter hoses


Detached the original installed shifter hoses from the Kindernay shifter


Chopped off the original shifter hoses ends and took the jam nuts off

Attached the jam nuts to the new hoses

Attached the new HAYES inserts to the new hoses

Attached the new hoses to the Kindernay shifter

Secured the hoses with a hoses clip

Attached the frame protectors to the hoses where they rub the swingarm

Alligator Hydraulic brake hose Olive/Bushing & Insert HAYES hydraulic brake | eBay
Find many great new & used options and get the best deals for Alligator Hydraulic brake hose Olive/Bushing & Insert HAYES hydraulic brake at the best online prices at eBay! Free shipping for many products!
www.ebay.com
Purchased some Saipe S-hooks cables clips
Purchased some Jagwire Tube Tops 5G Frame Protectors
Marked and trimmed the hydraulic shifter hoses
Detached the original installed shifter hoses from the Kindernay shifter
Chopped off the original shifter hoses ends and took the jam nuts off
Attached the jam nuts to the new hoses
Attached the new HAYES inserts to the new hoses
Attached the new hoses to the Kindernay shifter
Secured the hoses with a hoses clip
Attached the frame protectors to the hoses where they rub the swingarm
- Thread starter
- #70
Sat on the bike and figured out the handlebar position I like. Marked the steerer tube trim line


Trimmed the steerer tube


Designed and laser cut the star nut insertion tool parts


Assembled the insertion tool with the star nut supplied with the fork


Hammered the star nut into the steerer tube


Extracted the star nut insertion tool parts


Attached the trimmed fork with the handlebar to the frame. Tightened the steerer tube bolt

Attached the steerer tube bolt rubber cup supplied with the frame

Tightened the stem screws

Trimmed the steerer tube
Designed and laser cut the star nut insertion tool parts
Assembled the insertion tool with the star nut supplied with the fork
Hammered the star nut into the steerer tube
Extracted the star nut insertion tool parts
Attached the trimmed fork with the handlebar to the frame. Tightened the steerer tube bolt
Attached the steerer tube bolt rubber cup supplied with the frame
Tightened the stem screws
- Thread starter
- #71
Then I attached the hydraulic hoses to the Kindernay HYSEQ Onesie shifter levers housing using same parts and methods like I used here making sure the downshift and upshift hoses are connected to the correct ports

 www.emtbforums.com
Detached the original hoses

Trimmed the new hoses, attached the jam nuts and the HAYES hydraulic brake inserts to the new hoses

Attached the new hoses to the levers housing


Attached the S-clip to the hoses

Filled the Kindernay shifter hydraulic lines with Magura Blood mineral oil


Coveter the shifter nipples with 4mm inside diameter vinyl caps I purchased here


TQFreak's Dengfu E55 Build Thread
Tqfreak, you are crazy! Thanks for excelent photos. Your build must have taken hundreads of hours. Kudos to the stickers. And also to your craftmanship. Anyway have also Inno and also very bad experience. That company is a joke. Motor came also not setup as I ordered, X2 display does not work...
www.emtbforums.com
Detached the original hoses
Trimmed the new hoses, attached the jam nuts and the HAYES hydraulic brake inserts to the new hoses
Attached the new hoses to the levers housing
Attached the S-clip to the hoses
Filled the Kindernay shifter hydraulic lines with Magura Blood mineral oil
Coveter the shifter nipples with 4mm inside diameter vinyl caps I purchased here
- Thread starter
- #73
Then I installed the front brake (same as the rear one)

Attached the caliper to the fork

Routed the hose through the plastic clip on the fork

Attached the lever to the bar

Marked the hose trim line

Turned the brake lever to face the hose up and trimmed the hose close to the brake lever housing

Trimmed the hose along the marking line

Detached the sleeve and attached it to the trimmed hose


Detached the jam nut and attached it to the trimmed hose

Attached the new olive supplied with the brake kit to the trimmed hose

Attached the insert to the trimmed hose

Attached the trimmed hose to the lever housing


Attached the caliper to the fork
Routed the hose through the plastic clip on the fork
Attached the lever to the bar
Marked the hose trim line
Turned the brake lever to face the hose up and trimmed the hose close to the brake lever housing
Trimmed the hose along the marking line
Detached the sleeve and attached it to the trimmed hose
Detached the jam nut and attached it to the trimmed hose
Attached the new olive supplied with the brake kit to the trimmed hose
Attached the insert to the trimmed hose
Attached the trimmed hose to the lever housing
Last edited:
- Thread starter
- #74
Trimmed the rear brake line second time to final length and routed it along the Kindernay shifter hoses with plastic S-clip

Purchased and installed a Bafang right thumb throttle/accelerator for Bafang BBS/ Ultra M620/M400/M500/M600 motors
 www.greenbikekit.com

Attached the Innotrace X2 display to the handlebar


Connected the display, the throttle and the brakes to the harness cable and secured the cables with electrical tape on the left side

Wrapped the cables on the left side with cable spiral wrap and secured the electrical cable from the brake on the right side with s-clips


Purchased and installed a Bafang right thumb throttle/accelerator for Bafang BBS/ Ultra M620/M400/M500/M600 motors
Bafang thumb throttle for BBS/ULTRA M620/G510/m560/M400/M500/M600 motor-Greenbikekit.com BBS, ebike batteries, Bafang M620, Bafang M600, Bafang M500, Bafang M510, KT controller with display-GreenBikeKit.com
Thumb throttle with waterproof connector for bafang BBS, M400, M420, M500, M600, M800, Ultra G510 M620 mid motors.
www.greenbikekit.com
Attached the Innotrace X2 display to the handlebar
Connected the display, the throttle and the brakes to the harness cable and secured the cables with electrical tape on the left side
Wrapped the cables on the left side with cable spiral wrap and secured the electrical cable from the brake on the right side with s-clips
Last edited:
- Thread starter
- #75
Then I charged the battery I purchased with the frame with the charger supplied with the battery. The charger light is red during charging and it turns green when the battery is charged

The battery charge level indicator also shows the charge level during charging process.

The battery charge level indicator also shows the charge level during charging process.
- Thread starter
- #78
The first ride was good. It can go effortlessly on the flat at 25 mph and if I push pedals moderately it can go 28-30 mph on the flat. But over 30 mph it is really hard and I am not sure why. On the light downhill I was really struggle to reach 32-35 mph which surprised me because of on the same section I am able to reach 27-30 mph on derestricted Yamaha PW-X powered bike with the same pedaling effort. And Yamaha PW-X is 250W against at least 1500W in this motor (the battery I used with the Innotrace X1 is 52V 30A).
I also expected if the Innotrace X1 controller is programmed to consume 3000W then it can pull 60A from the battery lowering resistance low enough and causing the battery BMS shutting down the battery or at least blowing the 40A fuse inside the battery. But it never happened for some reason and the battery kept working without issues at any pedal assist level with throttle or with pedaling. The battery connector stayed cool. And now I am not sure if the Innotrace X1 they sent me really programmed to consume 3000W or the BMS inside the battery somehow can sense the load resistance and raise the battery pack resistance to limit the amperage so the Innotrace X1 motor just can not pull more juice from the battery because of the BMS limits it.
I rode about 30 miles making 20-28mph mostly on the flat at different modes and drained the battery from 100% to 30%.
The battery charge level on the Innotrace X2 display is not advanced. It just depends on the voltage and instantly react on it so the charge level can fluctuate within a few precents (slightly drops when the battery is under load and slightly raises when the battery has a rest). There is no smart programming algorithm can calculate and display the battery charge level without fluctuations.
The throttle is extremely sensitive and jerky. The pedal assist is OK, but not quite smooth, instant and controllable as Yamaha PW-X. It has some lags and the minimal crank arms torque threshold for starting the assistance feels slightly higher than on Yamaha PW-X (at lower support level modes), on higher support level modes the controller just senses pedal cadence and pushes the motor almost without pressure on the pedals (works just like throttle).
It also does not provide pedal assist without sensing speed, so you have to start moving the bike with pedals with your legs only first for some distance before it starts sensing the speed and it is quite hard, especially uphill and quite annoying after experience with Yamaha PW-X which gives support without sensing the speed from standing steel once it feel the pressure on the crank arms. I heard it can be programmed with Innotrace X1 tool and the Innotrace programming cable to make it instant crank arms torque baset support without sensing speed, but unfortunately Innotrace does not have the programming cable in stock and does not respond. I heard also even the people with the innotrace programming cable can not program their Innotrace X1 because of it requires online access to the Innotrace server or something and the server does not work anymore.
Other than these quirks it works fine, it feels about 2 times more powerful than Yamaha PW-X between 0-25mph, maybe 1.5 time more powerful than Yamaha PW-X between 25-30 mph and almost the same as Yamaha PW-X at speed over 30 mph (you have to push really hard to go over 30 mph).
The Kindernay VII internal gear hub shifts and works flawlessly. I do not use maybe two highest gears though because of the motor struggles to go over 30 mph making the highest gears useless.
Maybe I will build 52V 60A battery and modify the wiring and the connector for such amperage to open the 3000W power but at this point I'm not sure if the motor Innotrace sent me is really programmed for 3000W and if it is not then I will waste my time building the new battery while the Innotrace support does not work and I will not be able to program the controller for 3000W.
I also will probably change a few things in the future. I am planning to install 29" x 2.8" tires instead of the 29" x 3.0" because of the 29" x 3.0" tire profile is too tall and it is too close to the swingarm pivot point face and rubs the rubber cover I attached there. I also can not install front wheel Mudhugger mudguard I want to install because of it interferes with the 29" x 3.0" tire (so I installed the RockShocks front wheel mudguard for now). I will install Mudhugger mudguard on the rear wheel too. The PNW dropper lever X2 I use is not very good, the cable slides off the ramp (the ramp does not have groove for cable) jamming the cable and wearing it off so I am planning to install Funn UpDown 4 ways dropper lever instead of the PNW X2. The dropper lever requires quite high pressure to be actuated, I am not sure if it is because of the lever or because of the dropper, or because of the the cable routing, or combination of everything. By the way the PNW loam dropper post for some reason does not drop if you seat on it and press the lever - you need to release pressure on the dropper, press the lever and then press the dropper down and I am not sure if it is a bug or a feature or the nature of this mechanism, but my XLC dropper on an another bike I have drops down when you seat on it without releasing the sitting pressure on the dropper.
Last edited:
Dado
E*POWAH Master
- Jun 28, 2022
- 1,054
- 669
You are crazy mate. ") To manufacture star nut insertion tool... But I like your feeling for details.
To manufacture star nut insertion tool... But I like your feeling for details.
Few notes:
BMS Switch to tighten by screwdriver and hammer. And better is not to cable it to battery - making issues then after some time. I am using this switch for strong front light.
Have better charging connector. The one dengfu is providing is the cheapest one and also not sure if designed for 5Amps. This connector will cause you problems after year or two - many times happend to me it is loosing contact.
Heres an update. You would draw it easily and 3D print. Connector is CNlinko.

To manufacture star nut insertion tool... But I like your feeling for details.Few notes:
BMS Switch to tighten by screwdriver and hammer. And better is not to cable it to battery - making issues then after some time. I am using this switch for strong front light.
Have better charging connector. The one dengfu is providing is the cheapest one and also not sure if designed for 5Amps. This connector will cause you problems after year or two - many times happend to me it is loosing contact.
Heres an update. You would draw it easily and 3D print. Connector is CNlinko.
rezystor1990
Member
It's very strange on the original controller I reach a speed of 58-60 km/h (37.5 mph)But over 30 mph it is really hard and I am not sure why.
See what speeds the guy from YT reaches with the innotrace 2.5kW (80km/h-50mph)
I also expected if the Innotrace X1 controller is programmed to consume 3000W then it can pull 60A from the battery lowering resistance low enough and causing the battery BMS shutting down the battery or at least blowing the 40A fuse inside the battery.
I see a few possible problems here:
- BMS can't give more than 30A
- poor quality cells cannot give high power
- connection to only one pin from the battery is not able to send more current
- the innotrace controller overheats and limits the maximum current
- the controller is programmed in such a way that you do not reach full power when pedaling or pressing the throttle. Does the display not show the delivered power? What does the maximum given power indicate?
I don't trust the Chinese or the Chinese battery, that's why I build the battery itself. I am building a 14s4p battery on LG M50LT cells. I assume smartBMS 80A. Through the application on the phone, I will be able to check many parameters of the battery. I use 3 pins for the plus and three pins for the minus of the battery to keep the current at the connector as low as possible.

The first ride was good. It can go effortlessly on the flat at 25 mph and if I push pedals moderately it can go 28-30 mph on the flat. But over 30 mph it is really hard and I am not sure why. On the light downhill I was really struggle to reach 32-35 mph which surprised me because of on the same section I am able to reach 27-30 mph on derestricted Yamaha PW-X powered bike with the same pedaling effort. And Yamaha PW-X is 250W against at least 1500W in this motor (the battery I used with the Innotrace X1 is 52V 30A).
I saw on the other forum that you had doubts all together wether the controller was changed at all but didn't want to tear the warranty stickers.
One of the ways you can check that is by getting a Bafang UART programming cable and the Bafang software. If the software is able to read your controller this means it's still the original Bafang...
As for myself, I have decided not to go Innotrace after reading how bad their customer service is. If you're paying premium for getting a premium controller, you should be able to fine tune it to your needs. But with Innotrace it seems this possibility depends on their server that doesn't work due to overall lack of care and responsibility from Innotrace.
So I will stick with Bafang original controller which is not ideal, but fairly tunable and might eventually do a shunt mod.
rezystor1990
Member
If you have the original dpc18 display, connect it and you will see how much power the motor generates.The Innotrace X2 display I have does not indicate the delivered power.
- Thread starter
- #85
I do not have dpc18 display. I purchased the motor with controller from Innotrace as whole assembly and I purchased the Innotrace X2 display from them too. I did not have any Bafang components prior it. Maybe I will get a dpc18 display to check the power.
kiwitourer
Member
Congratulations on an amazing build and all your efforts to document each step and all the customisations you have made. Your skills are an inspiration. I have been following the Innotrace Controller for a year seeking control over power delivery and range but your experience has convinced me to avoid going down this path.
If you had a 3000w peak motor working as specified you should have no problem going 30 mph+ with the gearing you have installed. It is so sad that Innotrace has let you down so badly. I have 2 E55 builds on order and I will stick with the stock M620 (Canbus sadly) as I think 1000-1500w peak should be more than enough for extended climbs on my bike packing adventures here in New Zealand.
I have built 6 E10's with the M600 and have found what a difference firmware versions make to rideability and power & range. Hopefully I can find a sweet spot with the M620 firmware available.
Hope you get your "black beauty" performing in a way you deserve.
This is a really good write up that had the exact same thoughts I did. Stock that motor should be good for low to mid 30's throttle only, With 3500w's you should easily be looking at mid-40's. While it's a different motor, I can do high 40's on my bbshd with a 52v 65a controller. Barely hitting 30mph is stupid low and not right at all, I'm going to have to agree it doesn't sound like you actually got the 60a controller from them. I know you previously had issues so this sounds somewhat likely. Even with battery or wiring issues or controller / motor overheating you should see speeds over 40 for at least the start of a ride. I'm surprised to hear it doesn't have a wattage or amps readout, I was going to say that would be a great way of checking. What about voltage?It's very strange on the original controller I reach a speed of 58-60 km/h (37.5 mph)
See what speeds the guy from YT reaches with the innotrace 2.5kW (80km/h-50mph)
I see a few possible problems here:
- BMS can't give more than 30A
- poor quality cells cannot give high power
- connection to only one pin from the battery is not able to send more current
- the innotrace controller overheats and limits the maximum current
- the controller is programmed in such a way that you do not reach full power when pedaling or pressing the throttle. Does the display not show the delivered power? What does the maximum given power indicate?
I don't trust the Chinese or the Chinese battery, that's why I build the battery itself. I am building a 14s4p battery on LG M50LT cells. I assume smartBMS 80A. Through the application on the phone, I will be able to check many parameters of the battery. I use 3 pins for the plus and three pins for the minus of the battery to keep the current at the connector as low as possible.
View attachment 109140
And side note, rezystor1990 I hope you are not planning to push those cells to 80a. I recently learned that over 25c (which for me most of the time is ambient or higher temps) those cells are only rated at 7.2a each or 28.8a total for a 4p battery
I know high voltage has been working hard on their upgrade kit with the bac 855, last I heard they were still working on the app but otherwise had the kit sorted out so hopefully they will release it soon. I've talked with them in their discord and I can tell you it their customer service will leave you wanting every company you deal with to be like them. Of course it's an external controller but that comes with the benefit of not heating up the motor. As someone who's shunt modded a bbshd before, its a great way to cheaply get more power, but man does the more power and just better tuning of a aftermarket controller really wake up these bafang motors. Something to think aboutI saw on the other forum that you had doubts all together wether the controller was changed at all but didn't want to tear the warranty stickers.
One of the ways you can check that is by getting a Bafang UART programming cable and the Bafang software. If the software is able to read your controller this means it's still the original Bafang...
As for myself, I have decided not to go Innotrace after reading how bad their customer service is. If you're paying premium for getting a premium controller, you should be able to fine tune it to your needs. But with Innotrace it seems this possibility depends on their server that doesn't work due to overall lack of care and responsibility from Innotrace.
So I will stick with Bafang original controller which is not ideal, but fairly tunable and might eventually do a shunt mod.
I follow High Voltage closely and I really like them, but not using the discord though. On their website there was no update for a while, but I will be happy if they will release the bac855 kit.I know high voltage has been working hard on their upgrade kit with the bac 855, last I heard they were still working on the app but otherwise had the kit sorted out so hopefully they will release it soon. I've talked with them in their discord and I can tell you it their customer service will leave you wanting every company you deal with to be like them. Of course it's an external controller but that comes with the benefit of not heating up the motor. As someone who's shunt modded a bbshd before, its a great way to cheaply get more power, but man does the more power and just better tuning of a aftermarket controller really wake up these bafang motors. Something to think about
Although I kinda hope that UART controller is not that bad provided it's tuned properly. Do you have the experience?
Similar Threads
-
The Golden Goose. 72v Dengfu E55 CYC X1 Pro.
- Started by bram.biesiekierski
- Replies: 118
-
-
 Crestline RS 181.2 thread – builds, reviews, technical info
- Started by BikeBert
- Replies: 1K
-
 Dengfu E10 + E23 Carbon Fullsuspension E-Fatbike on Bafang M510
- Started by ncs
- Replies: 19
-
 DIY Bike Build: A Step-by-Step Guide to Assembling a Dengfu E55
- Started by Ksem07
- Replies: 8
Free account
Join 42,625
eMTB riders
eMTB riders
One tap. No forms. Fewer ads.
or sign up with email
Already a member? Log in