TQFreak's Dengfu E55 Build Thread

TQFreak

Active member
Dec 2, 2022
169
210
USA
A separate thread for the build of this bike from the main E55/56 thread :


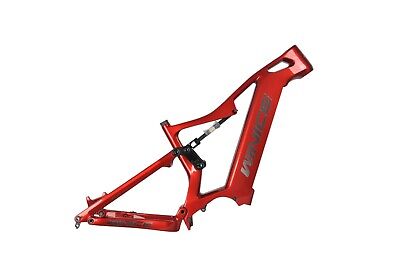
My 17" Dengfu E55 frame is arrived and it looks amazing!

The box with the frame

IMG-20230113-110058.jpg


Everything is packed very well

IMG-20230113-110143.jpg


IMG-20230113-110245.jpg


And here is the beauty! The finish is mazing. I ordered the frame with the battery, the headset and the rear axle option. When you order it with battery it comes with the battery attaching hardware. Please note the motor bottom cover is attached too (it is carbon fiber part too).

IMG-20230113-122422.jpg


Here are some picture if the details

IMG-20230113-113653.jpg


IMG-20230113-122508.jpg


IMG-20230113-122500.jpg


IMG-20230113-122450.jpg


IMG-20230113-122532.jpg


IMG-20230113-122547.jpg


IMG-20230113-122539.jpg


IMG-20230113-122521.jpg


The headset goes with a cable routing slot

IMG-20230113-122515.jpg


I'm still waiting the battery. The battery was sent separately.

I purchased this frame on eBay (the seller is carbon-cycle carbon-cycle | eBay Stores)


Please note the description is vague and not completely correct. It is not a fat bike frame, it is regular size MTB wheels frame (148x12 mm thru axle, I clarified it with the seller prior ordering the frame).
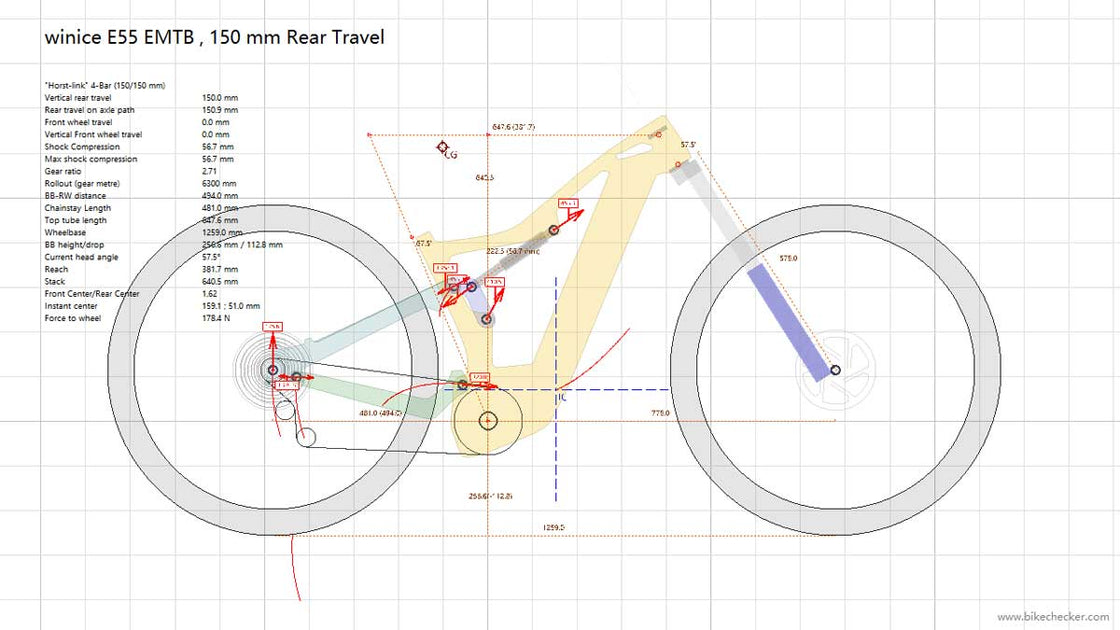
 
Last edited by a moderator:

TQFreak

Active member
Dec 2, 2022
169
210
USA
Installed the headset cups supplied with the frame gradually snugging the headset pressing tool and lightly tapping with a soft plastic hammer around the cups. The parts fit good.

The headset cups top and bottom are the same. Mounting diameter is 56 mm, mounting depth is 7.8 mm.

1673742285755.jpeg


1673742309405.jpeg


1673742330547.jpeg


1673742469039.jpeg


1673742515822.jpeg


1673742543546.jpeg


1673742571767.jpeg


1673742615388.jpeg


1673742643237.jpeg


1673742668541.jpeg


I also checked the fitment of the battery lock to the frame. The battery lock cylinder to the hole in the frame fitment was too snug, but I was able to lap the lock to the hole rocking and wiggling the lock and now it sits properly

1673742871230.jpeg


1673742913496.png
 
Last edited:

TQFreak

Active member
Dec 2, 2022
169
210
USA
I have assembled the frame. I have not found any information about the assembly process and where the parts go so here are the parts and locations. I used Loctite 243 for all the fasteners. The fasteners have applied blue threat locker, but it looks like it does not work well (the fasteners feel loose even with this blue threat locker) so I used Loctite 243 in addition. Pay attention to the spacers orientation (the spacers have steps and should be oriented the way they do not drag on the outer races of the bearings and touch only the inner race of the bearings). Use rags to protect the frame from cosmetic damage during assembly before you installed the rear shock absorber.

1673944316703.png


1673944365282.png


1673944415997.png


1673944951325.png


1673944461275.png


1673944487015.png


1673944509632.png


1673944530478.png


1673944560552.png


1673944581076.png


1673944610007.png


1673944749106.png


1673944764509.png


1673944812366.png


1673944839805.png


1673944869871.png


1673944903652.png


1673944993517.png


1673945035086.png


1673945063958.png


1673945156346.png


1673945196545.png


1673945440696.png


1673945462116.png


1673945480164.png


1673945809945.png


1673945496963.png


1673945557878.png
 
Last edited:

TQFreak

Active member
Dec 2, 2022
169
210
USA
The headset supplied with the frame did not have o-ring in the top race. So I measured the o-ring slot in the race and purchased the o-rings on McMaster.

O-ring material: Buna-N
Durometer: Durometer 70A (Medium)
Sizes: Width 2 mm, Inside Diameter 28.5 mm, Outside Diameter 32.5 mm.


1674186331433.png


1674186383494.png


1674186450628.png


Now the headset top race fits nice and snig on the steerer tube without any freeplay

1674186537772.png


1674186569081.png


For this build I decided to use RockShox Domain RC Suspension Fork (for 29" wheel, 160 mm travel, 15 x 110 hub, 44 mm hub offset, 1.5" Tapered Steerer, 38mm stanchions, manufacturer part number 00.4020.707.006)

1674186879515.png


1674186934872.png


The headset supplied with the frame has split crown race. Make sure you put the crown race with split oriented back so the water will have the channel to escape

1674187065418.png


The fork fits the frame

1674187160027.png


I decided to use different seat clamp (Hope Bolt On Seat post Clamp 34.5mm diameter)instead of the seat clamp supplied with the frame.

1674187259499.png


The main reason I replaced the seat clamp is the Dengfu seat clamp has sharp corners you can hurt yourself of. The Hope seat clamp does not have sharp corners and also looks better. The inside diameter of the Dengfu clamp is 35.0mm, the inside diameter of the Hope clamp is 34.9. I Hope 0.1mm difference will not cause any issues. The engaging height of the clamps is about the same (about 15mm).


1674187326595.png


1674187981942.png


1674188023699.png
 

TQFreak

Active member
Dec 2, 2022
169
210
USA
The rear shock is installed

1674952653168.png


That was quite a journey.

This frame accepts 230mm x 60mm rear shock (maximum stroke is 60mm provides 142 mm rear wheel travel). I found a new Rock Shox Deluxe RT3 Re:Aktiv 230mm x 57.5mm rear shock on eBay for cheap so I decided to sacrifice 2.5mm of the rear shock stroke (minus 6 mm of travel, or 136mm of travel with 230mm x 57.5mm rear shock).

1674953485018.png


1674952750643.png


1674953534716.png


It looks like this shock was detached from a Track bicycle and had the original hardware, so I had to remove the hardware first

1674953614889.png


Did the tool for removing the original bushing

1674953659281.png


1674953678389.png


1674953702819.png


The eyelet on the shock stanchion already had the insert installed. But the eyelet on the shock housing had nothing after extracting the original bushing. So I purchased POLYMER EYELET BUSHINGS 1/2 INCH 12.7MM DU BUSHING for the housing eyelet on eBay


1674954477690.png


1674954546225.png


Pressed the insert in the eyelet

1674954633750.png


1674954675159.png


1674954712689.png


Measured the width of the shock attaching points on the frame and on the aluminum rocker. To mount the shock you need 32.3 mm wide, 8 mm inside diameter bushing for the shock to frame interface and 16.8 mm wide, 8 mm inside diameter bushing for the shock to aluminum rocker interface.

1674953932524.png


1674954228156.png


I did not find shock bushings with the exact width. So for the shock to frame mount I purchased oversized 32.4mm wide Rock Shox mounting hardware on Amazon (3-Piece, 1/2", 8 x 32.4 RockShox Rear Shock Mounting Hardware)


1674955492283.png


For the shock to aluminum rocker mount I purchased undersized 16.4 mm wide Fox mounting hardware on eBay (FOX 2-Piece Aluminum Mounting Hardware Kit for DU Bushing Shocks 8mm x0.648" / 16.5mm)


1674955567419.png


1674955579647.png


1674955603003.png


As expected 32.4 mm hardware did not fit the 32.3 mm space in the frame and the 16.5 mm hardware was too lose in the 16.8 mm space in the aluminum rocker.

So here is what I did. I machined the 3-Piece, 1/2", 8 x 32.4 RockShox Rear Shock Mounting Hardware to 32.3 mm width.

Machined the aluminum bushing.

1674955687617.png


1674955738763.png


1674955814992.png


1674955802039.png


Then machined both plastic spacers

1674955850348.png


1674955868330.png


1674955891555.png


Pressed the hardware inside the shock

1674956988330.png


1674957020743.png


1674957050317.png


1674955917626.png


For the Fox bushings I ordered stainless steel 0.01" (0.25mm) Thick, 5/16" Inside Diameter, 1/2" Outside diameter shims


1674956002028.png


And just used one shim in between the bushings to make the stack width

1674956343391.png


1674956481925.png


The shim outside diameter is 12.7mm, but it is too large to fit the shock eyelet insert. So i grinded it down to 12.6mm to fit the hole

1674956575876.png


1674956594799.png


1674956606506.png


Lubed the hole and pressed partially one bushing on one side

1674956662647.png


1674956681552.png


Dropped the shim in

1674956698944.png


Pressed the second bushing in and pressed all together completely

1674956766288.png


1674956797176.png


Adjusted the bushings position with the press to make the stanchion centered in between the bushings

1674956881546.png


1674956893222.png


Then I figured out the original Dengfu shock to frame mounting fasteners do not fit well to the frame. The hollow bolt barely engages with the hole on the opposite side (it goes to the hole on just 1 mm) and it can cause excessive pressure on small area of the frame under the shock load or strong bottoming of the shock and can cause the carbon fiber frame crack. If it would be a few millimeters longer that would probably be OK, but it just barely engages with the hole and can cause catastrophic failure.

The hollow bolt engages with M6 bolt and that M6 bolt will be under significant stress too with such configuration.
1674957584928.png
1674954020593.png 1674955713113.png 1674955933439.png 1674956360203.png 1674957561133.png
 
Last edited:

TQFreak

Active member
Dec 2, 2022
169
210
USA
So I decided to fabricate my own mounting hardware for the shock to frame interface

I purchased stainless steel 90 Degree Countersink, M6 x 1.00mm Thread, 20mm Long screws


A stainless steel 8 mm outside diameter, 5 mm inside diameter tube


And 3/4" diameter 6061 aluminum rod


And machined this thing of of this

1674958737233.png


Machined 14.7 mm outside diameter of the aluminum bushings

1674958603886.png


Drilled pilot hole in the bushings

1674958803563.png


Drilled 8 mm hole in the bushings

1674958842519.png


Chamfered 90 deg the hole of the bushing for 90 deg flat head M6 screw

1674958904989.png


1674958920718.png


Cut off the bushing from the stock aluminum bar with 45 deg cut

1674958981463.png


1674959016061.png


Repeated it twice

1674959067367.png


1674959184321.png


Then lithely sanded with fine 2000 sandpaper the 8mm OD, 5mm ID stainless steel tube to make it smooth.

1674959243487.png


Trimmed it to necessary length

1674959327489.png


Chamfered both ends of the tube with 90 deg countersink

1674959374329.png


Tapped both ends of the tube with M6x1 tap

1674959409723.png


1674959431393.png


1674959449469.png


And here we have it

1674959538543.png


1674959569070.png


1674959594018.png


1674959689761.png


1674959654175.png


1674959754079.png


Applied Loctite 242 to the screws and attached the shock to the frame

1674959808963.png


1674959833372.png


1674959855809.png


1674959870646.png


1674959900498.png


1674959928098.png


1674958536313.png
 

TQFreak

Active member
Dec 2, 2022
169
210
USA
Alright, today I put protection on the rear triangle

1675652097982.jpeg


I wrapped the the chain side of the rear triangle with inner tube rubber for protection from chain. I also wrapped the left top arm of the rear triangle with inner tube rubber because of I am planning to attach Mudhugger (Mudhugger will be attached to the top tubes of the rear triangle with zip ties. I also covered the lower pivot point gap of the rear triangle with inner tube rubber to protect if from mud (there ta openings for cables in the frame and in the rear triangle) and rocks which can crack the carbon frame in case a rock got jammed in that gap.

To complete this work I used an inner tube SUNLITE 700 x 18-23c


1675652828557.png


an inner tube Schwalbe 700 x 38C, 38B


1675652858032.png


A roll of 3M 444 Double-Sided Film Tape , 3/4" wide


1675652942110.png


Some blue masking tape, some electric tape and a few zip ties.

Clean the frame

1675653105036.png


Cut off the valve from the SUNLITE 700 x 18-23c tire and cut it along one line

1675653147101.png


Clean the tube from the talc powder

1675653190821.png


Wrap the chain stay from front to back stretching the tube

1675653246331.png


1675653266837.png


1675653286550.png


1675653311060.png


Stop the wrap in front of the cable opening and trim the tube

1675653346587.png


1675653362018.png


1675653395481.png


Secure the end of the wrap with the electric tape

1675653444269.jpeg


Make sure the cable grommet does not interfere with the wrap

1675653495321.png


Secure the end of the wrap with a zip tie

1675653529110.png


1675653554830.png


1675653569779.png


Take the Schwalbe 700 x 38C, 38B tube and cut off the valve and cut a piece about 200 mm long. Split this piece along one line, clean it from talc powder and keep it for the rear triangle pivot point gap cover

1675653602827.png


Split the rest of the Schwalbe 700 x 38C, 38B on two halves along two lines, clen them from talc powder and use those two pieces to wrap left and right top tubes of the rear triangle. Wrap those from back to front (it is necessary for water flow so the water and dirt will not be trapped on the wrap

1675653868525.png


1675653888126.png


1675653917266.png


1675653945744.png


1675653962804.png


1675653984378.png


Use masking tape to make a template for the pivot point cover

1675654027203.png


1675654045793.png


The Dengfu 55 rear triangle in not completely symmetrical in that area but you can use fold and trim trick to make some symmetrical lines on the template

1675654063651.png


Check the fitment and trim or add tape if necessary until you are happy with the result

1675654194017.png


Round the corners

1675654215023.png


1675654234310.png


Put the template on the piece of tube you prepared before and cut the rubber piece


1675654274482.png


1675654298032.png


1675654337229.png


Mark the border lines where the adhesive tape will be placed


1675654354875.png


Degrease the rubber and the frame spot where it will be attached with alcohol

1675654416014.png


Put the 3M double coated tape on the rubber

1675654469521.png


Trim the tape

1675654487845.png


Peel the protective cover from the tape

1675654514422.png


Stick the rubber cover in to the place

1675654561591.png


1675654600337.png


1675654626424.png


And there you have it, chain protection, pivot point gap cover and Mudhugger mount place

1675654652499.png
 
Last edited:

TQFreak

Active member
Dec 2, 2022
169
210
USA
For this build I decided to use Magure MT5e brakes (MT5 with lever blade with integrated electrical switch) for front and rear


1675697212944.png


1675697234646.png


The 17" Dengfu E55 frame requires 180mm rear brake disk without adapters

1675696369024.jpeg


Here is the frame with Kindernay VII brake-torque arm adapter, it lifts the brake caliber by 10mm and now I need 200 mm rear brake disk.

1675696492770.jpeg


I am planning to use Magura brake with Kindernay VII gear hub and 220 mm brake disk for the rear so I also need 200-220mm brake caliper adapter (North Shore Billet *20MM (200MM+ MOUNT » 220MM+ ROTOR) ) and then I need to measure the necessary lengths of the screws for the brake caliper because of in this case the screws will through two adapters before they engage with the frame posts. Then I have to find and purchase those screws.

Here is the 200-220mm adapter I am going to use (*20MM (200MM+ MOUNT » 220MM+ ROTOR) )


I need the same adapter for the front brake because of the RockShox Domain RC fork requires 200 mm brake disk without adapters and I will use 220mm brake disk for the front brake.
 
Last edited:

TQFreak

Active member
Dec 2, 2022
169
210
USA
For steering bar I use Tag Metals T1 Carbon Handlebar 40mm Rise, 35mm Clamp Diameter


1676754145115.png


Steering bar hardware:

- Funn Equalizer Bike Stem with 10mm Drop or Rise, 35mm Bar Clamp


- Zipp Headset Carbon Spacer Set


- PNW Components Loam Grip


- 1-1/8 Stem Top Cap with Bolt FIFTY-FIFTY


1676754233168.png


Trimmed the handlebar to 770 mm

1676754453503.png


1676754470064.png


1676754520772.png


Chamfered the edges

1676754539817.png


1676754550987.png


Attached the grips

1676754580730.png


Attached the stem

1676754601303.png


Installed the headset bearings supplied with the frame

1676754631326.png


1676754643422.png


Installed the fork

1676754673795.png


1676754693598.png


1676754704956.png


1676754719000.png


Attached the handlebar

1676754742468.png


1676754766479.png


Attached the seat post so now I can put the frame vertically and work on it

1676754836725.png


1676754853095.png
 
Last edited:

TQFreak

Active member
Dec 2, 2022
169
210
USA
For drivetrain I am going to use 148mm Kindernay VII with Onesie shifter, 32H SWAP shell and 14t COG


1676755601304.png


1676755641948.png


1676755676826.png


1676755704152.png


1676755719598.png


The cog I am going to use with Kindernay VII is SHIMANO CS-MX66 DXR 14t


1676755804191.png


1676756763159.png


For some reason the chain tensioner the Kindernay retailer sold me did not have the washer on the sleeve and had freeplay due to it (I know it supposed to have a plastic washer there because of I have another same tensioner and it has a washer there)

1676755996203.png


So I purchased Nylon Plastic Washer for 7/16" Screw Size, 0.5" ID, 0.688" OD from McMaster and attached it to the chain tensioner so it wont wobble


1676756058387.png


1676756238102.png


1676756273098.png


1676756316633.png


I also grinded off the edges on the outside face of the stainless steel torque arm of the Kindernay VII and polished it (because of it had sharp unfinished edges can scratch the frame)

1676756589991.png


1676756610782.png


1676756630581.png


1676756815941.png
 

TQFreak

Active member
Dec 2, 2022
169
210
USA
The next thing I decided to do is to protect the frame with helicopter tape.

I found not very expensive 4 in. x 12 ft helicopter tape 0.01" thick on Amazon


1676763853176.png


Than I made templates using 2" wide masking tape to make sure each template will fit 4" wide helicopter tape

1676757075180.png


1676757348290.png


1676757364879.png


1676757377612.png


1676757390589.png


1676757409181.png


1676757429874.png


Then I detached the templated and sticked them on copier paper and scanned them with a paper scanner

1676757493626.png


1676757525639.png


Then I created accurate cutting lines in CAD program using those scans

1676757596069.png


Then I cut the helicopter tape patches on a laser cutter

1676757647567.png


1676757675852.png


Then I cleaned the frame with rubbing alcohol and attached the protective tape on the frame sparing mixture of water and dish washer detergent and removing air bubbles with squeegee.

1676757901555.png


1676757944797.png


1676758237976.png


1676758125374.png


1676758282714.png
 
Last edited:

TQFreak

Active member
Dec 2, 2022
169
210
USA
So if you want to replicate what I did here is the PDF file for cutting the protective tape pieces for 17" Dengfu E55 frame you can use


Here is the roll of 4 in. x 12 ft helicopter tape 0.01" thick (one roll is enough)


Here is the protective tape pieces map and recommended application order

1676761105720.jpeg


1676761114743.jpeg


1676761125649.jpeg


1676761138502.jpeg


1676761145649.jpeg


1676761153766.jpeg


1676761161223.jpeg


1676761167193.jpeg


1676761173886.jpeg
 
Last edited:

TQFreak

Active member
Dec 2, 2022
169
210
USA
For saddle I found a new old stock display unit full carbon fiber MTB saddle past gen Selle Repente with Comptus 4.0 pad on eBay for cheap.


1676764424713.png


1676764440370.png


1676764464172.png


Pumped the dropper post with air and installed the saddle

1676764526098.png


1676764804247.png


1676764837831.png


For brakes I decided to use 220mm diameter brake rotors front and rear. So I purchased a couple of SRAM Center Line Disc Brake Rotors 220mm, 6-Bolts.


1676764165488.png


The fork I use (RockShox Domain) has brake caliper mount for 200mm brake rotor. The Dengfu E55 rear triangle has brake caliper mount for 180mm brake rotor plus 20 mm from Kindernay VII brake torque arm adapter (which makes it suitable for 200mm brake rotor).

So I purchased a couple of 200-220 mm (*20MM (200MM+ MOUNT » 220MM+ ROTOR)) brake caliper adapters from North Shore Billet


1676765281074.png


1676765306564.png


The adapters go without screws. To mount the adapters you need 2x M6x20mm screws (fork), 1x M6x30mm screws and 1x M6x25mm screw (rear triangle stacked with Kindernay adapter). I found some low profile socket head M6x30mm screws and trimmed them to necessary length (It looks like regular profile socket screws should work too for these particular adapters with Magura M5 double pistons calipers).


1676765519505.png


One adapter goes to the fork.

1676765361085.png


Another adapter goes to the rear triangle and should be mounted above the Kindernay VII torque arm brake adapter. But the Kindernay VII torque arm brake adapter is tilted and the North Shore Billet adapter shares same mounting holes with the Kindernay VII torque arm brake adapter and also has no space for spherical washers.

So I measured the angle of the Kindernay VII torque arm brake adapter (4.5 deg)

1676765985500.png


And grounded the screws pockets to 4.5 deg on the North Shore Billet adapter with milling machine

1676766012369.png


1676766073059.png


1676766090827.png


Now the screws heads make full proper contact with the bottoms of the pockets without spherical washers.

1676766151722.png


Then I attached the stacked Kindernay and NSB adapters to the rear triangle brake mounts

1676766206381.png


1676766225868.png


1676766247671.png
 
Last edited:

TQFreak

Active member
Dec 2, 2022
169
210
USA
For the drive unit I purchased the Motorset X1 3000W (52V 60A) with Innotrace X2 display


1676956994965.png


1676957052880.png


The bottom of the motor has sticker 48V 30A 1000W but I guess that means nothing and any UART Bafang m620 can be turned to 52V 60A 3000W with Innotrace X1 controller?

1676957204597.png


I configured my order on Innotrace website with 60A XT60 connector but for some reason they sent me it with standard 30A Anderson connector? Can I pump 60A through this connector?

1676957390766.png


The motor fits the frame without issues

1676957506474.png


1676957688131.png


1676957594810.png


1676957622169.png
 
Last edited:

Bengy22

Member
Aug 25, 2022
97
58
USA
You're going to love the power than innotrace has, can the IGH support the torque that will have though? If you don't mind me asking what was the total price for it to the US? And as for the 30a anderson connector I would be a little concerned, 60a is double what those are rated for. I would contact innotrace and see what they say about the situation and if anything can be done or if they think it will be fine. If it were up to me I would have a anti-spark xt90 on that.
 

TQFreak

Active member
Dec 2, 2022
169
210
USA
You're going to love the power than innotrace has, can the IGH support the torque that will have though? If you don't mind me asking what was the total price for it to the US? And as for the 30a anderson connector I would be a little concerned, 60a is double what those are rated for. I would contact innotrace and see what they say about the situation and if anything can be done or if they think it will be fine. If it were up to me I would have a anti-spark xt90 on that.
I am going to use biggest chainring I can fit (maybe 44t) with smallest cog possible (14t) so the torque on the cog in not going to be that big. Kindernay guarantees IGH works without issues under 160 Nm maximum motor torque with 1.6 minimum chainring to cog ratio (so the maximum acceptable torque on the IGH is 160/1.6=100Nm). Innotrace X1 generates 240 Nm at 3000W. I expect to have have 44t/14t=3.14 chainring to cog ratio. So the maximal torque on the ING with my setup is going to be 240Nm/3.14=76.4 Nm. So it is less than the maximal acceptable torque Kindernay guarantees it will work without issues. I see no any problem here.

The total price is what it costs on their website plus shipping cost. It looks like Innotrace can ship it to USA if you email them and ask them to create custom quote for you which will include shipping cost. But I used forward service (International Parcel Forwarding Service | forward2me). I just registered an account on forward2me.com, it provided me an address in Germany and I ordered the motor from Innotrace using their website interface and the address forward2me.com provided to me (Innotrace website allows you to put an address only withing a few Europeans courtiers including Germany). So I paid to Innotrace the price they posted on the website plus the shipping withing Germany cost (14 euros). 5 days shipping from forward2me.com to me in the US cost me 154 euros. By the way Innotrace accepts only bank transfer.
 

TQFreak

Active member
Dec 2, 2022
169
210
USA
This frame has rear triangle with not usual rear axle mount. The rear axle bottoms on the hanger hole where it screws in and maintains exactly 148mm rear hub spacing. You basically can not squeeze the rear hub, you can just slightly pinch it. I believe they did it this way because of the rear triangle is made of carbon fiber and you do not want to clamp carbon fiber with high force because of it can crack. But Kindernay shifter mechanism relays on friction force to be fixed against the swingarm and you just can not maintain enough rear hub clamping force to fix the Kindernay shifter housing against the rear triangle (when you try to shift the shifter housing just rotates around the rear axle and does not shift the gear).

So I needed to figure out how to fix the shifter housing against the rear triangle. I designed and 3D printed a bracket, this bracket can be attached to the shifter housing with an M5 screw (the Kindenay shifter housing has an M5 hole). I 3D printeded it out of PLA to check the fitment and function and it works good. Now I need to 3D print this bracket out of polycarbonate plastic for better strength and service life.

1676971540991.png


1676971591227.png


1676971609474.png
 

TQFreak

Active member
Dec 2, 2022
169
210
USA
I would contact innotrace and see what they say about the situation and if anything can be done or if they think it will be fine. If it were up to me I would have a anti-spark xt90 on that.
I just got response from Innotrace. They said it looks like the person who prepared the motor forgot to solder the XT60 connector. Well, I hope they did not forgot to put the Innotrace X1 controller in it and program it properly. I'm wondering if there is a way to tell if there is Innotrace X1 controller inside without opening the motor and if motor can pull 3000W power as I requested.

Unfortunately they did not provide programming cable for Innotrace X1 tool so if they messed this up I will not be able to fix it.
 

Bengy22

Member
Aug 25, 2022
97
58
USA
I am going to use biggest chainring I can fit (maybe 44t) with smallest cog possible (14t) so the torque on the cog in not going to be that big. Kindernay guarantees IGH works without issues under 160 Nm maximum motor torque with 1.6 minimum chainring to cog ratio (so the maximum acceptable torque on the IGH is 160/1.6=100Nm). Innotrace X1 generates 240 Nm at 3000W. I expect to have have 44t/14t=3.14 chainring to cog ratio. So the maximal torque on the ING with my setup is going to be 240Nm/3.14=76.4 Nm. So it is less than the maximal acceptable torque Kindernay guarantees it will work without issues. I see no any problem here.

The total price is what it costs on their website plus shipping cost. It looks like Innotrace can ship it to USA if you email them and ask them to create custom quote for you which will include shipping cost. But I used forward service (International Parcel Forwarding Service | forward2me). I just registered an account on forward2me.com, it provided me an address in Germany and I ordered the motor from Innotrace using their website interface and the address forward2me.com provided to me (Innotrace website allows you to put an address only withing a few Europeans courtiers including Germany). So I paid to Innotrace the price they posted on the website plus the shipping withing Germany cost (14 euros). 5 days shipping from forward2me.com to me in the US cost me 154 euros. By the way Innotrace accepts only bank transfer.

That's good, I forgot you can gear the torque down before it goes into the igh. Obviously you have put a lot of thought into the build! Any reason you went through the forwarding service if innotrace will ship to the USA? I ask because that sounds more expensive to ship it to a forwarder first then to the USA not to mention the VAT I assume you had to pay because of it. I'm sure it does beat wattwagons prices though.

I just got response from Innotrace. They said it looks like the person who prepared the motor forgot to solder the XT60 connector. Well, I hope they did not forgot to put the Innotrace X1 controller in it and program it properly. I'm wondering if there is a way to tell if there is Innotrace X1 controller inside without opening the motor and if motor can pull 3000W power as I requested.

Unfortunately they did not provide programming cable for Innotrace X1 tool so if they messed this up I will not be able to fix it.

That's what I was worried about as well, I have no clue so I would say its another good question to ask them. With the original 30a markings and not anything with innotrace on it I find weird. Not including the tool as well as soldering on the right connector seems like pretty big mess up, hopefully they make it right to you. At the very least though the 30a andersons should be good for testing it out to see if it does the full 60a when the bike is built up although I personally wouldn't trust it over time. If you are good with soldering and they confirm it wouldn't mess with the warranty probably would be easiest to put your own connector on it. Either the xt60 or a xt90 ideally imo. What battery did you get from Dengfu? Curious what cells and capacity they offer and with the amps being double stock do they offer a bms that support its? I mean I assume they do because you ordered it from them but hearing more about it would be cool (or when you get it in the mail) :)
 

TQFreak

Active member
Dec 2, 2022
169
210
USA
I went through forwarding service because of the email they responded to me with and where I asked them about shipping to the US got into the spam folder for some reason and noticed it too late and I thought they did not responded on it. Then I assembled an order on their website with delivery withing Germany and emailed them if they have everything in this order before I do the payment and they responded back and I executed the payment. Then later I found the email from them in spam folder where they said they can ship it to the US, but that was too late.

Forward service with the shipping method I choose actually cost about the same as the shipping price they provided to me for example in that missed email from them. And the forward service actually had cheaper option (7 days delivery), so it costs less or about the same if you use forward service.

Yes it is cheaper than Watt Wagons and it includes cables, magnet sensor, display, XT60 plug, crank arms, motor fasteners, chainring while Watt Wagons sells bare motor (that's what they said or how I understand their response and the information from their website) for maybe 1.5 times of the price I paid and they also do not have the motors and controllers in stock so you have to wait they order it from Innottace and then resell it to you for higher price without extra parts. Watt Wagons also does not have any way to configure your motor through their website so you have to manage it somehow maybe through emails after purchasing the motor from them which is extra complexity for me.

I asked Watt Wagons about Anderson connector for 2300W nominal 3000W peak option and they say it works without issues at such power so they keep the Anderson connectors on the motor for any power configuration.

The battery supplied with the frame is 52V 30A (there is a 40A fuse on the power wire inside the battery) 1040Wh. I do not know which cells they use, but the battery configuration is 14S4P which means each cell is 5Wh and maybe 10A. Alibaba sellers sell battery cases with BMS for this frame with BMS 30A maximum which indicates to me again this is likely 30A battery.

I am planning to build 52V 60A battery but if I am going to use the battery supplied with the Dengfu frame I should not exceed 1500W power and asked Innotrace how they programmed the 3000W controller and how much each out of 10 support modes consumes power. Unfortunately for some reason Innotrace in not very responsive and I got no answer yet about it.
 
Last edited:

TeoElFeo

Member
Apr 13, 2022
179
58
Tallinn
I am planning to build 52V 60A battery but if I am going to use the battery supplied with the Dengfu frame I should not exceed 1500W power and asked Innotrace how they programmed the 3000W controller and how much each out of 10 support modes consumes power. Unfortunately for some reason Innotrace in not very responsive and I got no answer yet about it.

How much wh do you hope to squeeze in to the frame? Are you going to fabricate the lid or planning to use the standard battery box? Also do you know what is the rear wheel travel on this frame?
 

TQFreak

Active member
Dec 2, 2022
169
210
USA
How much wh do you hope to squeeze in to the frame? Are you going to fabricate the lid or planning to use the standard battery box? Also do you know what is the rear wheel travel on this frame?
I am going to use a standard Reention Rhino 21700 Ebike Battery Box so the capacity is going to be equal or less than 1040 Wh.

The lid is separate detachable part so there is no need to fabricate it, you can purchase it on aliexpress.com. If you want to use this lid with custom case battery pack you just need to figure out how to attach it to the battery or to the frame.

1677082409053.png


The maximal rear wheel travel is 142 mm
 

TeoElFeo

Member
Apr 13, 2022
179
58
Tallinn
The lid is separate detachable part so there is no need to fabricate it, you can purchase it on aliexpress.com. If you want to use this lid with custom case battery pack you just need to figure out how to attach it to the battery or to the frame.

View attachment 107388

The maximal rear wheel travel is 142 mm
Do you think the lid can be purchased without the box?
 

Bengy22

Member
Aug 25, 2022
97
58
USA
If you do a custom layout inside the case you might be able to make a larger capacity battery, like how someone in the e22 thread made a 14s4p battery case that fits. If only the newer 21700's were more available, if you could get your hands on lg m58t's you could have a 1200wh battery for the same amount of cells. Look forward to seeing the custom battery!
 

rezystor1990

Member
Feb 1, 2023
28
48
Poland
The maximal rear wheel travel is 142 mm


Dengfu claims 150mm of rear wheel travel with 57mm of shock travel. It's not true?

I ordered an empty battery case on aliexpress, still waiting for the frame to be shipped but dengfu has delays...

IMG_20230222_181752.jpg Screenshot_8.jpg
 

TeoElFeo

Member
Apr 13, 2022
179
58
Tallinn
I think it is possible if you put enough effort to do research.
You're right. If not then I can somehow have one fabricated for me.

Could you please also make one photo of the inside of the downtube. I want to understan if there the same 2 bolts that hold brackets securing all the housing.

Thanks!
 

TQFreak

Active member
Dec 2, 2022
169
210
USA
Dengfu claims 150mm of rear wheel travel with 57mm of shock travel. It's not true?

I draw the bike kinematics based on the Dengfu E55 17" drawing they shared and the rear wheel travel is about 142mm for 230mm shock with 60mm stroke

1677131427656.png


For 230mm shock with 57.5mm stroke the rear wheel travel is 136mm (this is the shock I use)

1677131467771.png


Even according to the Dengfu E55 17" drawing the rear wheel travel they indicated is less than 150mm (144mm) for 230mm shock with 60mm stroke.

1677131828242.png
 

EMTB Forums

Since 2018

The World's largest electric mountain bike community.

522K
Messages
25,789
Members
Join Our Community

Latest articles


Top