Navigation
Install the app
How to install the app on iOS
Follow along with the video below to see how to install our site as a web app on your home screen.
Note: This feature may not be available in some browsers.
More options
Style variation
You are using an out of date browser. It may not display this or other websites correctly.
You should upgrade or use an alternative browser.
You should upgrade or use an alternative browser.
Part # 1: Orbea Rise - Upper Linkage Axle and Bearing Service
- Thread starter Rod B.
- Start date

Rod B.
E*POWAH Master
- Thread starter
- #122
Cornish,Thanks very much, followed your guide to do my 1st upper linkage service. The link to the video for frame bearing replacement, do you know if that tool fits the rise M series?
Pivot bearing press and extractor kits come with various adapters in which to "Push" the bearing out of the bore or "Press" the bearing into the bore. Some kits work much better than others. I've found that when it comes to pivot bearing tools, it's best to go good quality and not budget if possible.
In this message I will list several kits which will work on the Rise. I cannot name them all, but know there are many good quality bearing press and extraction tool kits available. I've included a Rise bearing chart so that you can insure the kit you purchase will work with the linkage/pivot bearings on the Rise.
I re-read the thread and there are two companies I've mentioned in the thread. They are "RRP", seen in the opening page video and "Session" farther down in the thread. I will explain their use but first allow me to go into a bit more detail in case others would like to know further on how to use a bearing press.
Bearing press and extractor kits come in various forms. There is the universal bearing press tool that can be used to install various types of bearings on a bicycle, i.e. pivot, bottom bracket, headset, and wheel hub bearings. Pictured is the Wheels Manufacturing, Press-7 tool which I have and occasionally use to press in wheel hub, bottom bracket and frame pivot bearings.
This tool can be used to insert pivot bearings in the Rise frame. Use the correct size shoulder on the adapter which corresponds with the inner diameter bearing bore. Place the pivot bearing on the adapter's shoulder. Insert the threaded rod through the adapters and bearings. Install the threaded T-handle on each end of the threaded rod. Insure the bearings are aligned correctly with each bore hole and are not going in crooked. Slowly tighten the handles. Insure the bearings are gong in straight. Keep turning the handles until the pivot bearings are fully inserted inside their bores.
Frequently you will encounter bearings which are mounted "Blind" or in a "Semi-Blind" bore hole. The term "Blind" refers to a bearing mounted inside a bore and you have absolutely no access to the opposite side of the bearing and therefore cannot drive the bearing out. The term "Semi-Blind" refers to a bearing that is mounted in a bore and you have some access to the opposite side of the bearing in which to drive it out.
Blind bearing extractors work by being inserted into the bearing's inside bore opening. The tool has a threaded insert. You turn the threaded insert into the extractor and tighten it fully. This causes the sides of the extractor to expand outwards and wedge themselves tightly inside the bearing bore. A slide hammer is then threaded on to the end of the extractor and the force of the slide hammer is used to extract the bearing from the blind bore. Seen pictured is Enduro Bearing BBT-222 blind bearing extractor kit.
Blind Bearing Extractor:
Enduro Bearing Tool - BBT-222
Note: The slide hammer on Enduro's BBT-222 tool doubles as a hammer. The hammer can be used for those occasions where you have some access to the opposite side of the bearing. Using the hammer and a brass drift punch, you drive the bearing from the bore by striking the extractor with the brass drift punch.
Semi-Blind bearing extractors work in a similar manner to a blind bearing extractor. The extractor is inserted into the inner bearing bore and the insert threaded tightly into the extractor which causes the extractor to expand tightly against the wall of the inner bearing bore. The end of the extractor has a mushroom head. A brass punch is placed against the head of the extractor and struck. The force of the blow drives the extractor and bearing out of the bore.
Semi-Blind Bearing Extractor:
Wheels Manufacturing - Bearing Extractor Press-5
I like to use brass punches. The soft brass will not damage a tool and if used to drive a bearing directly out of a bore, the brass will not shatter the hardened bearing. You can buy brass punches in various sizes.
Every tool has it's weaknesses and strengths. If a bearing is too tightly in it's bore whether by friction or corrosion, a blind extractor will not work. Excessive bore friction or corrosion will override the friction of the extractor flange against the bearing, and the extractor will pull off the bearing. In truth, I find that the use of a blind bearing extractor will often not work unless the bearing has a lose fit in the bore.
When encountering a bearing that is too tight in it's bore, it is best to use a dedicated bearing press and puller kit. There are many companies which make a quality kit. Know that a quality bearing press and extractor set is going to cost you. If it helps, know that this is one of those tools you'll find yourself using frequently if you work on you and your mates bikes.
Before purchasing a kit, it's important to know what bearing sizes your bike has. Tool manufacturers will list which bearings their bearing press-extractor kit will work with. I've made a chart of the pivot bearings used on the Rise M and H series frames. Refer to the chart below to insure the kit works with your bearing sizes ad diameters:
Some tool manufacturers provide a comprehensive kit which will fit most standard bearing sizes, whereas other tool manufacturers allow you to buy adapters which will fit only the bearings that you need. Buying individual bearing adapters tends to be the less expensive route than a more comprehensive kit. Going the individual adapter route may mean encountering a situation where you won't have the correct bearing adapter readily on hand when working on a different bike other than the Rise.
Bearing extractor kits typically will not work with blind pivot bearings, i.e. bearings in which you cannot access the backside of the bearing to fit the adapter against. An example of this would be the Rise's upper and lower frame mounted main pivot bearings. You would need to use either a blind bearing extractor to remove the bearings, or use a drift punch to punch/drive the bearing out of the frame. During installation of the new frame pivot bearings, you would use a bearing press tool such as the Wheels Manufacturing bearing press which I've referenced above.
I use four types of pivot bearing tools when working on suspension bearings:
1. Wheels Manufacturing bearing press tool, Press 7
2. Wheels Manufacturing, blind bearing extractor tool, Press-5
3. Rapid Racer Products (RRP), bearing press and extractor with miscellaneous adapters
4. 12" long brass drift punch
The bearing extractor and press kits I've referenced below work well with the pivot bearings mounted in the Rise linkage arms and the chain stay axle bearings.
Park Tool, SBK-1 bearing press and extractor kit. Cost $299.95. This kit covers outside bearing diameters from 16mm to 35mm and inside diameters from 8.5mm to 20mm.
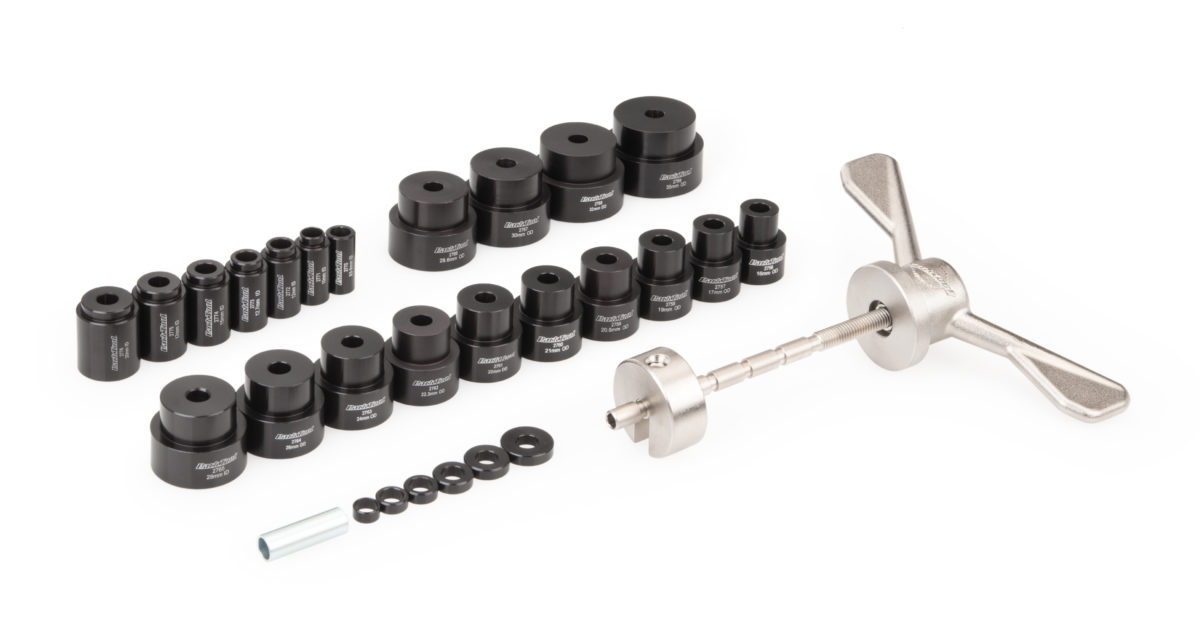
SBK-1 Suspension Bearing Kit
The SBK-1 is a professional level kit for installing and removing cartridge bearings in bicycle suspension pivots.
 www.parktool.com
Session Components USA makes a Bearing Press and Extraction Kit, kit # S3-FLB, that covers every (Non-Blind) pivot bearing on the Rise. Session Components also make a blind bearing extraction kit, Kit # S3-FLBE that will work with the Rise's frame mounted, upper and lower pivot axle bearings.
Note: the M series Rise carbon utilizes an odd size bearing for the left, non-drive side, lower main pivot axle. The bearing is an Enduro, 6803 LLU, MAX, Black Oxide. The Session Components Blind Bearing Extraction Kit does not come with an extractor to fit the 6803 bearing. If you buy this kit, you can use a brass drift punch to remove the 6803 bearing from the frame with no issues.
Linkage Arm Bearing Puller:
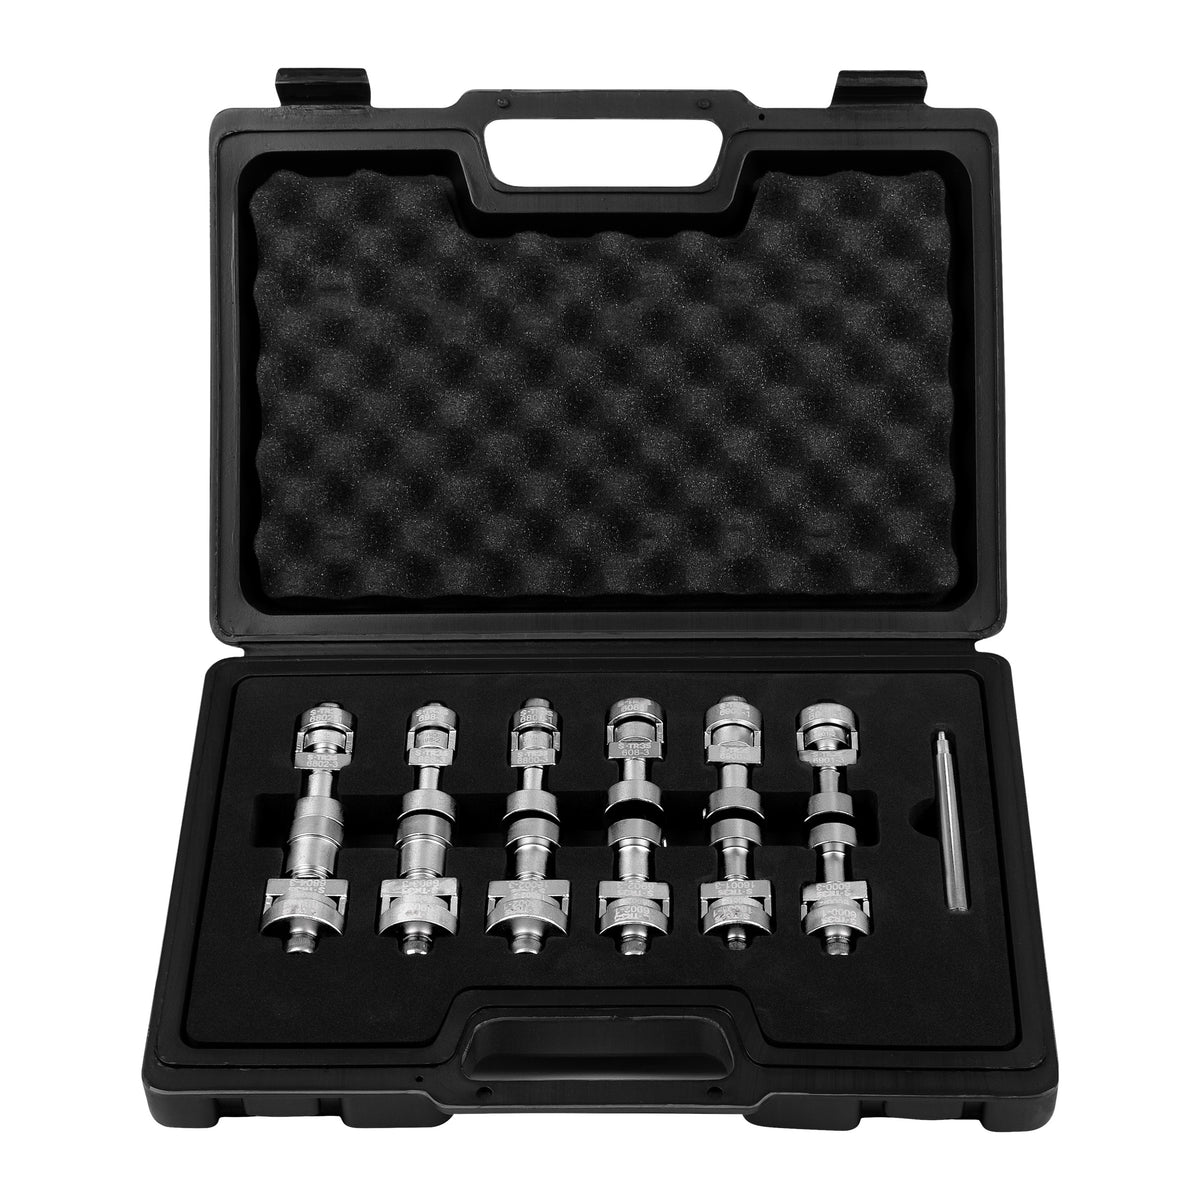
PIVOT AND LINKAGE BEARING EXTRACTION/INSTALLATION TOOL KIT
Your browser does not support our video. Install and Extract your Pivots and Links Bearing without impact, hammer or damaging your gear ! Our tools uses only pressure and makes your job easier and faster! PULL AND PRESS BEARINGS ! Bearings : - 608 (8mm ID / 22mm OD) - 698 (8mm ID / 19mm...
 www.sessioncomponents.com
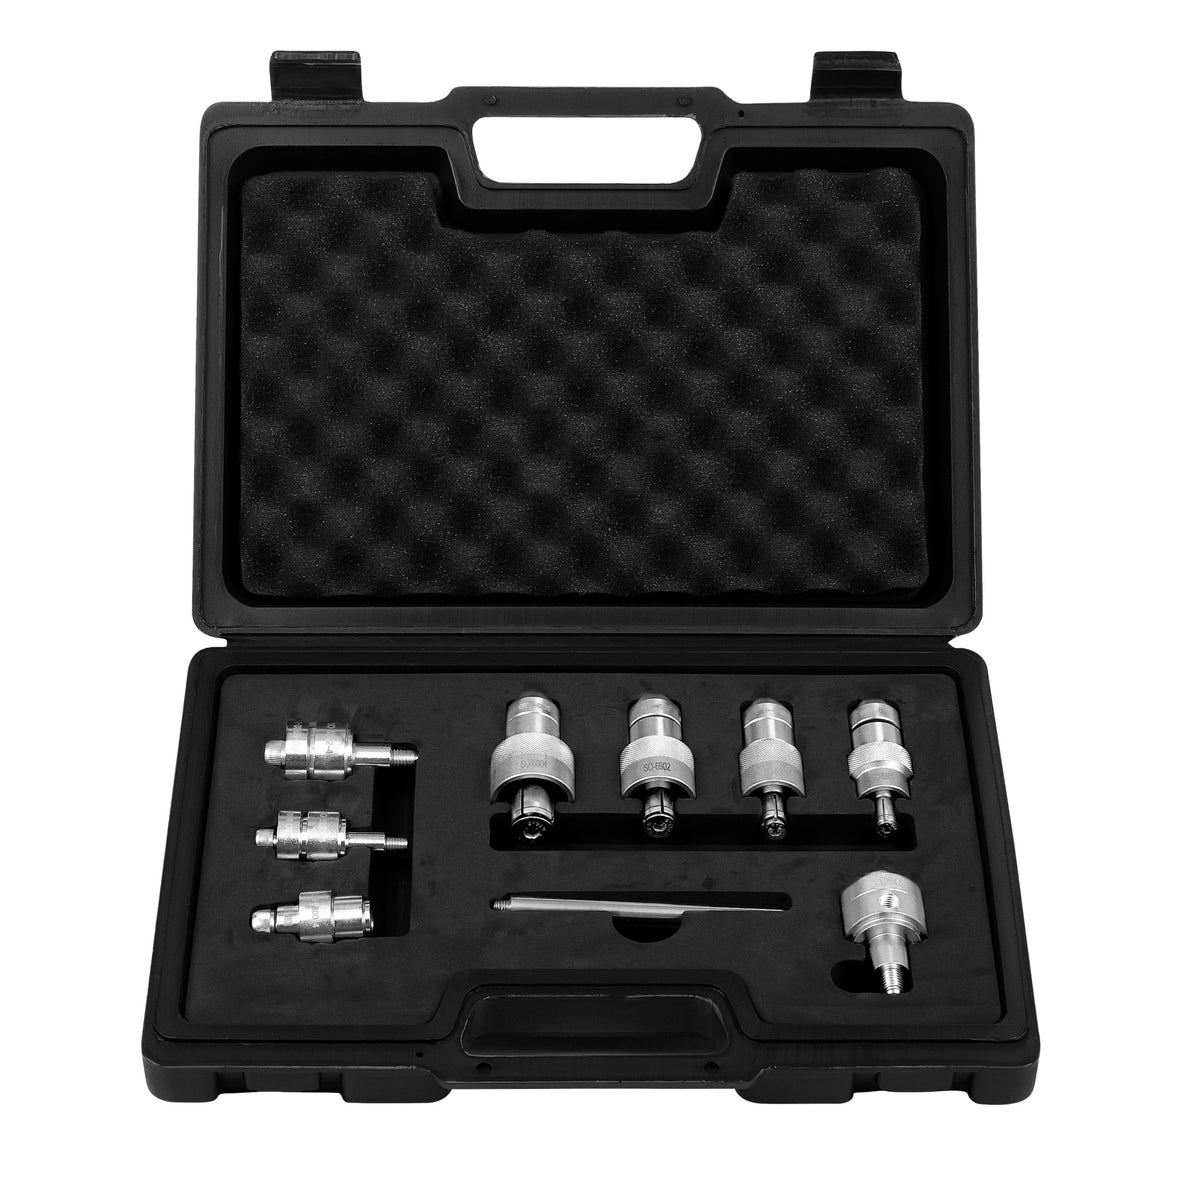
BLIND PULLER BEARING TOOL KIT
Extract and Install bicycle Frame or Hub bearings without impact or slide hammer ! Session Bearing Tool Kit is the perfect solution for Bearing Extraction and Installation, no side hammer, no impact and no damage! The Blind Puller was designed to help access and extract/Install the “hidden”...
www.sessioncomponents.com
Linkage arm bearing puller, S3-FLB, $250.00
Blind Bearing Extractor, S3-FLBE, $295.00
Another company that makes bearing press and extractor kits at a decent price is British based company BearingProTools.com. Bearing Pro Tools sells bearing extractor/presses and blind bearing extractors individually. Use the Rise bearing chart to insure you buy the correct extractor and presses.

Frame Bearing Pullers
Below are our bearing pullers sold individually by size. Many of the same tools can be used for frames and hubs, but we have a few extra tools made specifically for hubs, which can be found here. If you're looking for a ready-made kit of tools to suit your frame, see the 'Tool Kits by Bike'...
www.bearingprotools.com
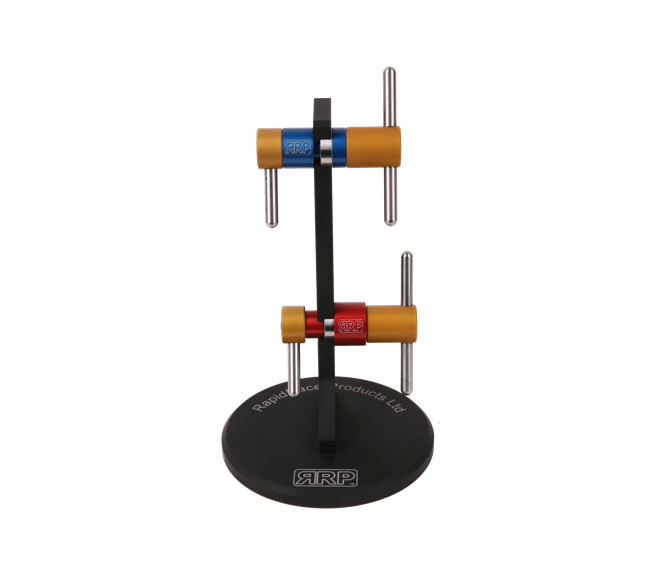
British based Rapid Racer Products (RRP) manufacturers excellent pivot and linkage tools. RRP sells the main bearing press and extraction tool. You must buy the individual bearing adapters separately. RRP sells adapters for every bearing on the Rise. I once again remind that this type of bearing press will not work on blind bearings such as the Rise's upper and lower frame mounted pivot axle bearings. You will need to use either a brass drift punch or blind bearing extractor to remove the bearings from the frame.
RapidRacerProducts | BPET
The Bearing Press and Extraction Tool is a simple tool used to extract and insert linkage bearings on mountain bikes
www.rapidracerproducts.com
RRP diagram depicting how to extract a bearing using the main tool (Yellow) and bearing adapter (Red)
RRP diagram depicting how to press a bearing in a frame/linkage arm using the main tool (Yellow) and bearing adapter (Blue)
Example of a RRP extractor and press bearing adapter.
I hope this helps answer your questions. If you have any further questions, just ask.
Be safe,
Rod
Last edited:
Rod such a detailed reply, thanks very much for your time. I think I’m ready to have a go now but do have a question ref the blind M rise bearings. I understand using the slide hammer for extraction but for installing a blind bearing does this need a special tool or will a press work as it does with the rest of the bearings on the M rise? Probably a really silly question but I’ve never tackled bearings at all.
Last edited:
Rod B.
E*POWAH Master
- Thread starter
- #124
Rod such a detailed reply, thanks very much for your time. I think I’m ready to have a go now but do have a question ref the blind M rise bearings. I understand using the slide hammer for extraction but for installing a blind bearing does this need a special tool or will a press work as it does with the rest of the bearings on the M rise? Probably a really silly question but I’ve never tackled bearings at all.
Cornish, as you suspect, you will need to use a bearing press to install the upper and lower pivot axle bearings which are blind mounted in the frame. You can also use a bearing press to install the linkage arm and rear axle chain stay bearings.
In order to use a bearing press for all of the Rise's pivot bearings, i.e. rear axle, linkage arm and upper/lower pivot axles, you need to make sure that the "All Thread" diameter of the bearing press that you purchase is the correct size. The smallest inner bore diameter for the Rise M series is the linkage arm's seat stay bearing which is 10mm. Make sure the bearing press you purchase has an "All Thread" diameter of less than 10mm.
Note: I use a Wheels Manufacturing bearing press which has a 1/2 inch (12.7mm) all thread rod. Unfortunately, it's not ideally suited for the Rise since it won't work on the small seat stay bearings. It's ideally suited for bottom bracket and headset bearings. I bought the press years ago and make do with it. If I were to purchase a new press, I would buy a press with a smaller diameter all thread rod to accommodate smaller inner bore diameter pivot bearings.
I would suggest looking at the bearing press offered by BearingProTools.com. They sell a bare bones T-Handle bearing press that has a 8mm diameter threaded rod, 144mm in length, for £17.00. You can buy individual adapters for specific bearings at £12.00 a set.
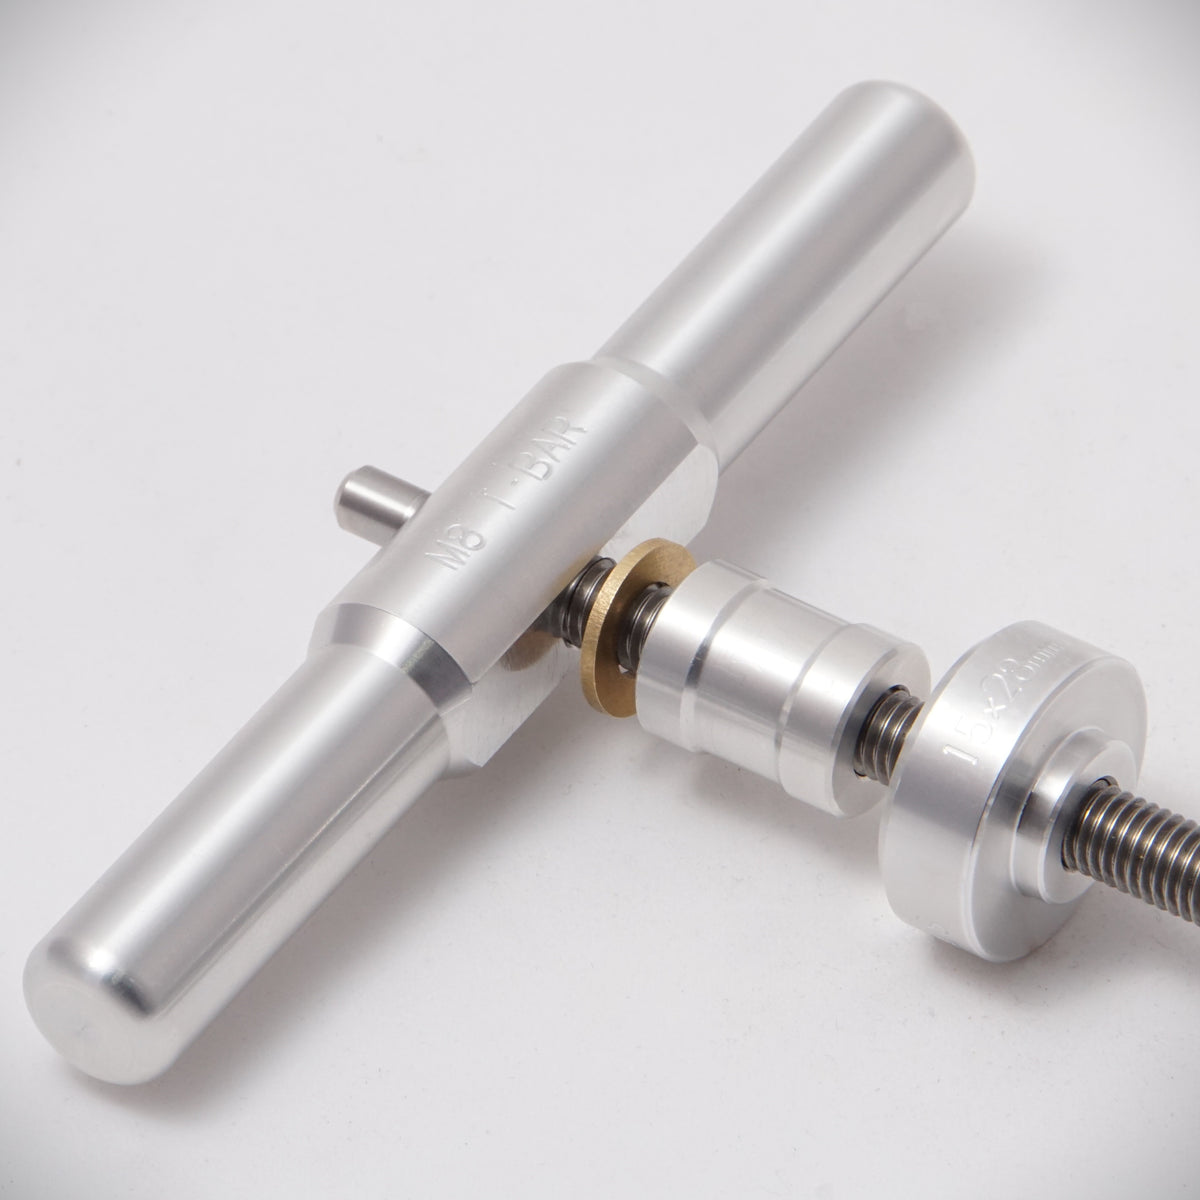
Bearing Press (with T-bar Handles)
Buy one, get one 30% off any mix of individual presses and pullers! Bearing press and puller tools for mountain bike and road bike hubs, wheels, bottom brackets and MTB frame pivots. Fast and free shipping in the UK, low cost international shipping
www.bearingprotools.com
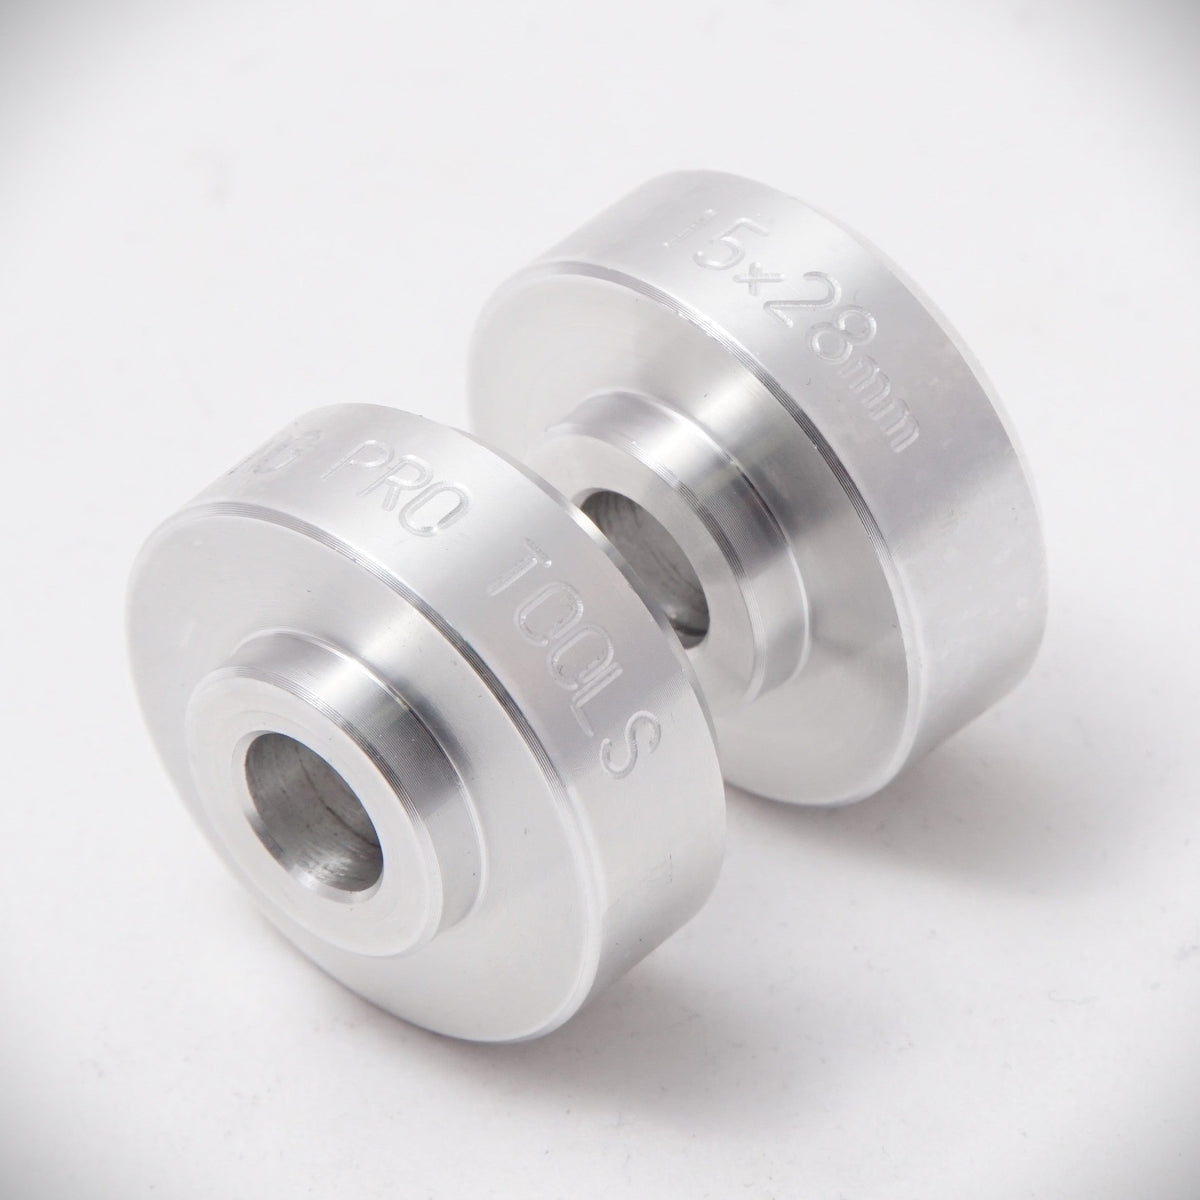
Bearing Press (drifts only)
Buy one, get one 30% off any mix of individual presses and pullers! Bearing press and puller tools for mountain bike and road bike hubs, wheels, bottom brackets and MTB frame pivots. Fast and free shipping in the UK, low cost international shipping
www.bearingprotools.com
If your budget does not allow the purchase of specialized tools such as a bearing press, you can make your own. Simply go down to your local hardware store and purchase a length of 8mm threaded rod, several thick washers and nuts. Cut the threaded rod to length and you have a do it yourself (DIY) bearing press.
If you go the DIY route, you need to be very careful during the installation. The pressing force must be applied to the outer bearing race and not solely to the inner race. If you apply pressing force only to the inner bearing race, if may damage the ball bearings by denting them. This can occur if the DIY washer bends/flexes inwards and applies pressure to the inner bearing race. Also, DIY washers will not offer an exact fit on the bearing. The sloppiness can cause the bearing to cock at an off angle. If the bearing is pressed off angle, it will damage the bore and can lead to serious issues. Always insure the bearing is going in straight while turning the handles to press the bearings into place.
When you purchase a bearing press, it's not the press itself that is important, you can easily make a threaded press. It's the adapters/drifts that are the most important part. The adapters insure that an equal force is applied across all of the bearing face. Because the adapters are machined to fit the bearing, the chance of a cocked bearing is much reduced. However......you still need to make absolutely sure the bearing is being pressed in straight and true. The trick is to align the bearing with the bore hole. Slowly take up tension with the press. Once tension has been reached, check the bearing(s) once again to make sure they are true. After one final check, begin turning the handle to press the bearing(s) into place.
One last bit of advice. When the bearing has bottomed out in the bore and is fully seated, do not crank on the press to give the bearing a final seat. This can damage the ball bearings. When you press a bearing, you will feel the resistance in the handles when the bearing has been fully seated. I like to lightly apply tension the press to insure the bearing is fully seated and then I back off the press and remove it. I then do a visual inspection with my Mark One eyeball to insure the bearing is where it should be in the bore.
Let me know how you do.
Cheers,
Rod
Awesome detail again Rod, thank you very muchCornish, as you suspect, you will need to use a bearing press to install the upper and lower pivot axle bearings which are blind mounted in the frame. You can also use a bearing press to install the linkage arm and rear axle chain stay bearings.
View attachment 98048
In order to use a bearing press for all of the Rise's pivot bearings, i.e. rear axle, linkage arm and upper/lower pivot axles, you need to make sure that the "All Thread" diameter of the bearing press that you purchase is the correct size. The smallest inner bore diameter for the Rise M series is the linkage arm's seat stay bearing which is 10mm. Make sure the bearing press you purchase has an "All Thread" diameter of less than 10mm.
Note: I use a Wheels Manufacturing bearing press which has a 1/2 inch (12.7mm) all thread rod. Unfortunately, it's not ideally suited for the Rise since it won't work on the small seat stay bearings. It's ideally suited for bottom bracket and headset bearings. I bought the press years ago and make do with it. If I were to purchase a new press, I would buy a press with a smaller diameter all thread rod to accommodate smaller inner bore diameter pivot bearings.
I would suggest looking at the bearing press offered by BearingProTools.com. They sell a bare bones T-Handle bearing press that has a 8mm diameter threaded rod, 144mm in length, for £17.00. You can buy individual adapters for specific bearings at £12.00 a set.
Bearing Press (with T-bar Handles)
Buy one, get one 30% off any mix of individual presses and pullers! Bearing press and puller tools for mountain bike and road bike hubs, wheels, bottom brackets and MTB frame pivots. Fast and free shipping in the UK, low cost international shippingwww.bearingprotools.com
Bearing Press (drifts only)
Buy one, get one 30% off any mix of individual presses and pullers! Bearing press and puller tools for mountain bike and road bike hubs, wheels, bottom brackets and MTB frame pivots. Fast and free shipping in the UK, low cost international shippingwww.bearingprotools.com
View attachment 98060
View attachment 98059
If your budget does not allow the purchase of specialized tools such as a bearing press, you can make your own. Simply go down to your local hardware store and purchase a length of 8mm threaded rod, several thick washers and nuts. Cut the threaded rod to length and you have a do it yourself (DIY) bearing press.
If you go the DIY route, you need to be very careful during the installation. The pressing force must be applied to the outer bearing race and not solely to the inner race. If you apply pressing force only to the inner bearing race, if may damage the ball bearings by denting them. This can occur if the DIY washer bends/flexes inwards and applies pressure to the inner bearing race. Also, DIY washers will not offer an exact fit on the bearing. The sloppiness can cause the bearing to cock at an off angle. If the bearing is pressed off angle, it will damage the bore and can lead to serious issues. Always insure the bearing is going in straight while turning the handles to press the bearings into place.
When you purchase a bearing press, it's not the press itself that is important, you can easily make a threaded press. It's the adapters/drifts that are the most important part. The adapters insure that an equal force is applied across all of the bearing face. Because the adapters are machined to fit the bearing, the chance of a cocked bearing is much reduced. However......you still need to make absolutely sure the bearing is being pressed in straight and true. The trick is to align the bearing with the bore hole. Slowly take up tension with the press. Once tension has been reached, check the bearing(s) once again to make sure they are true. After one final check, begin turning the handle to press the bearing(s) into place.
One last bit of advice. When the bearing has bottomed out in the bore and is fully seated, do not crank on the press to give the bearing a final seat. This can damage the ball bearings. When you press a bearing, you will feel the resistance in the handles when the bearing has been fully seated. I like to lightly apply tension the press to insure the bearing is fully seated and then I back off the press and remove it. I then do a visual inspection with my Mark One eyeball to insure the bearing is where it should be in the bore.
Let me know how you do.
Cheers,
Rod
") ))
))I have an Occam and am currently servicing my suspension.
Yeah, I know - it's not an eMTB. But my understanding is that the suspension linkage is pretty much identical to the Rise, so this thread has been very useful. A huge thank you to all the contributors, and in particular Rod!
As reported here by a few other folks also, my linkage pivot bearings were very crunchy after moderate use in dry conditions, even after repacking them with fresh grease.
I removed them yesterday, and the bearing seats look... interesting...

This looks like it's been machined by a 5 year old with a rusty fondue fork on a Dremel... There are voids in the middle section, and chips on the lip of the bearing seat.
I also suspect the hole is undersized, and that this is what results in crunchy bearings, rather than water or dirt ingress. The bearings spun freely after removal with none of the clickiness or grinding noise as when they were installed. I measured the hole with a caliper at ~31.8 mm; my understanding is that the correct dimension for a press fit would be somewhere around 31.96?! I'm happy to be corrected on this, and know measuring a bore with a caliper isn't particularly accurate, but I tried hard to get the largest measurement I could.
The 6803 on the chainstay around the axle nut was also very crunchy, and the axle nut could barely be removed. Again, after removal the bearing spins freely and the axle nut slides through it no problem, so I suspect an undersized hole crushing the bearing was the problem here, too.
How does this compare to other folks' frames? Is this what I should expect? Should I attempt to clean this up somehow, just live with it and replace my bearings once a year, or attempt a warranty replacement with Orbea? Am I freaking out over nothing?
Cheers,
- Dave.
Yeah, I know - it's not an eMTB. But my understanding is that the suspension linkage is pretty much identical to the Rise, so this thread has been very useful. A huge thank you to all the contributors, and in particular Rod!
As reported here by a few other folks also, my linkage pivot bearings were very crunchy after moderate use in dry conditions, even after repacking them with fresh grease.
I removed them yesterday, and the bearing seats look... interesting...
This looks like it's been machined by a 5 year old with a rusty fondue fork on a Dremel... There are voids in the middle section, and chips on the lip of the bearing seat.
I also suspect the hole is undersized, and that this is what results in crunchy bearings, rather than water or dirt ingress. The bearings spun freely after removal with none of the clickiness or grinding noise as when they were installed. I measured the hole with a caliper at ~31.8 mm; my understanding is that the correct dimension for a press fit would be somewhere around 31.96?! I'm happy to be corrected on this, and know measuring a bore with a caliper isn't particularly accurate, but I tried hard to get the largest measurement I could.
The 6803 on the chainstay around the axle nut was also very crunchy, and the axle nut could barely be removed. Again, after removal the bearing spins freely and the axle nut slides through it no problem, so I suspect an undersized hole crushing the bearing was the problem here, too.
How does this compare to other folks' frames? Is this what I should expect? Should I attempt to clean this up somehow, just live with it and replace my bearings once a year, or attempt a warranty replacement with Orbea? Am I freaking out over nothing?
Cheers,
- Dave.
Last edited:
Rod B.
E*POWAH Master
- Thread starter
- #127
Dave,I have an Occam and am currently servicing my suspension.
Yeah, I know - it's not an eMTB. But my understanding is that the suspension linkage is pretty much identical to the Rise, so this thread has been very useful. A huge thank you to all the contributors, and in particular Rob!
As reported here by a few other folks also, my linkage pivot bearings were very crunchy after moderate use in dry conditions, even after repacking them with fresh grease.
I removed them yesterday, and the bearing seats look... interesting...
View attachment 100662
This looks like it's been machined by a 5 year old with a rusty fondue fork on a Dremel... There are voids in the middle section, and chips on the lip of the bearing seat.
I also suspect the hole is undersized, and that this is what results in crunchy bearings, rather than water or dirt ingress. The bearings spun freely after removal with none of the clickiness or grinding noise as when they were installed. I measured the hole with a caliper at ~31.8 mm; my understanding is that the correct dimension for a press fit would be somewhere around 31.96?! I'm happy to be corrected on this, and know measuring a bore with a caliper isn't particularly accurate, but I tried hard to get the largest measurement I could.
The 6803 on the chainstay around the axle nut was also very crunchy, and the axle nut could barely be removed. Again, after removal the bearing spins freely and the axle nut slides through it no problem, so I suspect an undersized hole crushing the bearing was the problem here, too.
How does this compare to other folks' frames? Is this what I should expect? Should I attempt to clean this up somehow, just live with it and replace my bearings once a year, or attempt a warranty replacement with Orbea? Am I freaking out over nothing?
Cheers,
- Dave.
I got a laugh out of your description, funny. Never under estimate a kid with a rusty fondue fork.
I'm unsure from looking at the picture, which bore the picture depicts. The linkage arm bearing bore should be smooth. The pivot bearings in their bores should not have a crunchy/notchy feel. With the linkage in place, minus the rear wheel and rear shock, rotate the rear triangle up and down. It should move smoothly with no rough spots or binding.
The bearings used for Occam/Rise are thin bearings and it doesn't take much to over compress the bearing and thus throw the bearing out of round. An undersized bearing bore or a high spot in the bearing bore will cause the bearing to freeze or become rough.
While I do not have any experience with the Occam, I do have a lot of experience with the Rise. I've encountered multiple Rises with rear axle chainstay bearings which I could hardly rotate while inserted in their chainstay bore. They had a "Crunchy" feel. As soon as I removed them, they spun freely. When I reinserted them, they became crunchy/notchy again. When they were removed, they spun freely again.
To fix the problem, I ended up taking a piece of emery cloth sandpaper and carefully cleaned out/enlarged the bores slightly so that the bearings were still tight in the bore, but not overly compressed in the bore. Since you have experience using a caliper, it should not too big an issue to fit the bearing, just be patient.
I have not used a fiber bearing bore cleaning wheel, but I know they are available for small bearing bores.
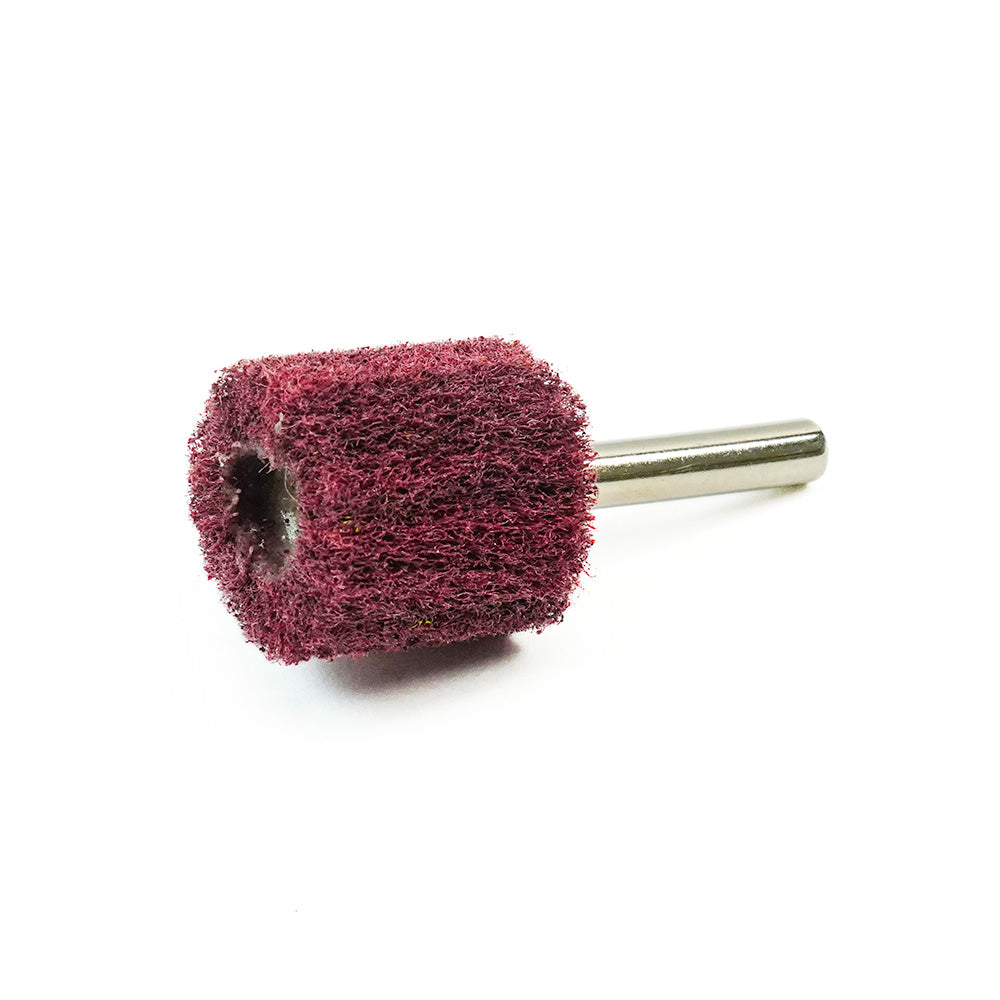
Bearing Bore Cleaning Wheel
Clean out your dirty and corroded bearing bores in preparation for new bearings with a Pryme cleaning wheel. Having a clean surface allows new bearings to press in easier and straighter. 1" diameter x 1" wide x 1/4" shaft (best used with air die grinder, but can be used on a drill with decent...
 www.prymemx.com
If your bike is still under warranty, I would first bring it to the attention of your bike shop and see what they can do. The Orbea warranty/parts replacement process can take a bit of time due to the country being located in Spain. Maybe you can see if the bike shop will give you the go ahead to clean out the bearing bore without voiding your warranty.
I had to warranty the right chainstay on my Rise due to the paint peeling off of it. It took me two months to get the chainstay. And.....drum roll please.....the axle bearing was crunchy in the bore due to the bore being undersized. I had to clean it out.
If you have any questions ask away or shoot me a message.
Be safe,
Rod
OK the bearing seat may be undersized but if that was the case I would have expected the process of pressing in the bearing to have displaced surface material given it is pressed in sideways of course.
A word of warning a bout testing bearings with no load on them. Assuming there is still grease in them and no ingress of water/dust etc they may well feel smooth just rotating the inner race with your finger, but that will not take account of any wear that has occured between the ball bearings and race. That wear, and resulting roughness of rotation will only be apparent when the bearing is under load. At the very least you need to test a free standing bearing by emulating some vertical load with a suitable rod and rolling the bearing on a worktop.
A word of warning a bout testing bearings with no load on them. Assuming there is still grease in them and no ingress of water/dust etc they may well feel smooth just rotating the inner race with your finger, but that will not take account of any wear that has occured between the ball bearings and race. That wear, and resulting roughness of rotation will only be apparent when the bearing is under load. At the very least you need to test a free standing bearing by emulating some vertical load with a suitable rod and rolling the bearing on a worktop.
Thanks for the responses!
To clarify, the hole in the picture is the bearing seat/bore for the linkage axle.
I'm also worried about the several large voids visible in the picture. That "filler" part between the bearing lips probably isn't that structurally relevant (?), but if this is what the visible parts of the carbon look like, it's not very confidence inspiring. I (carefully) used a dental pick as a depth gauge, and those holes are pretty deep (>1 mm).
I've talked to my LBS and sent them some pictures, and am currently awaiting their response. If I can get this fixed through the proper channels, I'm not going to touch it, although I do fear sending off my frame somewhere and waiting for a return for weeks or months.
To clarify, the hole in the picture is the bearing seat/bore for the linkage axle.
So I'm not crazy... Disappointing though that Orbea can't make holes in the right size.I've encountered multiple Rises with rear axle chainstay bearings which I could hardly rotate while inserted in their chainstay bore. They had a "Crunchy" feel. As soon as I removed them, they spun freely.
Yeah... This is what I'm considering doing (for both the chainstay and linkage pivot bores). I'm paranoid about ending up with a rounded or angled or "unround" hole, or chewing up the lip more than it already is. But I guess if done very slowly and carefully it can be done - glad to hear it worked for you!To fix the problem, I ended up taking a piece of emery cloth sandpaper and carefully cleaned out/enlarged the bores slightly so that the bearings were still tight in the bore, but not overly compressed in the bore.
I'm also worried about the several large voids visible in the picture. That "filler" part between the bearing lips probably isn't that structurally relevant (?), but if this is what the visible parts of the carbon look like, it's not very confidence inspiring. I (carefully) used a dental pick as a depth gauge, and those holes are pretty deep (>1 mm).
I've talked to my LBS and sent them some pictures, and am currently awaiting their response. If I can get this fixed through the proper channels, I'm not going to touch it, although I do fear sending off my frame somewhere and waiting for a return for weeks or months.
I don't think the edge of the outer race is sharp enough to cut the carbon, the bevel will just push it out of the way (and in the worst case result in cracked carbon...). Too-tight bottom brackets shredding bearings is a common complaint, and I think this is what happened here, too.OK the bearing seat may be undersized but if that was the case I would have expected the process of pressing in the bearing to have displaced surface material
But if it doesn't spin smoothly even without load it's probably shot... When installed, the bearings were hard to turn and notchy with no load other than my finger touching the inner race, and made enough noise to elicit a snarky comment from my wife (who knows nothing about bearings other than that's not what they're supposed to sound like). These are definitely toast and going in the trash.That wear, and resulting roughness of rotation will only be apparent when the bearing is under load.
Rod B.
E*POWAH Master
- Thread starter
- #130
Dave,Thanks for the responses!
To clarify, the hole in the picture is the bearing seat/bore for the linkage axle.
So I'm not crazy... Disappointing though that Orbea can't make holes in the right size.
Yeah... This is what I'm considering doing (for both the chainstay and linkage pivot bores). I'm paranoid about ending up with a rounded or angled or "unround" hole, or chewing up the lip more than it already is. But I guess if done very slowly and carefully it can be done - glad to hear it worked for you!
I'm also worried about the several large voids visible in the picture. That "filler" part between the bearing lips probably isn't that structurally relevant (?), but if this is what the visible parts of the carbon look like, it's not very confidence inspiring. I (carefully) used a dental pick as a depth gauge, and those holes are pretty deep (>1 mm).
I've talked to my LBS and sent them some pictures, and am currently awaiting their response. If I can get this fixed through the proper channels, I'm not going to touch it, although I do fear sending off my frame somewhere and waiting for a return for weeks or months.
I don't think the edge of the outer race is sharp enough to cut the carbon, the bevel will just push it out of the way (and in the worst case result in cracked carbon...). Too-tight bottom brackets shredding bearings is a common complaint, and I think this is what happened here, too.
But if it doesn't spin smoothly even without load it's probably shot... When installed, the bearings were hard to turn and notchy with no load other than my finger touching the inner race, and made enough noise to elicit a snarky comment from my wife (who knows nothing about bearings other than that's not what they're supposed to sound like). These are definitely toast and going in the trash.
The warranty process is simple. The bike shop will submit the warranty claim. Orbea will send the bike shop the new chainstay, seatstay, linkage arm, etc. If the bike shop is handling the repair, you simply take the bike to the shop for the parts replacement. If you are doing the work yourself, you must bring the defective part to the bike shop and exchange it for the new part.
Note: If you live far away from the bike shop, you may be able to have the bike shop mail the new part to your home. The bike shop will want you to destroy the defective part first and send them a picture of the part, before they will ship you the part. If you have a good relationship with the shop, they dealer may waive destruction of the part until after you've received the new part and verified its the correct part.
My bike shop initially wanted me to destroy the defective seatstay before they would mail the replacement part to my home. I argued against this because I was worried the new part would get lost in the mail or I would be sent the wrong part. The dealer said it wouldn't happen. I insisted, the dealer relented..... I got the new part. Orbea sent me a chainstay. It took me another month to get the new seatstay. Dodged a bullet on that one.
Thanks for the info, Rod. I've had bad experiences with bike component manufacturers in the past - high-end, stupid expensive ones - who refused to do anything about parts that clearly had manufacturing defects. Glad to hear Orbea doesn't seem to be one of them.
Although, in my case, the questionable part is the frame's main triangle, so they may be a little more reluctant to replace it. I also hate the idea of destroying an otherwise perfectly good part because someone was in a hurry when drilling a hole. In a perfect world, Orbea would take the frame back, examine it for structural integrity, re-machine those bearing seats, send it back me, and give me a loaner in the mean time. (Well, I guess in a truly perfect world they would've gotten it right the first time around...)
I'll see what the bike shop says (luckily they're local) and report back here...
(edit: Apologies for misspelling your name )
)
Although, in my case, the questionable part is the frame's main triangle, so they may be a little more reluctant to replace it. I also hate the idea of destroying an otherwise perfectly good part because someone was in a hurry when drilling a hole. In a perfect world, Orbea would take the frame back, examine it for structural integrity, re-machine those bearing seats, send it back me, and give me a loaner in the mean time. (Well, I guess in a truly perfect world they would've gotten it right the first time around...)
I'll see what the bike shop says (luckily they're local) and report back here...
(edit: Apologies for misspelling your name
)I cannot believe the seats for the bearings were "machined". In a carbon layup surely the position for the insertion of bearings would be layered up on a former. In fact I would have thought that former would stay in place to act as the seating shell for the bearing.
Work's been pretty busy, but I found some time to take the bike to the shop where I bought it.
They agreed that the frame should be warrantied, and filed a warranty claim right away.
They did warn me that Orbea has been increasingly flaky in honoring their warranty, though. In fact the owner of the shop showed me an Orbea (road) frame where the bottom bracket was so undersized that the frame cracked when they attempted to replace the poor screaming bearings. Orbea apparently denied the warranty claim, and instead offered a "crash replacement" - for a frame that never was crashed, and for a whopping $1700, far more than it costs them to manufacture and ship that frame.
This really ticks me off. At the stratospheric prices we pay for our bikes, the least we should expect is some semblance of decent workmanship and QA, and that manufacturing defects are dealt with in good faith. Instead, companies look at warranty claims as a way to make yet more money...
Anyway, I'll await Orbea's verdict and hope they'll do right by me.
My understanding is that machining is actually superior if done properly. It's lighter than bonding in metal parts as you describe, and can achieve tighter tolerances than molding it directly in carbon because carbon parts shrink during the curing process. Of course, this requires properly calibrated and maintained tooling. I'm guessing when my frame was machined, the cutting tool was worn far beyond its useful life.I cannot believe the seats for the bearings were "machined". In a carbon layup surely the position for the insertion of bearings would be layered up on a former. In fact I would have thought that former would stay in place to act as the seating shell for the bearing.
Rod B.
E*POWAH Master
- Thread starter
- #135
Jene,Hi guys, do you recommend to put wd40 or C3 ceramic lube in the upper linkeage from time to time or after washing the bike?
I typically ride in extremely dry conditions, i.e. it rains once a year whether it needs to or not. The ground is either hard as a rock or has soil the consistency of flour. If you ride in similar conditions, I would not spray any lubrication on the linkage. My thought is it will attract dirt. The linkage has no seals which would prevent dirt from working between the axle and bearings.
Hopefully somebody from a wet climate can respond regarding how they treat their Rise's linkage for protection against moisture and corrosion.
not Rise linkage..........but on all my bikes after a ride as part of my cleaning and servicing post ride, I use a stiff brush to clean linkages followed by pulling a thin piece of cotton cloth around it...............and then drip a few drops of wet chain lube on them................that of course runs around the exposed part of the linkage taking remaining dust etc with it and is then wiped clean. Seat stay and shock linkages and to some extent chain stay forward linkages, are mostly protected as much as possible by a short rear mudguard. Never had to replace any pivot bearings on any bike.
The point is that after two months, linkeage sounds againJene,
I typically ride in extremely dry conditions, i.e. it rains once a year whether it needs to or not. The ground is either hard as a rock or has soil the consistency of flour. If you ride in similar conditions, I would not spray any lubrication on the linkage. My thought is it will attract dirt. The linkage has no seals which would prevent dirt from working between the axle and bearings.
Hopefully somebody from a wet climate can respond regarding how they treat their Rise's linkage for protection against moisture and corrosion.

Rod B.
E*POWAH Master
- Thread starter
- #139
Jene, my linkage would do the exact same thing. I would lubricate the pivot axles (Both upper and Lower and the creaking/clicking noise would eventually return after only a month or so.The point is that after two months, linkeage sounds again
I eventually realized the noise was cause by the linkage arms slipping on the upper pivot axle spline. Once the linkage arms loosened on the axle splines, free play and excessive "Pre-Load" would occur in the upper linkage assembly. The free play creates sloppiness in the rear end and allows the axle to shift side to side across the steel bearings. This creates the noise you are hearing.
Note: Correct linkage arm "Pre-Load" is critical on the Rise. This is the reason Orbea provides the purple "Pre-Load" tool with the bike when it is purchased. If the correct "Pre-Load" is not maintained, noise will occur and the rear end on the bike will become loose and sloppy.
The only way to stop the linkage arms from shifting on the upper pivot axle splines is to use a cylindrical retaining compound such as Loctite 638. The next time you take the linkage arms off of the upper pivot to set the correct pre-load, apply a small amount of Loctite 638 to the axle's splines and the splined linkage arm interface. This will eliminate the noise.
It looks like Orbea was aware of the issues with the upper pivot axle loosening up on the axle splines. From the picture, it looks like the 2023 model linkage arm assembly and axle have been redesigned and also feature a small tool carrier. From the picture, it also looks like Orbea may possibly be using seals on the upper pivot axle. I hope this is so.
It does make you wonder if it's possible to retro fit a 2022 model with the 2023 linkage arms and axle?
Haha not really, it's about putting that seal on the 2022 rise.. But not sure how is covered the hidden part of the arm because the hole is wider there and most of the dust or water comes from there...Jene, my linkage would do the exact same thing. I would lubricate the pivot axles (Both upper and Lower and the creaking/clicking noise would eventually return after only a month or so.
I eventually realized the noise was cause by the linkage arms slipping on the upper pivot axle spline. Once the linkage arms loosened on the axle splines, free play and excessive "Pre-Load" would occur in the upper linkage assembly. The free play creates sloppiness in the rear end and allows the axle to shift side to side across the steel bearings. This creates the noise you are hearing.
Note: Correct linkage arm "Pre-Load" is critical on the Rise. This is the reason Orbea provides the purple "Pre-Load" tool with the bike when it is purchased. If the correct "Pre-Load" is not maintained, noise will occur and the rear end on the bike will become loose and sloppy.
The only way to stop the linkage arms from shifting on the upper pivot axle splines is to use a cylindrical retaining compound such as Loctite 638. The next time you take the linkage arms off of the upper pivot to set the correct pre-load, apply a small amount of Loctite 638 to the axle's splines and the splined linkage arm interface. This will eliminate the noise.
View attachment 102439
It looks like Orbea was aware of the issues with the upper pivot axle loosening up on the axle splines. From the picture, it looks like the 2023 model linkage arm assembly and axle have been redesigned and also feature a small tool carrier. From the picture, it also looks like Orbea may possibly be using seals on the upper pivot axle. I hope this is so.
It does make you wonder if it's possible to retro fit a 2022 model with the 2023 linkage arms and axle?
View attachment 102440

Rod B.
E*POWAH Master
- Thread starter
- #142
MAster,Hi,
another question, probably wrong here, is the gap on the left side of the main pivot normal? Bike is new, but already dust in the gap.
Cheers
View attachment 102779
I hope you are enjoying your new Rise. How's the riding in Germany?
For those who are following this thread, what you see pictured is the lower chain stay assembly and lower pivot axle bushing which is the slightly tan colored item seen in the small gap.
MAster, the small gap is normal for the Rise, M Series Carbon. Depending upon the riding conditions in your area, you will need to occasionally remove the lower pivot axle to clean and re-grease the lower pivot axle assembly and also check and re-grease the lower pivot axle bearings. I like to do this about every 1,000 miles - 1,600 km.
I wrote a tech article titled "PART # 2 - Orbea Rise - Lower Main Linkage Axle and Bearing Service." The article has diagrams and goes into detail on the lower pivot axle assembly and how it works.
PART # 2: ORBEA RISE - LOWER MAIN LINKAGE AXLE AND BEARING SERVICE
This is Part Two in a two part series on servicing the Rise pivot bearings and linkage. Part Two will discuss servicing the Rise's lower main pivot axle and bearings. If possible, please read Part One before continuing with this article. In Part One, "Orbea Rise - Upper Linkage Axle and Bearing...
 www.emtbforums.com
Diagram depicting the Rise M Series Carbon lower pivot axle assembly
cookie70
Active member
So my rear end is loose again.. I looked a back through this thread and I did the loctite service back in mid june. I hope that the updated axle and arms from the new model fit the old bike and solves this for good! Any word on that?
Rod B.
E*POWAH Master
- Thread starter
- #144
Cookie,So my rear end is loose again.. I looked a back through this thread and I did the loctite service back in mid june. I hope that the updated axle and arms from the new model fit the old bike and solves this for good! Any word on that?
I have not heard anything. The 2023 Rise Blue Paper hasn't been released yet. I also checked the "Spare Parts" section on Orbea's website to get a look at the 2023 axle and linkage arms, to see if it might work. The 2023 Rise parts haven't been posted yet.
Decolocsta
Active member
I bet it Works without any Problem.
Dont think orbea has changed more than needed.
Dont think orbea has changed more than needed.
I realized that the cracking sound is louder while pedaling with the seat and dropper in highest position and in fact, I have a 210mm dropper so it might produce more strength and leverage into the linkeage and so that on bearings. Perhaps it's the main cause that the cracking sound comes as soon after revision...
Decolocsta
Active member
A longer Travel dropper did Not put more Stress on the linkeage. It produces less Stress. More Travel dropper is longer, reaches deeper into the seat tube.I realized that the cracking sound is louder while pedaling with the seat and dropper in highest position and in fact, I have a 210mm dropper so it might produce more strength and leverage into the linkeage and so that on bearings. Perhaps it's the main cause that the cracking sound comes as soon after revision...
You have your riding height, its Not getting Longer By having More travel.
I think it might be the same as the Rallon linkage - but different non asymetric jokeCookie,
I have not heard anything. The 2023 Rise Blue Paper hasn't been released yet. I also checked the "Spare Parts" section on Orbea's website to get a look at the 2023 axle and linkage arms, to see if it might work. The 2023 Rise parts haven't been posted yet.

Last edited:
cookie70
Active member
Stripped and redid upper axle. It was getting play on the drive side every ride. Used 638 compound on the drive side, I felt I did not need to pull apart the non drive side as that is still solid from last application.
I'm very surprised and happy with the condition of all the bearings, after 9 months 2600kms hard riding in all conditions they are still in great condition. I have always run a rear mudgaurd so I think this helps alot!
Hopefully in the coming months Orbea will respond regarding a possible solution using the new design. Otherwise I will source replacement axle and arms and do the 638 on it from first install. I think my axle is worn enough that it will always eventually need reapplication.
hind-corners
Member
Correct me if I’m wrong 2023 Hydro still uses old design. At least thats how it looks in the pictures. Just wondering when I looked images after post from cookie70.
Mine still better than new after 4 months and I “loctited” it around 300kms.
Mine still better than new after 4 months and I “loctited” it around 300kms.
Similar Threads
-
 Giant SyncDrive Pro2 (Yamaha PW-X3) Motor axle bearings replacement
- Started by ceromx
- Replies: 0
-
-

-
-
 Sold 2024 Cascade Components Orbea Rise Link 170€: Europe
- Started by alex_o
- Replies: 1