Last night I was working in the garage, and I said to myself, "Self, some of the folks over at eMTB might enjoy seeing what you're doing." So I wiped off my hands, got out the phone, and took a few pictures.
My tale of woe is one that I'm sure many of you have experienced. The tiny hose clamp threads in my fork had become buggered up to the point of no longer working properly. Tie wraps are bush league. I'd sooner push an Amish bike than put tie wraps on my fork. There are plenty of solutions to the problem. Installing a helicoil is the most obvious, but it would required buying stuff that I don't want and it would take time to get the parts. I decided to enlarge the hole in the fork and install a smooth-sided bushing.
A smooth sided bushing that's epoxied into place can be really strong, especially in this application where everything is tiny and there isn't much outward pulling force. I'll describe making the bushing, but for those who are not so inclined, a threaded coupling would be a perfect solution that is easier. I would have used one if I had one. A threaded coupling is like a long cylindrical nut, often used to join threaded pieces. Another option that could be used here is a bushing with a threaded outside diameter. It would be easy to start with the appropriately sized screw, cut off the threaded portion, and then drill and tap a hole down the middle. This solution is great when there is a lot of outward pulling force, like the supercharger on your funny car. But I didn't need that.
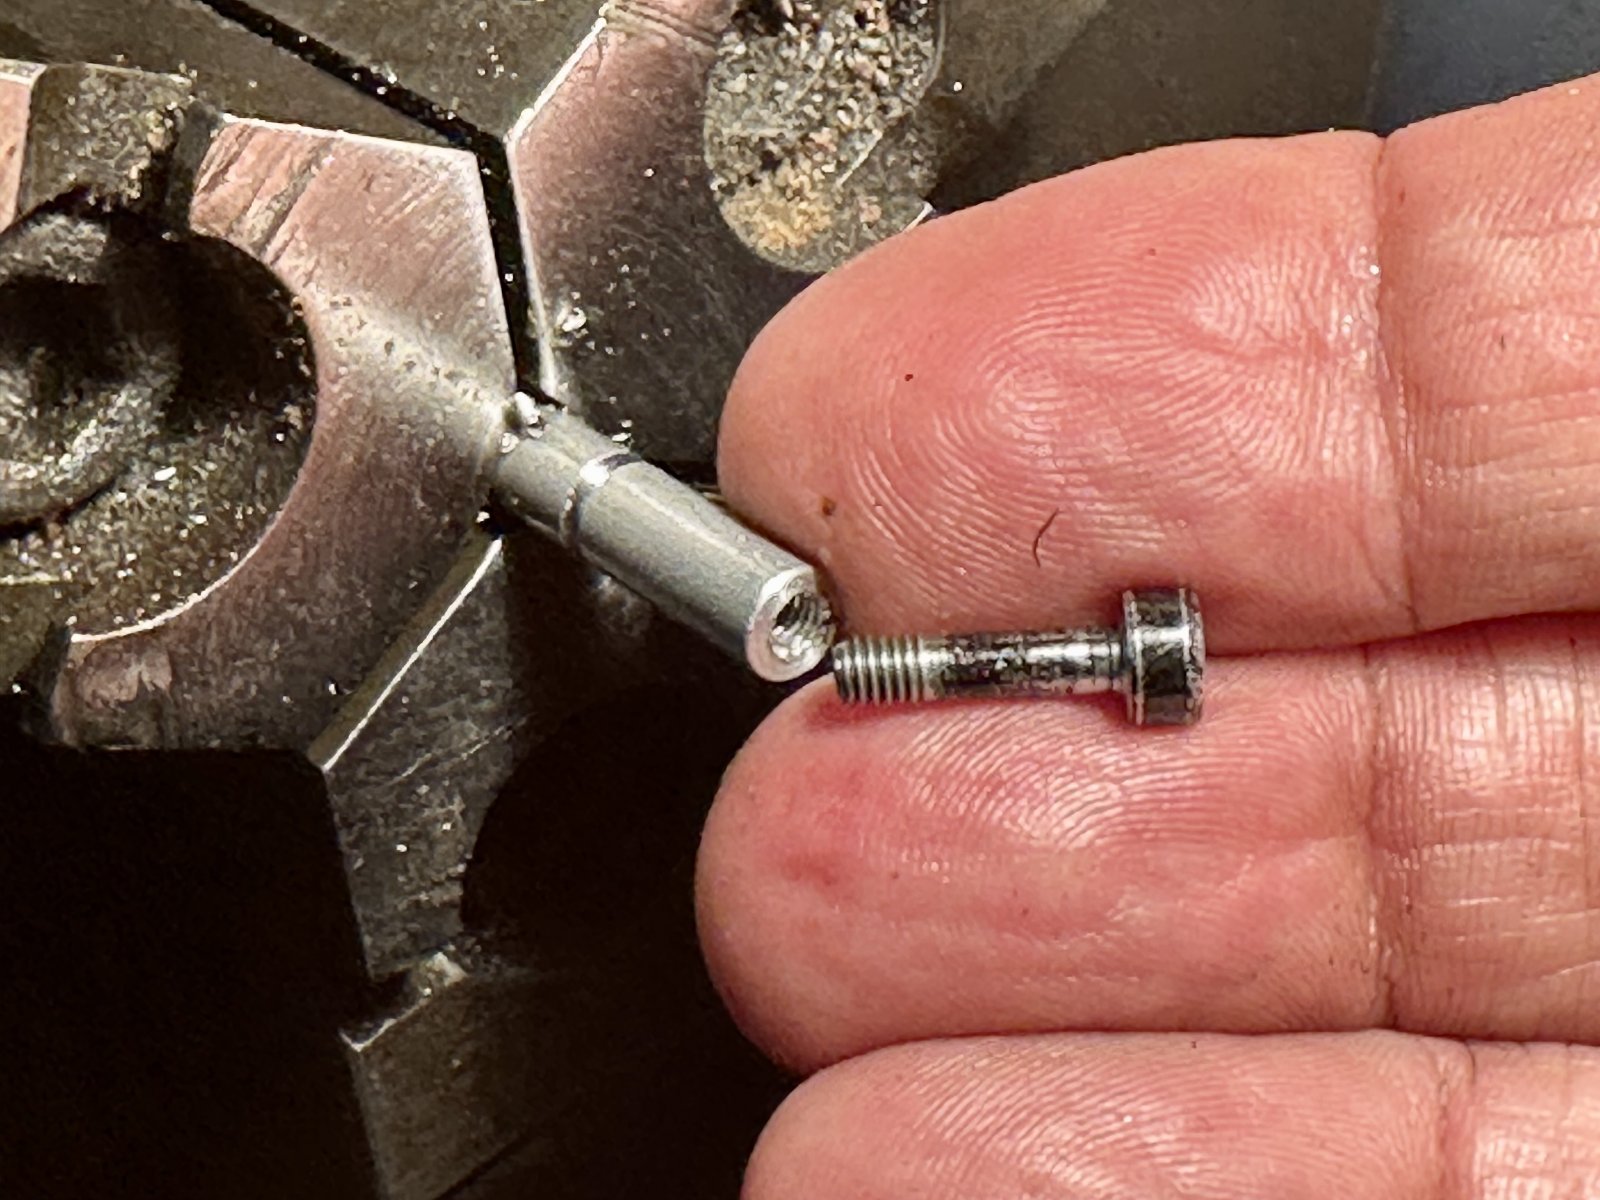
The threads on the hose clamp screw are M3-0.5. I found a 5mm rod in my pile of aluminum. Actually, it was a broken cleaning rod for a .22 caliber rifle. It was perfect. I drilled a hole down the middle and cut new threads using a tap. Although in the pictures you'll see I'm drilling the hole with a lathe, you can do perfectly good work on a drill press or even using a hand drill. Patience is key. I cut off with a hacksaw, filed the corners, and roughed up the outside diameter. The bushing was complete.
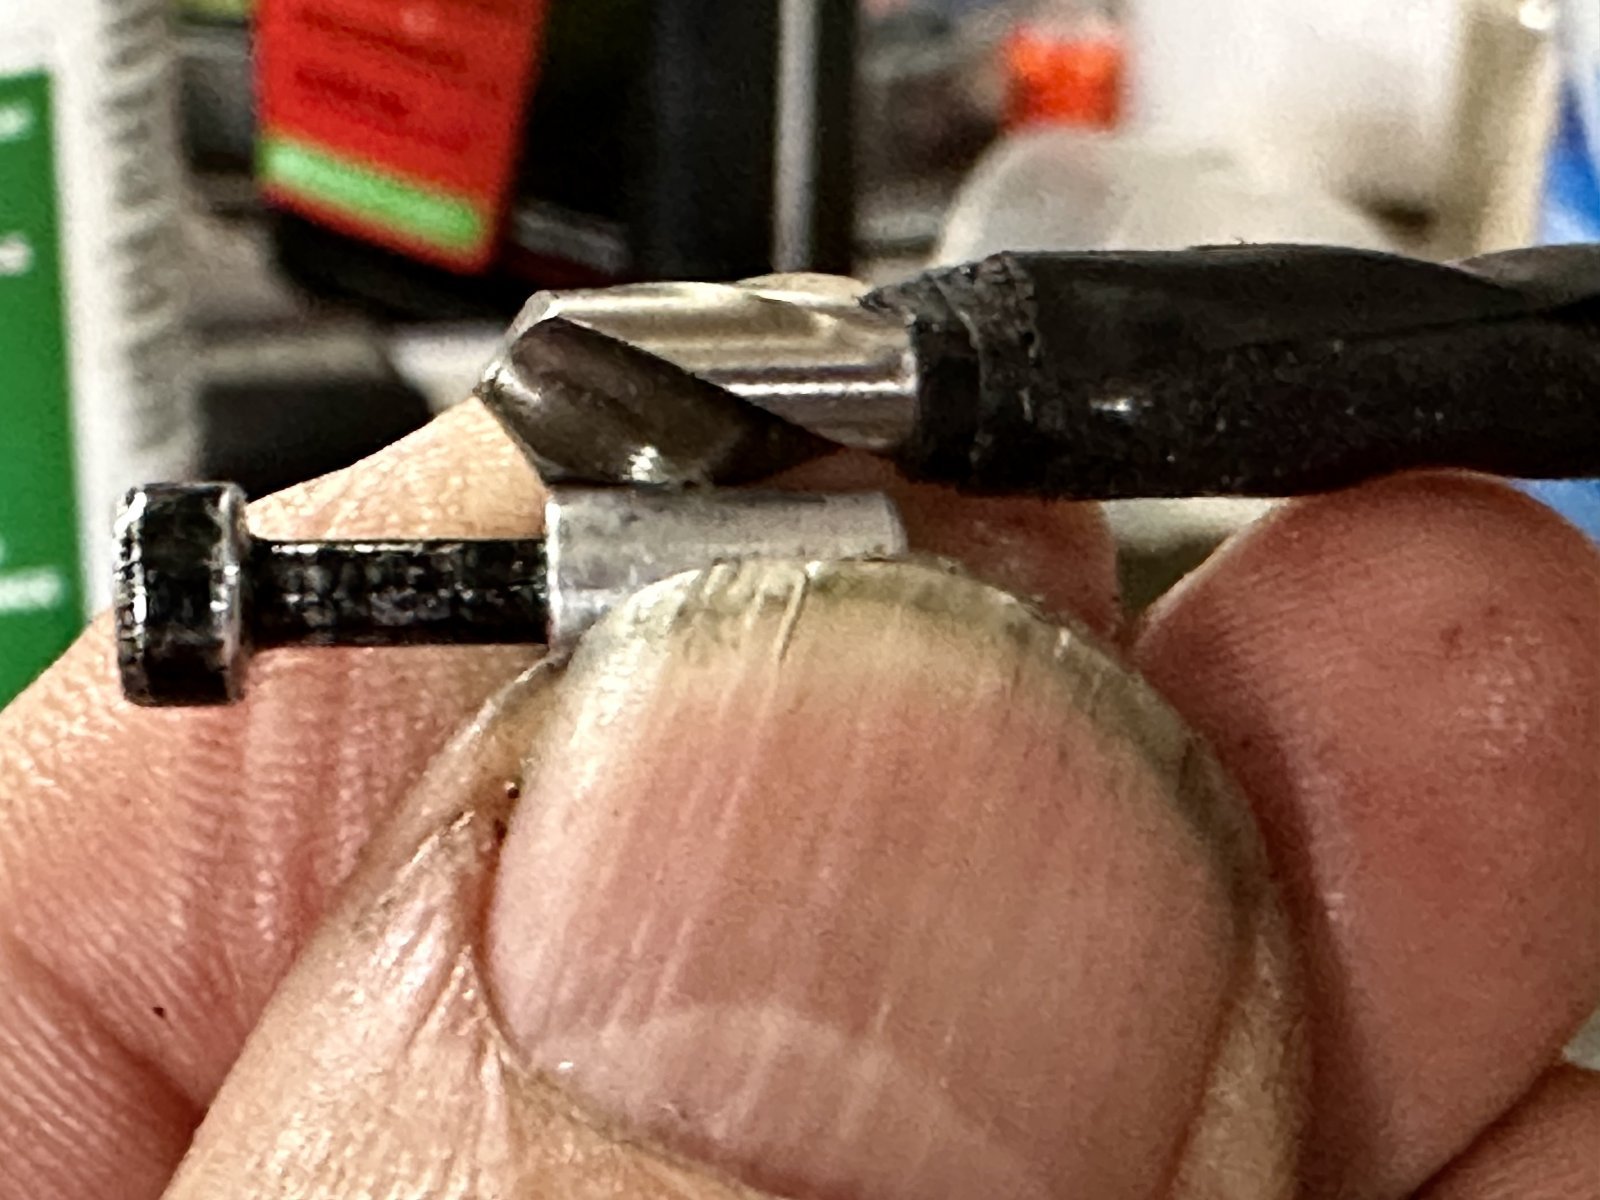
Drilling the fork is really no big deal. I precisely determined the depth of the hole by sticking a tiny allen wrench in the hole, and holding my thumb at the edge. That's how I measured the length of the bushing. You'll see in the picture that I'm just as precise in determining how deep to drill the hole in the fork. I eyeballed the bushing against the drill bit, and marked it with a piece of tape. The OD of the bushing is 0.197", so I used a 0.199" diameter drill. I drilled the hole with a hand-held electric drill motor. Precisely drilling holes by hand is an acquired skill that everyone needs to learn. If you don't have it, now's a good time to start. The exact location of the hole isn't all that important in this case. It's just a hose clamp.
After everything was all set up, I hosed everything down with brake cleaner. I mixed up some epoxy and carefully coated the inside of the hole with a sharpened chop stick. Then I coated the outside of the bushing. The key is to avoid being sloppy. You want to keep the epoxy away from your threads. If you put too much epoxy in the fork hole, you'll force the epoxy back through the threaded bushing hole. That would be a bummer. I left the screw in the bushing to inhibit intrusion of epoxy. I like to use JB Weld epoxy. It's a phenomenal product at a cheap price. In this case, I used some stuff called PC-11 because I wanted to. I had no reason other than that.
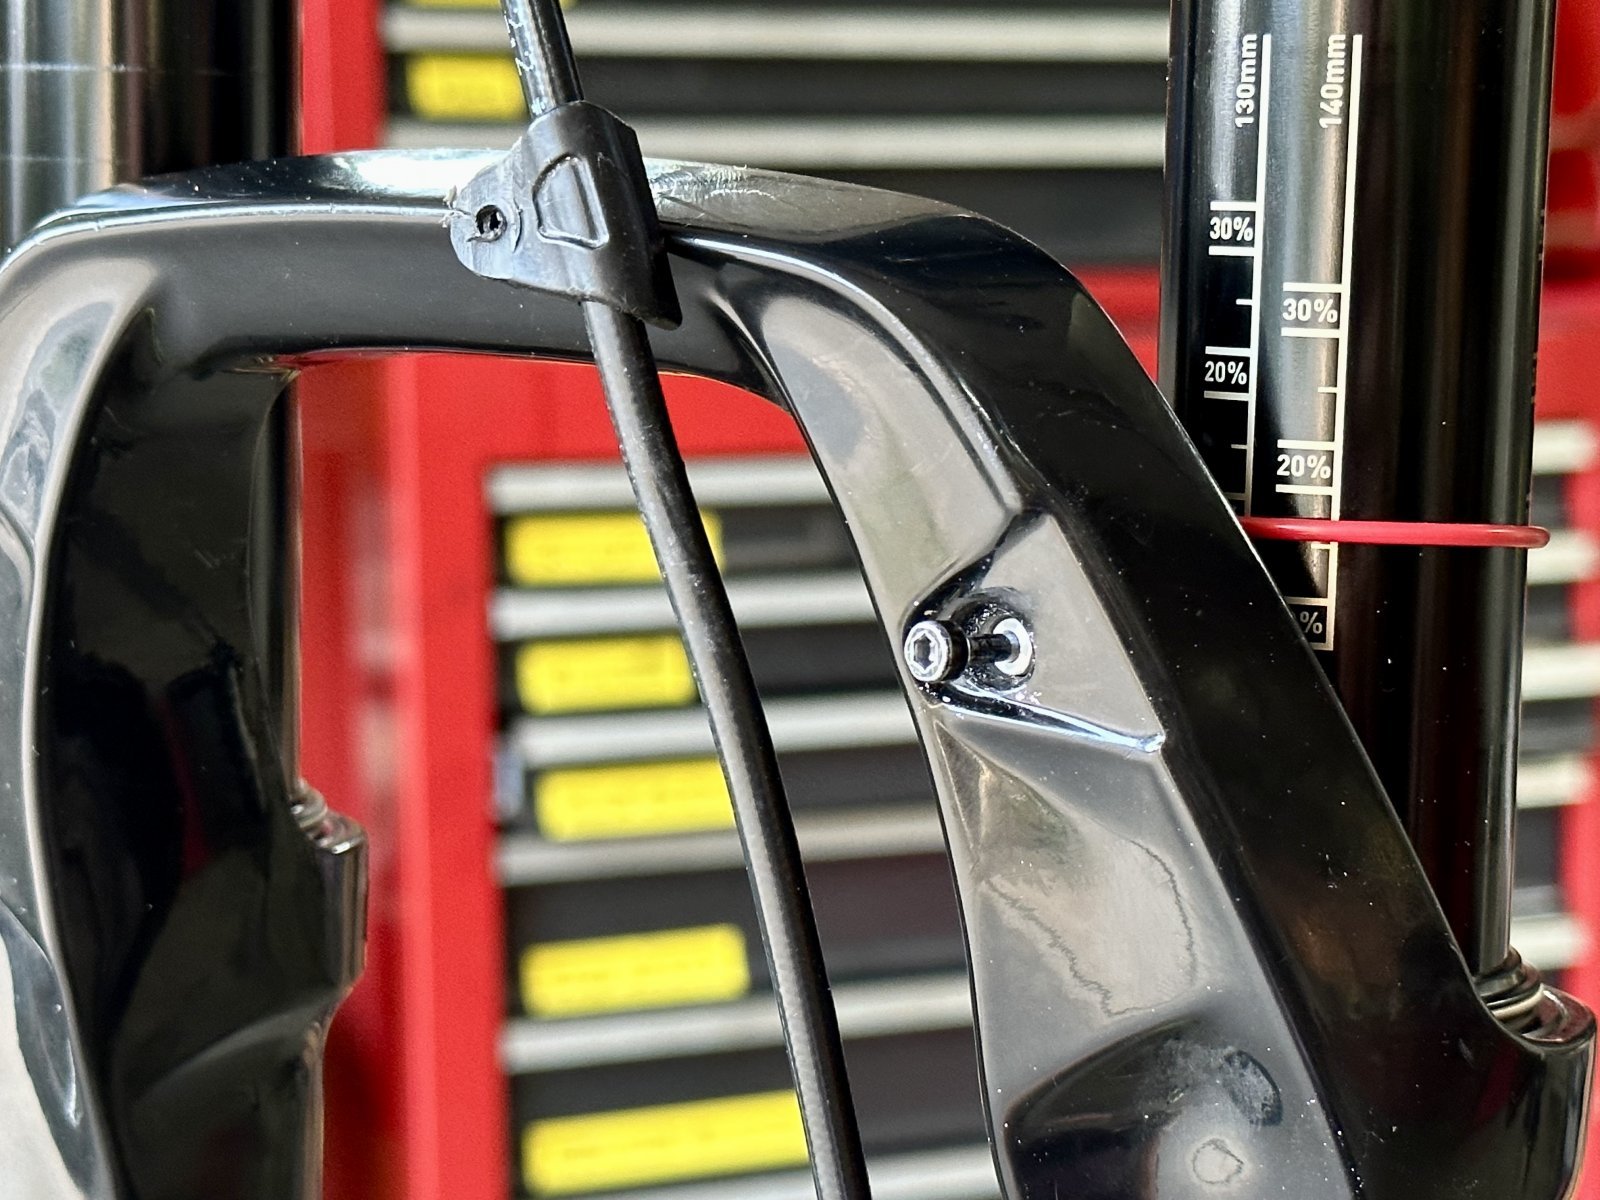
This morning I went out to the garage, the epoxy was set up, and I slapped everything back together. Good as new... maybe better.
Finished threads in the bushing:

Marking drill bit for proper depth:

Finished repair, ready to reassemble:

My tale of woe is one that I'm sure many of you have experienced. The tiny hose clamp threads in my fork had become buggered up to the point of no longer working properly. Tie wraps are bush league. I'd sooner push an Amish bike than put tie wraps on my fork. There are plenty of solutions to the problem. Installing a helicoil is the most obvious, but it would required buying stuff that I don't want and it would take time to get the parts. I decided to enlarge the hole in the fork and install a smooth-sided bushing.
A smooth sided bushing that's epoxied into place can be really strong, especially in this application where everything is tiny and there isn't much outward pulling force. I'll describe making the bushing, but for those who are not so inclined, a threaded coupling would be a perfect solution that is easier. I would have used one if I had one. A threaded coupling is like a long cylindrical nut, often used to join threaded pieces. Another option that could be used here is a bushing with a threaded outside diameter. It would be easy to start with the appropriately sized screw, cut off the threaded portion, and then drill and tap a hole down the middle. This solution is great when there is a lot of outward pulling force, like the supercharger on your funny car. But I didn't need that.
The threads on the hose clamp screw are M3-0.5. I found a 5mm rod in my pile of aluminum. Actually, it was a broken cleaning rod for a .22 caliber rifle. It was perfect. I drilled a hole down the middle and cut new threads using a tap. Although in the pictures you'll see I'm drilling the hole with a lathe, you can do perfectly good work on a drill press or even using a hand drill. Patience is key. I cut off with a hacksaw, filed the corners, and roughed up the outside diameter. The bushing was complete.
Drilling the fork is really no big deal. I precisely determined the depth of the hole by sticking a tiny allen wrench in the hole, and holding my thumb at the edge. That's how I measured the length of the bushing. You'll see in the picture that I'm just as precise in determining how deep to drill the hole in the fork. I eyeballed the bushing against the drill bit, and marked it with a piece of tape. The OD of the bushing is 0.197", so I used a 0.199" diameter drill. I drilled the hole with a hand-held electric drill motor. Precisely drilling holes by hand is an acquired skill that everyone needs to learn. If you don't have it, now's a good time to start. The exact location of the hole isn't all that important in this case. It's just a hose clamp.
After everything was all set up, I hosed everything down with brake cleaner. I mixed up some epoxy and carefully coated the inside of the hole with a sharpened chop stick. Then I coated the outside of the bushing. The key is to avoid being sloppy. You want to keep the epoxy away from your threads. If you put too much epoxy in the fork hole, you'll force the epoxy back through the threaded bushing hole. That would be a bummer. I left the screw in the bushing to inhibit intrusion of epoxy. I like to use JB Weld epoxy. It's a phenomenal product at a cheap price. In this case, I used some stuff called PC-11 because I wanted to. I had no reason other than that.
This morning I went out to the garage, the epoxy was set up, and I slapped everything back together. Good as new... maybe better.
Finished threads in the bushing:

Marking drill bit for proper depth:

Finished repair, ready to reassemble:

