Rod B.
Well-known member
Greetings,
This will be the third installment in a three part series on suspension. This third installment will cover hacking a Fox Float X Performance shock and other small performance tips that you can do to improve your suspension.
You can find read the first two installments via the following links:
 www.emtbforums.com
www.emtbforums.com
The purpose of the three technical articles is to provide information that newer mountain bikers may find useful. More advanced riders may find the information basic. Maybe not, we're never to old to learn new things. Suspension can make or break a bike and we pay a lot of money for modern suspension, let's get the most out of it.
Hack # 1: Fox Float X Performance:
The Float X is available to the public in two forms. They are the Fox "Factory" and "Performance Elite" models. A review of Fox's website reveals there isn't a Performance Float X offered for sale. That's because the Fox Float X is an "O.E.M." shock which Fox makes available only to bicycle manufacturers.
To better understand the hack, it's important to understand the break down between Fox Float X series of shocks:
Fox Factory: The Fox Float X "Factory" comes with a Kashima coating, a separate High and Low Speed compression adjustment and a Rebound adjustment. The Kashima coating looks spiffy, however is it worth $100 extra in performance? The Fox Factory Float X will set you back $599.
Fox Performance Elite: The Fox Float X "Performance Elite" comes with a black stanchion coating, a separate High and Low Speed compression adjustment and a Rebound adjustment. You may be thinking "Hey, what's the difference between the two?" The Performance Elite comes with a murdered out appearance and black stanchions. I personally like my bikes murdered out, so I'm all for the black coating. The Fox Float X Performance Elite will set you back $519. You save $80 by opting for the very cool black coating.
Fox O.E.M. Float X Performance: The Fox Float X "Performance" comes with the same black stanchion coating as the Performance Elite. The Performance model has a High Speed Compression adjustment the same as the Factory and Performance Elite. The Fox Float X Performance has a rebound adjustment the same as the Factory and Performance Elite models. The Float X Performance lacks a Low Speed Compression Adjustment.
You can source a brand new "Take Off" Fox Float X Performance online for $250 and even lower used. The 210mm x 55mm Float X Performance is a direct bolt on replacement for the Rise Float DPS and a worthy upgrade.
You have to ask yourself, ‘Is a low speed compression adjustment worth $269 in extra cost?’ If you are a newer rider, no it’s not.
If you are on a budget, or maybe a newer rider and you wish to upgrade the Float DPS on your Rise or Wild, then the OEM Fox Float X Performance is an excellent choice.
Suppose I told you that you could modify the Float X Performance model and give it a low speed compression adjustment for $30. It will turn the Performance shock into a semi Performance Elite? Who doesn't like saving $239....?
Below is depicted a Fox Float X Performance model. You will note there is a black plastic, non-adjustable cap in place of the blue low speed compression adjustment knob found on the Performance Elite. Beneath the black plastic cap is the low speed compression adjustment shaft. The LSC shaft is capable of providing four clicks of LSC. The bike manufacturer determines which of the four clicks of adjustment the black plastic cap is placed upon.
As a side note, the Performance Elite utilizes a slightly different LSC damper valving which gives the Performance Elite 11 clicks of LSC adjustment.
Fox Float X OEM Performance Fox Float X Performance Elite


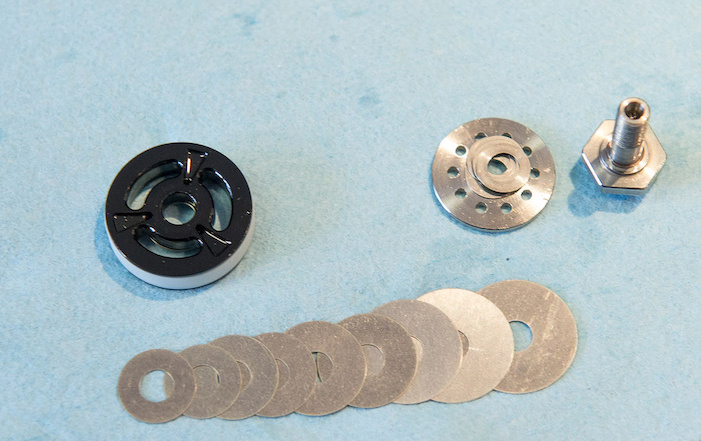
You can purchase a replacement low speed compression adjustment knob and detent ball bearing kit via your local bike shop. The kit is referenced under Fox Part # 808-17-470 KIT.
If you don't wish to purchase the blue LSC compression adjustment knob, you can pop off the black plastic cap. Using a pair of pliers, you can adjust LSC using the LSC shaft which protrudes from the shock body. After you are done, the cap can be snapped back into place.
Here is a link to Fox's webpage which details how to perform the upgrade on a Performance Float X.

 www.ridefox.com
You can also find several YouTube videos which detail how to perform the hack.
Important Note: I spoke with Fox and they state this modification will give you four clicks of Low Speed Compression Adjustment. However, after installing the LSC knob, the blue LSC knob will turn 11 clicks. Is Fox telling the truth about the four clicks? At the time I spoke to Fox, the hack was not readily known. Fox may have been attempting to protect the higher cost of the Performance Elite. Maybe Fox is telling the truth, I believe so. Fox states the Performance Elite uses a different LSC damper valving which gives the Performance Elite an actual 11 clicks of adjustment. Theoretically, you could disassemble the Performance OEM shock and replace the LSC valving. However the high cost would not justify the modification.
Hack # 2: Fork Stanchion Wiper Seal Quick Lube
All forks whether Rockshox or Fox, utilize a wiper seal which is located at the top of the fork's lower leg assembly. Underneath the wiper seal is an oil saturated foam ring. The oil saturated foam ring serves the extremely important purpose of lubricating the stanchion.

The purpose of the black rubber fork wiper seal is to wipe debris off of the fork upper as it compresses and rebounds inside the lower leg assembly.
.jpg")
The lower leg assembly on the Fox 36 has two bushings, one at the top of the lower leg assembly and the other at the bottom of the lower leg assembly. The two bushings keep the upper fork assembly in alignment and running straight and true within the lower leg assembly.
The lower leg assembly contains oil which is used to lubricate the foam rings and bushings. Without the oil saturated lubrication that the foam rings provide,, your stanchions and the upper bushing will have severe stiction.
A dry or dirt caked foam ring will cause stanchion scoring if allowed to run dry for an extended period of time. If the upper assembly becomes badly scored, it cannot be fixed and will need to be replaced.
Note, a minor stanchion scratch can be fixed with a slight coating of clear fingernail polish. If the scoring is not fixed, the scoring will carry dirt past the wiper seal and into your fork. The contamination will quickly wear out your fork bushings.
Depicted in the photo below is a fork wiper seal, oil saturated foam O ring and upper bushing.

You want to avoid having your fork's wiper seal and foam ring look like what is pictured in the photo below. Imagine what the upper fork must have looked like. This my friends is really bad “JU JU", don't let this ever happen to your fork.

Fox recommends that a complete seal service be performed every 150 hours of operation. A wiper seal service typically includes replacing the wiper seal, foam ring and lower leg assembly oil.
Rockshox recommends cleaning the foam ring and replacing the lower oil every 50 hours and at 200 hours, perform a full fork service.
I am religious about performing regular wiper seal services on my forks. I do not always replace the rubber wiper seal, but I do replace or clean the foam ring. I also replace the lower leg assembly oil which is used to keep the foam ring saturated with oil.
It’s important to know that over time, the foam ring will become caked with dirt. The dirt prevents the foam ring from lubricating the stanchion. The caked dirt will act like a scouring pad on your stanchion and destroy it. Furthermore, a dry or dirty foam ring will create loads of stiction and cause your fork to run very harsh on the top end. A harsh riding fork will cause hand fatigue. So my friends, Keep your wiper seal foam ring clean and well oiled.
Here is a link to a Fox video detailing how to perform a complete wiper seal service. Most people can perform this service themselves.
Typically, the open damper side of a Fox lower leg has approximately 40cc of Fox Teflon infused suspension oil whereas the air side of the lower leg has 10cc of Fox Gold oil. Which type of oil your fork takes depends on the the fork chamber, i.e. damper side or air side and the model of the fork.

IMPORTANT: At least once a week, or even better, before every ride, you need to turn your bike upside down and let it sit there for 30 minutes. Seriously, you need to do this. Turning your bike upside down will allow the oil in the lower leg assembly to flow down to the upper bushing and also saturate the foam ring with oil.
Okay let's talk about the hack. Occasionally there will come a time where you are going to be doing a critical ride and you want the very best performance from your fork. You want your fork to perform like new and with zero stiction.
It’s possible to saturate the foam O ring externally. This hack will give the fork an immediate like new plushness.
Note, you don't want to do this hack frequently. If done frequently, it will cause excessive build up of debris around the wiper seal. Ideally, you want to turn your bike over and saturate the foam ring before a critical ride. Suppose however, you don’t have time and your fork is riding harsh on the top end from stiction? Here’s what you do:
To perform this hack it takes about ten minutes. You will need three things:
1. You will need the appropriate Fox oil for each lower leg assembly, i.e. Teflon infused oil for the damper side of the lower leg and Gold oil for the air bath side.
2) You will need a plastic pick like what's pictured. They can be easily purchased on Amazon. I keep one in my bicycle tool drawer for shock O ring service. You want to use a plastic pick to prevent scratching the stanchion.

3. You will need an industrial size syringe. These have a larger, non-sharp injection port. You will use the syringe to inject lubricant into the wiper seal.

To perform the service, I load the syringe with the appropriate Fox or Rockshox oil. I place the plastic pick against the stanchion and delicately pry the wiper seal away from the stanchion to form an opening. I inject oil into the opening using the syringe. if you dislodge the steel spring band from the wiper seal it will make prying easier. Note, once you are done with the procedure, place the spring band back in place on the wiper seal.
Once a gap has been opened, place the tip of the syringe in the wiper seal opening you created and inject a very slight amount of oil into the gap. Do not overly saturate with oil. We're talking just a little bit. Do this procedure repeatedly as you work your way totally around the wiper seal. When your done, take a rag soaked with rubbing alcohol and completely clean the oil from the stanchion and wiper seal. If you don't do this, the excess oil will cause a large amount of dirt to accumulate on the wiper seal.
This procedure will give your fork a like new plushness with zero stiction. The remedy will last for a few days. It’s much better to occasionally turn your bike over to lube the foam rings instead. However, if time doesn’t allow for turning the bike over, this hack will serve well and alleviate stiction.
As stated, you don't want to do this hack often. Injecting oil down into wiper seal tends to cause excess dirt build up around the wiper seal.
Hack # 3: Zero stiction quick and fast
Maxima makes a spray product called "SC1." It's a clear silicone spray that is used by bike and auto detailers to make rubber components look like new. The stuff is expensive, but absolutely worth every single penny or Euro. I very much endorse this product.
SC1 can make the rattiest death trap of a bicycle or car look like brand new and unstick any dropper post, fork or rear shock stiction.

I use SC1 on all areas of my bike with one exception. You CANNOT let this stuff get anywhere near your brakes or rotors. When using SC1, I will literally step a short distance away from my bike and spray a small amount onto a rag. I will then return back to the bike and wipe it down. This includes cables, wheels, brake levers, frame, and handelbar. The SC1 silcone spray will attract fine dust, but it really helps keeps mud and other debris from sticking like glue to the bike.
My Specialized Levo has a flat matte carbon finish which allows mud to stick like glue to the frame. Those of you who have a matte carbon frame know what I'm talking about. SC1 prevents debris from sticking like glue. It can be easily washed off post ride. I especially like applying a light coating of SC1 via a rag to the stanchions on my fork, shock and dropper post. This quickly eliminates stiction.
Note, if you do contaminate your brakes with SC1, you will need to perform a perform a brake pad and rotor cleaning service using rubbing alcohol to remove the SC1..
Here is a picture of my bike after a wet Blackstar Canyon ride.

Here's my bike after a wash and a wipe with Maxima SC1

An astute viewer may notice my Levo in this picture is sporting a Fox Float X Performance with a blue Low Speed Compression knob hack. As NASA would state...my Fox X2 suffered a catastrophic air loss and died. It's currently being warrantied by Fox. I'm using my Fox Float X in the mean time.
Hack # 4: Rubber Stair Tread Grip Tape
Okay, this hack has absolutely nothing to do with suspension. I'm tired and throwing it in before I go to bed. Most after market bicycle frame protection brands charge a left testicle for clear frame protection tape. Anybody whose laid their bike down fairly hard on rocky ground, soon realizes the stuff doesn't protect diddly squat.
There's a company called Safe Way Traction, that sells a 1 inch wide x 60 feet length roll of black rubberized, no grit, stair tread traction tape (Item # 3510-1). The tape is extremely durable and tough. A roll of the rubber tape costs about $25 for a 60 foot roll.
I love this stuff and use it on all of my bikes. In the picture above, you can see I applied the rubberized traction tape to my seat and chain stays, down tube and top tube. My shorts tend to rub against the top tube and I'll occasionally rest my trail pack on the top tube. The rubber traction tape prevents the top tube or my stays from being scratched. My bike and the tape look like new despite having over a thousand miles on them.


Unfortunately, the tape isn't currently available in the one inch width on Amazon. A two wide width is available but costs a bit more.


I hope you have found this series on suspension and hacks useful. If you have any questions about suspension, feel free to send me a private message or post a comment.
Be safe,
Rod
This will be the third installment in a three part series on suspension. This third installment will cover hacking a Fox Float X Performance shock and other small performance tips that you can do to improve your suspension.
You can find read the first two installments via the following links:
Technical Article, Part # 1: Suspension, The Ups, The Downs, The Hacks
Hello, It's been a while since I've posted anything for the Orbea Forum. This will be a three part series on basic suspension and simple to perform suspension hacks that you might find interesting and helpful. If you have a "Simple" to perform suspension hack, post it to this thread so others...
www.emtbforums.com
Technical Article, Part # 2: Suspension, The Ups, The Downs, The Hacks
This is Part Two in a three part series on suspension, tuning, hacks and tips. I've always enjoyed the people on the Orbea forum and I've met a lot of good people and many new ride partners through this forum. If you're looking for new ride partners, I encourage you to reach out to other members...
www.emtbforums.com
The purpose of the three technical articles is to provide information that newer mountain bikers may find useful. More advanced riders may find the information basic. Maybe not, we're never to old to learn new things. Suspension can make or break a bike and we pay a lot of money for modern suspension, let's get the most out of it.
Hack # 1: Fox Float X Performance:
The Float X is available to the public in two forms. They are the Fox "Factory" and "Performance Elite" models. A review of Fox's website reveals there isn't a Performance Float X offered for sale. That's because the Fox Float X is an "O.E.M." shock which Fox makes available only to bicycle manufacturers.
To better understand the hack, it's important to understand the break down between Fox Float X series of shocks:
Fox Factory: The Fox Float X "Factory" comes with a Kashima coating, a separate High and Low Speed compression adjustment and a Rebound adjustment. The Kashima coating looks spiffy, however is it worth $100 extra in performance? The Fox Factory Float X will set you back $599.
Fox Performance Elite: The Fox Float X "Performance Elite" comes with a black stanchion coating, a separate High and Low Speed compression adjustment and a Rebound adjustment. You may be thinking "Hey, what's the difference between the two?" The Performance Elite comes with a murdered out appearance and black stanchions. I personally like my bikes murdered out, so I'm all for the black coating. The Fox Float X Performance Elite will set you back $519. You save $80 by opting for the very cool black coating.
Fox O.E.M. Float X Performance: The Fox Float X "Performance" comes with the same black stanchion coating as the Performance Elite. The Performance model has a High Speed Compression adjustment the same as the Factory and Performance Elite. The Fox Float X Performance has a rebound adjustment the same as the Factory and Performance Elite models. The Float X Performance lacks a Low Speed Compression Adjustment.
You can source a brand new "Take Off" Fox Float X Performance online for $250 and even lower used. The 210mm x 55mm Float X Performance is a direct bolt on replacement for the Rise Float DPS and a worthy upgrade.
You have to ask yourself, ‘Is a low speed compression adjustment worth $269 in extra cost?’ If you are a newer rider, no it’s not.
If you are on a budget, or maybe a newer rider and you wish to upgrade the Float DPS on your Rise or Wild, then the OEM Fox Float X Performance is an excellent choice.
Suppose I told you that you could modify the Float X Performance model and give it a low speed compression adjustment for $30. It will turn the Performance shock into a semi Performance Elite? Who doesn't like saving $239....?
Below is depicted a Fox Float X Performance model. You will note there is a black plastic, non-adjustable cap in place of the blue low speed compression adjustment knob found on the Performance Elite. Beneath the black plastic cap is the low speed compression adjustment shaft. The LSC shaft is capable of providing four clicks of LSC. The bike manufacturer determines which of the four clicks of adjustment the black plastic cap is placed upon.
As a side note, the Performance Elite utilizes a slightly different LSC damper valving which gives the Performance Elite 11 clicks of LSC adjustment.
Fox Float X OEM Performance Fox Float X Performance Elite
You can purchase a replacement low speed compression adjustment knob and detent ball bearing kit via your local bike shop. The kit is referenced under Fox Part # 808-17-470 KIT.
If you don't wish to purchase the blue LSC compression adjustment knob, you can pop off the black plastic cap. Using a pair of pliers, you can adjust LSC using the LSC shaft which protrudes from the shock body. After you are done, the cap can be snapped back into place.
Here is a link to Fox's webpage which details how to perform the upgrade on a Performance Float X.
2022 FLOAT X/DHX LSC Upgrade | Bike Help Center | FOX
You can also find several YouTube videos which detail how to perform the hack.
Important Note: I spoke with Fox and they state this modification will give you four clicks of Low Speed Compression Adjustment. However, after installing the LSC knob, the blue LSC knob will turn 11 clicks. Is Fox telling the truth about the four clicks? At the time I spoke to Fox, the hack was not readily known. Fox may have been attempting to protect the higher cost of the Performance Elite. Maybe Fox is telling the truth, I believe so. Fox states the Performance Elite uses a different LSC damper valving which gives the Performance Elite an actual 11 clicks of adjustment. Theoretically, you could disassemble the Performance OEM shock and replace the LSC valving. However the high cost would not justify the modification.
Hack # 2: Fork Stanchion Wiper Seal Quick Lube
All forks whether Rockshox or Fox, utilize a wiper seal which is located at the top of the fork's lower leg assembly. Underneath the wiper seal is an oil saturated foam ring. The oil saturated foam ring serves the extremely important purpose of lubricating the stanchion.
The purpose of the black rubber fork wiper seal is to wipe debris off of the fork upper as it compresses and rebounds inside the lower leg assembly.
The lower leg assembly on the Fox 36 has two bushings, one at the top of the lower leg assembly and the other at the bottom of the lower leg assembly. The two bushings keep the upper fork assembly in alignment and running straight and true within the lower leg assembly.
The lower leg assembly contains oil which is used to lubricate the foam rings and bushings. Without the oil saturated lubrication that the foam rings provide,, your stanchions and the upper bushing will have severe stiction.
A dry or dirt caked foam ring will cause stanchion scoring if allowed to run dry for an extended period of time. If the upper assembly becomes badly scored, it cannot be fixed and will need to be replaced.
Note, a minor stanchion scratch can be fixed with a slight coating of clear fingernail polish. If the scoring is not fixed, the scoring will carry dirt past the wiper seal and into your fork. The contamination will quickly wear out your fork bushings.
Depicted in the photo below is a fork wiper seal, oil saturated foam O ring and upper bushing.
You want to avoid having your fork's wiper seal and foam ring look like what is pictured in the photo below. Imagine what the upper fork must have looked like. This my friends is really bad “JU JU", don't let this ever happen to your fork.
Fox recommends that a complete seal service be performed every 150 hours of operation. A wiper seal service typically includes replacing the wiper seal, foam ring and lower leg assembly oil.
Rockshox recommends cleaning the foam ring and replacing the lower oil every 50 hours and at 200 hours, perform a full fork service.
I am religious about performing regular wiper seal services on my forks. I do not always replace the rubber wiper seal, but I do replace or clean the foam ring. I also replace the lower leg assembly oil which is used to keep the foam ring saturated with oil.
It’s important to know that over time, the foam ring will become caked with dirt. The dirt prevents the foam ring from lubricating the stanchion. The caked dirt will act like a scouring pad on your stanchion and destroy it. Furthermore, a dry or dirty foam ring will create loads of stiction and cause your fork to run very harsh on the top end. A harsh riding fork will cause hand fatigue. So my friends, Keep your wiper seal foam ring clean and well oiled.
Here is a link to a Fox video detailing how to perform a complete wiper seal service. Most people can perform this service themselves.
Typically, the open damper side of a Fox lower leg has approximately 40cc of Fox Teflon infused suspension oil whereas the air side of the lower leg has 10cc of Fox Gold oil. Which type of oil your fork takes depends on the the fork chamber, i.e. damper side or air side and the model of the fork.
IMPORTANT: At least once a week, or even better, before every ride, you need to turn your bike upside down and let it sit there for 30 minutes. Seriously, you need to do this. Turning your bike upside down will allow the oil in the lower leg assembly to flow down to the upper bushing and also saturate the foam ring with oil.
Okay let's talk about the hack. Occasionally there will come a time where you are going to be doing a critical ride and you want the very best performance from your fork. You want your fork to perform like new and with zero stiction.
It’s possible to saturate the foam O ring externally. This hack will give the fork an immediate like new plushness.
Note, you don't want to do this hack frequently. If done frequently, it will cause excessive build up of debris around the wiper seal. Ideally, you want to turn your bike over and saturate the foam ring before a critical ride. Suppose however, you don’t have time and your fork is riding harsh on the top end from stiction? Here’s what you do:
To perform this hack it takes about ten minutes. You will need three things:
1. You will need the appropriate Fox oil for each lower leg assembly, i.e. Teflon infused oil for the damper side of the lower leg and Gold oil for the air bath side.
2) You will need a plastic pick like what's pictured. They can be easily purchased on Amazon. I keep one in my bicycle tool drawer for shock O ring service. You want to use a plastic pick to prevent scratching the stanchion.
3. You will need an industrial size syringe. These have a larger, non-sharp injection port. You will use the syringe to inject lubricant into the wiper seal.
To perform the service, I load the syringe with the appropriate Fox or Rockshox oil. I place the plastic pick against the stanchion and delicately pry the wiper seal away from the stanchion to form an opening. I inject oil into the opening using the syringe. if you dislodge the steel spring band from the wiper seal it will make prying easier. Note, once you are done with the procedure, place the spring band back in place on the wiper seal.
Once a gap has been opened, place the tip of the syringe in the wiper seal opening you created and inject a very slight amount of oil into the gap. Do not overly saturate with oil. We're talking just a little bit. Do this procedure repeatedly as you work your way totally around the wiper seal. When your done, take a rag soaked with rubbing alcohol and completely clean the oil from the stanchion and wiper seal. If you don't do this, the excess oil will cause a large amount of dirt to accumulate on the wiper seal.
This procedure will give your fork a like new plushness with zero stiction. The remedy will last for a few days. It’s much better to occasionally turn your bike over to lube the foam rings instead. However, if time doesn’t allow for turning the bike over, this hack will serve well and alleviate stiction.
As stated, you don't want to do this hack often. Injecting oil down into wiper seal tends to cause excess dirt build up around the wiper seal.
Hack # 3: Zero stiction quick and fast
Maxima makes a spray product called "SC1." It's a clear silicone spray that is used by bike and auto detailers to make rubber components look like new. The stuff is expensive, but absolutely worth every single penny or Euro. I very much endorse this product.
SC1 can make the rattiest death trap of a bicycle or car look like brand new and unstick any dropper post, fork or rear shock stiction.
I use SC1 on all areas of my bike with one exception. You CANNOT let this stuff get anywhere near your brakes or rotors. When using SC1, I will literally step a short distance away from my bike and spray a small amount onto a rag. I will then return back to the bike and wipe it down. This includes cables, wheels, brake levers, frame, and handelbar. The SC1 silcone spray will attract fine dust, but it really helps keeps mud and other debris from sticking like glue to the bike.
My Specialized Levo has a flat matte carbon finish which allows mud to stick like glue to the frame. Those of you who have a matte carbon frame know what I'm talking about. SC1 prevents debris from sticking like glue. It can be easily washed off post ride. I especially like applying a light coating of SC1 via a rag to the stanchions on my fork, shock and dropper post. This quickly eliminates stiction.
Note, if you do contaminate your brakes with SC1, you will need to perform a perform a brake pad and rotor cleaning service using rubbing alcohol to remove the SC1..
Here is a picture of my bike after a wet Blackstar Canyon ride.
Here's my bike after a wash and a wipe with Maxima SC1
An astute viewer may notice my Levo in this picture is sporting a Fox Float X Performance with a blue Low Speed Compression knob hack. As NASA would state...my Fox X2 suffered a catastrophic air loss and died. It's currently being warrantied by Fox. I'm using my Fox Float X in the mean time.
Hack # 4: Rubber Stair Tread Grip Tape
Okay, this hack has absolutely nothing to do with suspension. I'm tired and throwing it in before I go to bed. Most after market bicycle frame protection brands charge a left testicle for clear frame protection tape. Anybody whose laid their bike down fairly hard on rocky ground, soon realizes the stuff doesn't protect diddly squat.
There's a company called Safe Way Traction, that sells a 1 inch wide x 60 feet length roll of black rubberized, no grit, stair tread traction tape (Item # 3510-1). The tape is extremely durable and tough. A roll of the rubber tape costs about $25 for a 60 foot roll.
I love this stuff and use it on all of my bikes. In the picture above, you can see I applied the rubberized traction tape to my seat and chain stays, down tube and top tube. My shorts tend to rub against the top tube and I'll occasionally rest my trail pack on the top tube. The rubber traction tape prevents the top tube or my stays from being scratched. My bike and the tape look like new despite having over a thousand miles on them.
Unfortunately, the tape isn't currently available in the one inch width on Amazon. A two wide width is available but costs a bit more.
I hope you have found this series on suspension and hacks useful. If you have any questions about suspension, feel free to send me a private message or post a comment.
Be safe,
Rod
Last edited: