Rod B.
Well-known member
This will be a three part technical article discussing Shimano braking system components, how to service your Shimano brakes and brake system modification on your Rise.
Part # 1 will discuss basic maintenance on your Shimano brakes.
Part # 2 will discuss brake modifications to your Orbea Rise.
 www.emtbforums.com
Part # 3 will discuss uneven brake rotor wear and checking your rotor for thickness.

 www.emtbforums.com
I am not a professional mechanic but I do enjoy working on bikes. I’ve built up many bikes in my lifetime. I presently own a highly modified Rise M20. I began working on bikes because I dislike waiting in a queue to have my bike fixed at my local bike shop. Who wants to wait two weeks for a repair? I’ve made a lot of mistakes and over time, I’ve learned a lot. The knowledge I've gained has contributed to many successful backcountry field repairs which prevented long walks back to the trailhead. Knowledge is a good thing, long walks back to the truck, absolutely suck…..
I am hopeful there will be no mistakes in Part # 1 and Part # 2 of this technical article, I am confident there will be. Should I make a mistake, please let me know so that I may correct the article. Hopefully this article will constantly evolve with time and input from you. If you ever have any question about something on your Rise, shoot me a message and I'll help you figure things out.
Let’s begin:
Shimano’s website provides parts diagrams and compatibility charts of all the manufacturer’s components and system levels. The parts diagrams are very useful when it comes to buying or identifying the correct replacement part, i.e. brake pads, brake hose, rotors, caliper adapters, etc. You don’t want to automatically assume something will fit on your bike. It most likely won’t. This is especially so when it comes to eBike parts.
To access parts diagrams and the compatibility chart, go to Shimano’s American or European website:
 bike.shimano.com
Once Shimano's home page has opened, you will see “Information” displayed on the top header bar. Click on Information and a drop down menu will appear. From the drop down menu, click on "Tech Docs" and you will be taken to Shimano's technical webpage which allows you to access compatibility charts, component parts diagrams, installation manuals, etc. Once you've dialed how to access and use the information, you'll find this page extremely useful for parts identification.

Click on Information and select Tech Docs


Shimano Brake Fluid:
Modern Shimano hydraulic disc braking systems use mineral oil. Mineral oil offers several benefits. It does not absorb water, it handles high braking temperatures well and unlike D.O.T. brake fluid, it will not ruin the paint job on your bike or fork if you suffer a spill during brake bleeding.
Some manufacturers such as SRAM, use a D.O.T. 5.1 type braking fluid. DOT brake fluids and mineral oils are NOT compatible and under no circumstances should the two fluids be mixed in your Shimano brake system. Should this ever occur, the rubber seals inside your brake levers and calipers will swell and your brakes will be ruined.
Mineral brake oil will darken with use. This is due to particulates from the normal wear and tear of braking components and seals becoming suspended in the oil. Shimano recommends that brake fluids be changed if a noticeable change in brake fluid color occurs. As a general rule, I like to flush and replace my braking fluids once a year.
Shimano recommends that you use Shimano brake fluid on Shimano braking systems. Due to covid supply chain issues, it can be difficult sourcing Shimano brake fluid. There are other manufacturers such as Maxima and Finish Line that sell acceptable mineral oil braking fluids, however they are green in color. Shimano brake fluid is tinted red in color. Try not to mix colors, use one or the other. If you mix colors, it makes it difficult to determine If the brake oil is discolored and dirty.
Here is a Shimano tech article on mineral oil brake fluids:
bike.shimano.com

Bleeding and Servicing Shimano Brakes:
Here is an excellent video produced by Park Tool on how to bleed your Shimano brakes. Whether you own a Shimano two piston brake caliper or four piston brake caliper, the bleed process is the same. If you plan to do your own brake bleed service, I recommend the Park Tool bleed kit, BKM-1. It has an excellent bleed block which comes with the tool kit. I describe below why I recommend this kit.
Shimano ceramic caliper pistons are extremely fragile. You absolutely need the correct bleed block when performing a brake bleed service or the piston will crack. Never pry directly on a ceramic piston with a hard object, i.e. screw driver. If you do, you stand a very good chance of damaging the piston. If you have to pry on a piston to collapse it back into the caliper during a brake pad replacement, keep the old brake pads in place and pry between them. Never pry directly against the piston. I always keep a used pair of brake pads in my tool box for this purpose.
All brake caliper pistons whether SRAM or Shimano, two piston or four piston, will start to seize up and get sticky with time. When this occurs, your brake pads will drag on the brake rotor creating a rubbing noise. Additionally, a sticky caliper piston will cause your brake pads to wear unevenly. This is because the sticky piston does not retract and keeps brake pad pressure against the rotor. The other pistons that are not sticky, retract and release pressure on the brake pads.
Example of an uneven wearing brake pad due to a sticky caliper piston

To understand why caliper pistons stick, you first need to know how your brake caliper operates. When you squeeze the brake lever, a piston in the brake lever housing forces brake fluid under pressure through the brake hose and into the brake caliper. Shimano uses a four sided, square edged piston seal in it's calipers. When the brake fluid advances the piston outwards, it rolls the four sided square edged piston seal outwards as the piston advances. Due to the rubber seal's elastic nature, it wants to return back to it's original shape. When you release the brake lever, fluid pressure is released, and the seal rolls back to it's original position, taking the caliper piston with it. To assist with retraction and brake pad alignment, Shimano and SRAM use a metal spring situated between the two brake pads.

After a period of use, trail dirt, braking pad compound, and traces of brake fluid will accumulate around the sides of the piston. This build up of crud will hinder the pulling nature of the piston seals and prevent piston retraction.

When a sticking piston first occurs, you will begin to hear the brake rotor rubbing against the brake pads. There are several other things that may cause a brake rotor rubbing noise. This includes a bent brake rotor or a caliper that is not centered on the brake rotor.
Rule out a bent rotor by shining a light upwards from beneath the caliper. Spin the wheel and look downwards at the caliper. Watch the rotor as it spins between the two brake pads. If you see a badly wobbling rotor, then it is bent and needs to be trued using a brake rotor truing tool. Park Tool, DT-2 works well at truing rotors. Note that no rotor is absolutely perfect and a very slight bit of wobble is acceptable.
If the brake rotor checks okay, next check to see if the caliper is centered on the brake rotor. To do this, loosen the two caliper bolts, squeeze the brake lever firmly. While holding tension on the brake lever, re-tighten the caliper bolts. Your caliper should now be centered on the rotor and no rubbing noise should be heard. If the brake rotor spins true, the caliper is correctly centered, and you still hear a rubbing noise, then you have dragging brake caliper piston(s).
Fortunately, its an easy fix to cure a dragging piston. You do this by scrubbing the sides of brake pistons using Q-Tips and mineral oil brake fluid. Here is an excellent video made by Park Tool which details how to clean brake caliper pistons. The video describes using Q-Tips to scrub the sides of the pistons. I find this method works well, but is not totally 100% effective. I also like to buff the sides of the pistons so they are smooth and polished. To do this, I use a long strip of cotton cloth torn from a cotton tee shirt or a piece of cotton twine. I partially wrap the cotton cloth around the piston and I push-pull the cotton cloth in a buffing action while working my way around each of the pistons. Once the pistons have been cleaned and lubricated with mineral oil, they should easily retract back into the caliper when pressed in. You will have a bit of excess mineral brake oil on the pistons and caliper after the cleaning process. Wipe off this excess oil so it doesn't attract dirt.
NOTE: It is imperative that you do not squeeze the brake lever so much that it forces a piston out of the caliper. It's very easy to do. If you do force the piston out of the caliper, you will need to re-bleed the brake system to remove all of the air that has entered the system.
******** HUGELY IMPORTANT - SHIMANO FOUR and TWO PISTON BRAKE CALIPERS **********
While performing the piston cleaning process on my XT Br-M8120 calipers, I accidentally pushed one of the ceramic pistons out of the bore. This resulted in loss of fluid and air entering the brake system. No biggie, I re-installed the ceramic piston and began the bleed process by placing a standard Shimano yellow bleed block between the four pistons. The bleed process was quickly performed. As I squeezed the brake lever to check for piston seal leakage, I heard a loud snapping noise come from the caliper. I then saw brake fluid dripping from the caliper. When I removed the bleed block, I saw that one of the small ceramic caliper pistons had cracked in half.
After reviewing the matter to figure out why this happened, I realized the spacer block I used, had not completely covered all four of the ceramic pistons. When I squeezed the brake lever, half of the ceramic piston stopped against the bleed block. The other half of the piston was not covered by the bleed block and tried to move forward. This caused the brake piston to shear in half.
YOU MUST MAKE ABSOLUTELY SURE THAT THE BLEED BLOCK YOU USE COMPLETELY COVERS ALL TWO OR FOUR OF THE CERAMIC CALIPER PISTONS. IF IT DOES NOT, THE PISTONS WILL CRACK WHEN THE LEVER IS SQUEEZED FIRMLY. PARK TOOL, BKM-1 COMES WITH AN EXCELLENT BLEED BLOCK WHICH PREVENTS THIS FROM OCCURRING.
I went online to order a replacement set of BR-M8120 pistons, only to discover that unlike SRAM, Shimano does not sell a replacement piston and seal kit. You must buy a whole new caliper. Because of covid and a lack of Shimano parts availability in the USA, I could not source just the caliper and had to buy a complete brake lever and caliper set.
If you Google "Shimano Cracked Pistons", you will see this is a significant issue which occurs during the brake bleed process. There are Chinese vendors on Amazon that sell replacement pistons however, these pistons are not ceramic and issues with heat expansion and brake failure are reported in user reviews. Properly functioning brakes is mission critical and I don't recommend experimenting with knock off pistons. As a side note, if anybody is looking for a brand new Shimano XT left brake lever hit me up, I have one for sell.
After the fiasco with the cracked caliper piston, I purchased Park Tool bleed kit, "BKM-1" which comes with an excellent bleed block and is perfect for bleeding Shimano two and four piston calipers. I highly recommend this bleed kit.
 www.parktool.com
Dirty Brakes, Done Dirt Cheap....
Occasionally you may experience a noisy/howling brake when the brakes are applied. This typically occurs if you have accidentally contaminated the brakes and or rotor during a bike cleaning or maintenance. It doesn't take much oil, grease or a cleaning agent to foul up your brakes. When this occurs, the contamination will cause the brake pads to glaze over and howl when the brakes are applied. I've also had clay like soils contaminate my brake pads and after a stream crossing, along with high heat, will create a glaze on the pads which hinders stopping and causes a lot of noise.
When contamination occurs, you will need to clean your brake pads and rotor in order to alleviate noise and restore braking performance. I will describe my own process for cleaning brake pads and rotors. Everybody has their own method, there are many. My method works well, I'm sure your method does also. I will also attach a video on decontamination of brake pads and brake rotor, in case you would rather watch a video.
Brake pad before cleaning and surfacing

The same brake pad after cleaning and surfacing

To clean my brake pads, I first remove them from the caliper. I mark the backside of the pads with a L for left and R for right. I do this so that they go back into the caliper in the same wear orientation. You don't need to mark finned pads. I use a sheet of 400 grit sandpaper, a can of Acetone and a very clean wiping rag. Isopropyl alcohol also works, but I prefer not to use it because it contains water.
I place the sheet of 400 grit sandpaper on a pane of glass which I bought from my local hardware store. The pane of glass serves as perfectly flat surface in which to surface the face of the brake pad. I pour a small amount of acetone on the sandpaper. I place the brake pad compound side down on the sandpaper. Using a figure 8 pattern, I slide the brake pad around on the sandpaper. I don't press down hard. I add acetone as needed in order to wash the contaminated material off of the sandpaper as I work the pad. It doesn't take much or long to surface and clean the pad. After surfacing the pad, I take a clean rag with acetone and wipe the pad clean.
With the wheels still on the bike, I take a piece of fine emory cloth sandpaper and I hold it against the side of the brake rotor while I spin the wheel. I do this to both sides of the brake rotor. After several full revolutions, I take a clean rag with acetone and completely wipe down both sides of the rotor. After you have completed the cleaning process and reassembled the brakes, you will need to bed the brakes in by running your bike up the street and applying the brakes several times. Do this until your brakes feel good. The braking action will deposit a trace amount of brake compound on both sides of the rotor and your brakes will function like new.
Brake Pads
Shimano offers several types of brake pad compounds, including resin and metallic. Given the heavy nature of eBikes and my large butt, I prefer metallic pads. I find metallic pads last longer and they don't fade as much as a resin pad will do on a hard downhill run. I find metallic pads tend to stop better when things become wet. On the flip side of the coin, resin pads tend to be quieter and they are not as abrasive on brake rotors as a metallic pad will be. Brake pads can also be purchased with cooling fins molded into the backing pad or they can come with just a plain backing pad.
Here is an excellent article by Shimano on brake pad compounds.
bike.shimano.com
Metallic brake pad with cooling fins

The same brake pad in resin and non-finned

Those of you who have tried to source Shimano N04C metallic or N03A resin brake pads with cooling fins, know they are rarer than unicorns and very costly. Plain backed brake pads are much more readily available. I don't know the effectiveness of the cooling fins, but they do look very cool...see what I did there? Personally, I don't see a big difference between finned or non finned brake pads. I'm positive they do provide an added cooling benefit, but is the benefit worth the cost? If you have trouble sourcing Shimano brakes pads, there are a number of companies that make equally good brake pads, Galfer, Kool Stop, Trucker, Jagwire, are just a few of the companies which manufacturer replacement brake pads.
To determine which pads your caliper model uses, refer to Shimano's compatibility chart.


I hope you find this article useful.
Cheers and be safe....
Part # 1 will discuss basic maintenance on your Shimano brakes.
Part # 2 will discuss brake modifications to your Orbea Rise.
PART # 2: SHIMANO BRAKE SYSTEM – Orbea Rise Brake System Modification
This technical article is the second installment in a two part series on Shimano brake systems. Refer to “Part # 1: Shimano Brake System Service”, for information on bleeding and servicing Shimano brakes and brake pad compounds...
www.emtbforums.com
Part # 3 will discuss uneven brake rotor wear and checking your rotor for thickness.
Part # 3: Shimano Brake System Service - EMTB Forums
After submitting Part # 1 and Part # 2 of the tech series on Shimano brakes, I realized I had not included anything on checking your Shimano brake rotor for minimum thickness or signs of uneven rotor wear. You can review Part # 1 and Part # 2 in the series here...
www.emtbforums.com
I am not a professional mechanic but I do enjoy working on bikes. I’ve built up many bikes in my lifetime. I presently own a highly modified Rise M20. I began working on bikes because I dislike waiting in a queue to have my bike fixed at my local bike shop. Who wants to wait two weeks for a repair? I’ve made a lot of mistakes and over time, I’ve learned a lot. The knowledge I've gained has contributed to many successful backcountry field repairs which prevented long walks back to the trailhead. Knowledge is a good thing, long walks back to the truck, absolutely suck…..
I am hopeful there will be no mistakes in Part # 1 and Part # 2 of this technical article, I am confident there will be. Should I make a mistake, please let me know so that I may correct the article. Hopefully this article will constantly evolve with time and input from you. If you ever have any question about something on your Rise, shoot me a message and I'll help you figure things out.
Let’s begin:
Shimano’s website provides parts diagrams and compatibility charts of all the manufacturer’s components and system levels. The parts diagrams are very useful when it comes to buying or identifying the correct replacement part, i.e. brake pads, brake hose, rotors, caliper adapters, etc. You don’t want to automatically assume something will fit on your bike. It most likely won’t. This is especially so when it comes to eBike parts.
To access parts diagrams and the compatibility chart, go to Shimano’s American or European website:
SHIMANO BIKE-US
To Build Closer Relationships between People, Nature, and Bicycles. We believe in the power of cycling to create a better world as we move forward. We inspire all people to enjoy our products in their everyday lives and where they take them.
Once Shimano's home page has opened, you will see “Information” displayed on the top header bar. Click on Information and a drop down menu will appear. From the drop down menu, click on "Tech Docs" and you will be taken to Shimano's technical webpage which allows you to access compatibility charts, component parts diagrams, installation manuals, etc. Once you've dialed how to access and use the information, you'll find this page extremely useful for parts identification.
Click on Information and select Tech Docs
Shimano Brake Fluid:
Modern Shimano hydraulic disc braking systems use mineral oil. Mineral oil offers several benefits. It does not absorb water, it handles high braking temperatures well and unlike D.O.T. brake fluid, it will not ruin the paint job on your bike or fork if you suffer a spill during brake bleeding.
Some manufacturers such as SRAM, use a D.O.T. 5.1 type braking fluid. DOT brake fluids and mineral oils are NOT compatible and under no circumstances should the two fluids be mixed in your Shimano brake system. Should this ever occur, the rubber seals inside your brake levers and calipers will swell and your brakes will be ruined.
Mineral brake oil will darken with use. This is due to particulates from the normal wear and tear of braking components and seals becoming suspended in the oil. Shimano recommends that brake fluids be changed if a noticeable change in brake fluid color occurs. As a general rule, I like to flush and replace my braking fluids once a year.
Shimano recommends that you use Shimano brake fluid on Shimano braking systems. Due to covid supply chain issues, it can be difficult sourcing Shimano brake fluid. There are other manufacturers such as Maxima and Finish Line that sell acceptable mineral oil braking fluids, however they are green in color. Shimano brake fluid is tinted red in color. Try not to mix colors, use one or the other. If you mix colors, it makes it difficult to determine If the brake oil is discolored and dirty.
Here is a Shimano tech article on mineral oil brake fluids:
Mineral Oil Brake Fluids | SHIMANO BIKE-US
Broadly speaking, hydraulic disc brakes designed for bicycles will use either a mineral oil fluid, or an automotive DOT fluid. Genuine Shimano Mineral Oil is the only fluid compatible with Shimano brakes.
Bleeding and Servicing Shimano Brakes:
Here is an excellent video produced by Park Tool on how to bleed your Shimano brakes. Whether you own a Shimano two piston brake caliper or four piston brake caliper, the bleed process is the same. If you plan to do your own brake bleed service, I recommend the Park Tool bleed kit, BKM-1. It has an excellent bleed block which comes with the tool kit. I describe below why I recommend this kit.
Shimano ceramic caliper pistons are extremely fragile. You absolutely need the correct bleed block when performing a brake bleed service or the piston will crack. Never pry directly on a ceramic piston with a hard object, i.e. screw driver. If you do, you stand a very good chance of damaging the piston. If you have to pry on a piston to collapse it back into the caliper during a brake pad replacement, keep the old brake pads in place and pry between them. Never pry directly against the piston. I always keep a used pair of brake pads in my tool box for this purpose.
All brake caliper pistons whether SRAM or Shimano, two piston or four piston, will start to seize up and get sticky with time. When this occurs, your brake pads will drag on the brake rotor creating a rubbing noise. Additionally, a sticky caliper piston will cause your brake pads to wear unevenly. This is because the sticky piston does not retract and keeps brake pad pressure against the rotor. The other pistons that are not sticky, retract and release pressure on the brake pads.
Example of an uneven wearing brake pad due to a sticky caliper piston
To understand why caliper pistons stick, you first need to know how your brake caliper operates. When you squeeze the brake lever, a piston in the brake lever housing forces brake fluid under pressure through the brake hose and into the brake caliper. Shimano uses a four sided, square edged piston seal in it's calipers. When the brake fluid advances the piston outwards, it rolls the four sided square edged piston seal outwards as the piston advances. Due to the rubber seal's elastic nature, it wants to return back to it's original shape. When you release the brake lever, fluid pressure is released, and the seal rolls back to it's original position, taking the caliper piston with it. To assist with retraction and brake pad alignment, Shimano and SRAM use a metal spring situated between the two brake pads.
After a period of use, trail dirt, braking pad compound, and traces of brake fluid will accumulate around the sides of the piston. This build up of crud will hinder the pulling nature of the piston seals and prevent piston retraction.
When a sticking piston first occurs, you will begin to hear the brake rotor rubbing against the brake pads. There are several other things that may cause a brake rotor rubbing noise. This includes a bent brake rotor or a caliper that is not centered on the brake rotor.
Rule out a bent rotor by shining a light upwards from beneath the caliper. Spin the wheel and look downwards at the caliper. Watch the rotor as it spins between the two brake pads. If you see a badly wobbling rotor, then it is bent and needs to be trued using a brake rotor truing tool. Park Tool, DT-2 works well at truing rotors. Note that no rotor is absolutely perfect and a very slight bit of wobble is acceptable.
If the brake rotor checks okay, next check to see if the caliper is centered on the brake rotor. To do this, loosen the two caliper bolts, squeeze the brake lever firmly. While holding tension on the brake lever, re-tighten the caliper bolts. Your caliper should now be centered on the rotor and no rubbing noise should be heard. If the brake rotor spins true, the caliper is correctly centered, and you still hear a rubbing noise, then you have dragging brake caliper piston(s).
Fortunately, its an easy fix to cure a dragging piston. You do this by scrubbing the sides of brake pistons using Q-Tips and mineral oil brake fluid. Here is an excellent video made by Park Tool which details how to clean brake caliper pistons. The video describes using Q-Tips to scrub the sides of the pistons. I find this method works well, but is not totally 100% effective. I also like to buff the sides of the pistons so they are smooth and polished. To do this, I use a long strip of cotton cloth torn from a cotton tee shirt or a piece of cotton twine. I partially wrap the cotton cloth around the piston and I push-pull the cotton cloth in a buffing action while working my way around each of the pistons. Once the pistons have been cleaned and lubricated with mineral oil, they should easily retract back into the caliper when pressed in. You will have a bit of excess mineral brake oil on the pistons and caliper after the cleaning process. Wipe off this excess oil so it doesn't attract dirt.
NOTE: It is imperative that you do not squeeze the brake lever so much that it forces a piston out of the caliper. It's very easy to do. If you do force the piston out of the caliper, you will need to re-bleed the brake system to remove all of the air that has entered the system.
******** HUGELY IMPORTANT - SHIMANO FOUR and TWO PISTON BRAKE CALIPERS **********
While performing the piston cleaning process on my XT Br-M8120 calipers, I accidentally pushed one of the ceramic pistons out of the bore. This resulted in loss of fluid and air entering the brake system. No biggie, I re-installed the ceramic piston and began the bleed process by placing a standard Shimano yellow bleed block between the four pistons. The bleed process was quickly performed. As I squeezed the brake lever to check for piston seal leakage, I heard a loud snapping noise come from the caliper. I then saw brake fluid dripping from the caliper. When I removed the bleed block, I saw that one of the small ceramic caliper pistons had cracked in half.
After reviewing the matter to figure out why this happened, I realized the spacer block I used, had not completely covered all four of the ceramic pistons. When I squeezed the brake lever, half of the ceramic piston stopped against the bleed block. The other half of the piston was not covered by the bleed block and tried to move forward. This caused the brake piston to shear in half.
YOU MUST MAKE ABSOLUTELY SURE THAT THE BLEED BLOCK YOU USE COMPLETELY COVERS ALL TWO OR FOUR OF THE CERAMIC CALIPER PISTONS. IF IT DOES NOT, THE PISTONS WILL CRACK WHEN THE LEVER IS SQUEEZED FIRMLY. PARK TOOL, BKM-1 COMES WITH AN EXCELLENT BLEED BLOCK WHICH PREVENTS THIS FROM OCCURRING.
I went online to order a replacement set of BR-M8120 pistons, only to discover that unlike SRAM, Shimano does not sell a replacement piston and seal kit. You must buy a whole new caliper. Because of covid and a lack of Shimano parts availability in the USA, I could not source just the caliper and had to buy a complete brake lever and caliper set.
If you Google "Shimano Cracked Pistons", you will see this is a significant issue which occurs during the brake bleed process. There are Chinese vendors on Amazon that sell replacement pistons however, these pistons are not ceramic and issues with heat expansion and brake failure are reported in user reviews. Properly functioning brakes is mission critical and I don't recommend experimenting with knock off pistons. As a side note, if anybody is looking for a brand new Shimano XT left brake lever hit me up, I have one for sell.
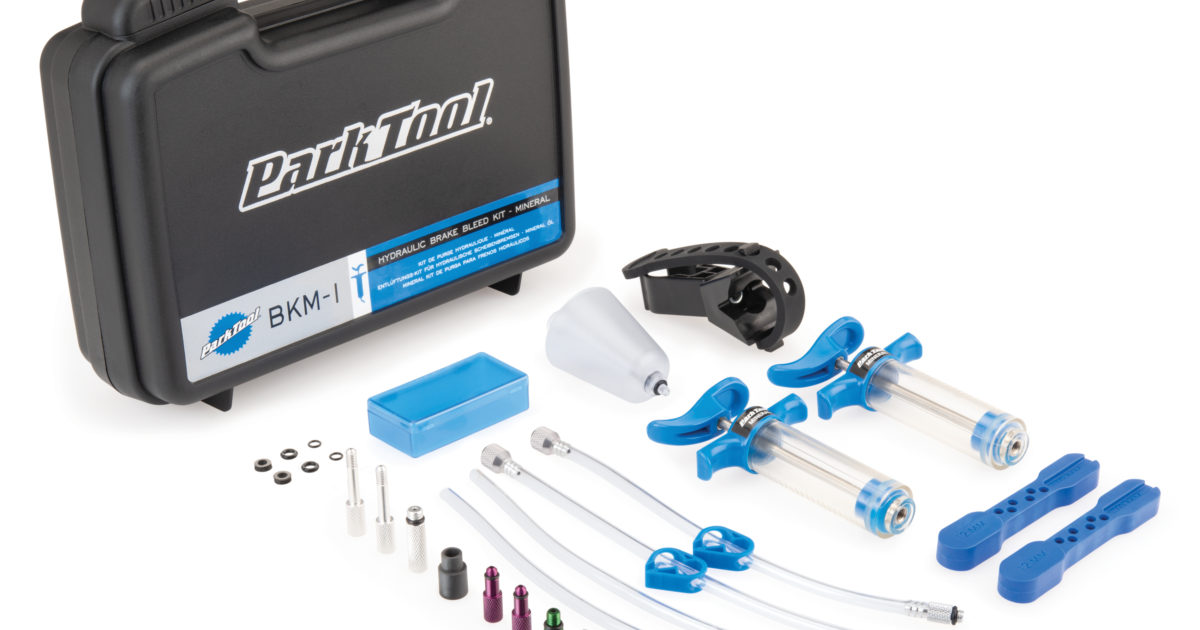
After the fiasco with the cracked caliper piston, I purchased Park Tool bleed kit, "BKM-1" which comes with an excellent bleed block and is perfect for bleeding Shimano two and four piston calipers. I highly recommend this bleed kit.
BKM-1 Hydraulic Brake Bleed Kit — Mineral
The BKM-1 Hydraulic Brake Bleed Kit will bleed most models of mineral oil based hydraulic brakes, removing any air bubbles and injecting new, clean fluid.
www.parktool.com
Dirty Brakes, Done Dirt Cheap....
Occasionally you may experience a noisy/howling brake when the brakes are applied. This typically occurs if you have accidentally contaminated the brakes and or rotor during a bike cleaning or maintenance. It doesn't take much oil, grease or a cleaning agent to foul up your brakes. When this occurs, the contamination will cause the brake pads to glaze over and howl when the brakes are applied. I've also had clay like soils contaminate my brake pads and after a stream crossing, along with high heat, will create a glaze on the pads which hinders stopping and causes a lot of noise.
When contamination occurs, you will need to clean your brake pads and rotor in order to alleviate noise and restore braking performance. I will describe my own process for cleaning brake pads and rotors. Everybody has their own method, there are many. My method works well, I'm sure your method does also. I will also attach a video on decontamination of brake pads and brake rotor, in case you would rather watch a video.
Brake pad before cleaning and surfacing
The same brake pad after cleaning and surfacing
To clean my brake pads, I first remove them from the caliper. I mark the backside of the pads with a L for left and R for right. I do this so that they go back into the caliper in the same wear orientation. You don't need to mark finned pads. I use a sheet of 400 grit sandpaper, a can of Acetone and a very clean wiping rag. Isopropyl alcohol also works, but I prefer not to use it because it contains water.
I place the sheet of 400 grit sandpaper on a pane of glass which I bought from my local hardware store. The pane of glass serves as perfectly flat surface in which to surface the face of the brake pad. I pour a small amount of acetone on the sandpaper. I place the brake pad compound side down on the sandpaper. Using a figure 8 pattern, I slide the brake pad around on the sandpaper. I don't press down hard. I add acetone as needed in order to wash the contaminated material off of the sandpaper as I work the pad. It doesn't take much or long to surface and clean the pad. After surfacing the pad, I take a clean rag with acetone and wipe the pad clean.
With the wheels still on the bike, I take a piece of fine emory cloth sandpaper and I hold it against the side of the brake rotor while I spin the wheel. I do this to both sides of the brake rotor. After several full revolutions, I take a clean rag with acetone and completely wipe down both sides of the rotor. After you have completed the cleaning process and reassembled the brakes, you will need to bed the brakes in by running your bike up the street and applying the brakes several times. Do this until your brakes feel good. The braking action will deposit a trace amount of brake compound on both sides of the rotor and your brakes will function like new.
Brake Pads
Shimano offers several types of brake pad compounds, including resin and metallic. Given the heavy nature of eBikes and my large butt, I prefer metallic pads. I find metallic pads last longer and they don't fade as much as a resin pad will do on a hard downhill run. I find metallic pads tend to stop better when things become wet. On the flip side of the coin, resin pads tend to be quieter and they are not as abrasive on brake rotors as a metallic pad will be. Brake pads can also be purchased with cooling fins molded into the backing pad or they can come with just a plain backing pad.
Here is an excellent article by Shimano on brake pad compounds.
Brake Pad Breakdown Metal versus Resin Pads: What you need to know | SHIMANO BIKE-US
So, what’s the difference between metal and resin brake pads, and what are the benefits of each?
Metallic brake pad with cooling fins
The same brake pad in resin and non-finned
Those of you who have tried to source Shimano N04C metallic or N03A resin brake pads with cooling fins, know they are rarer than unicorns and very costly. Plain backed brake pads are much more readily available. I don't know the effectiveness of the cooling fins, but they do look very cool...see what I did there? Personally, I don't see a big difference between finned or non finned brake pads. I'm positive they do provide an added cooling benefit, but is the benefit worth the cost? If you have trouble sourcing Shimano brakes pads, there are a number of companies that make equally good brake pads, Galfer, Kool Stop, Trucker, Jagwire, are just a few of the companies which manufacturer replacement brake pads.
To determine which pads your caliper model uses, refer to Shimano's compatibility chart.
I hope you find this article useful.
Cheers and be safe....
Last edited:
")

