Giant ebike Lezyne Macro Drive light installation tutorial (and ANT+ Control One Upgrade)

KuRi

Active member
May 30, 2019
376
185
Spain
Hi!!

Thanks to other forum post and the help of user bushkila and others I decided to update the ride control one to the ANT+ version and install a new light on my Fathom E+2 PRO 2019.

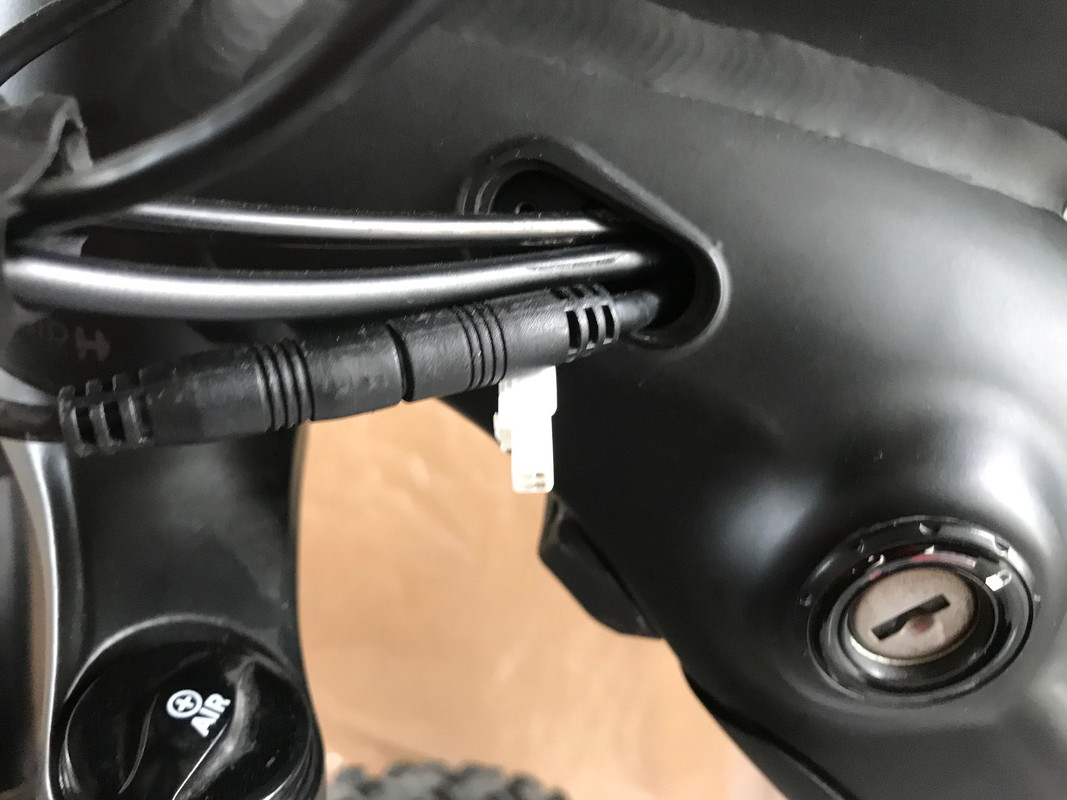
1- Remove the rubber protector from the frame, where the cables go in (near the headstock)
2- With some care, gently pull the cables until you get the ride control one connector and the light connector. A good advice is to remove battery and wiggle the big center cable to help you do this. The professional way to do it is to remove the battery lock mechanism, but I was able to do all the process without doing it so.
3- For the ridecontrol one, just disconnect the old one and connect the new one :D
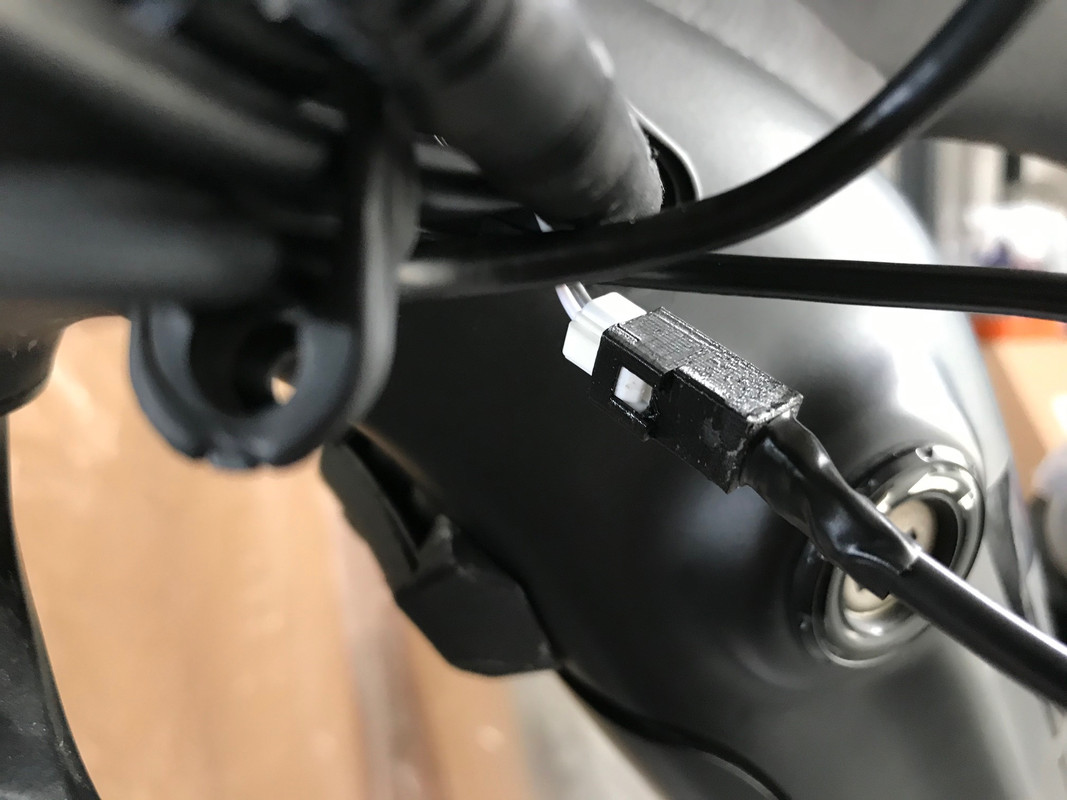
4- For the light, I built a custom connector using my 3D Printer, so I did not have to buy one and wait for it to come (1€ + 18€ shipping lol). This is the one you need: https://es.farnell.com/jst-japan-so...le-s/caja-conector-de-leng-eta-2-v/dp/3849818
5- Cut the cable from the lezyne light to suit your length needs and solder the connector (pay attention to positive and negative, at least three times!!! XD)
6- Pass the cables through the rubber protector, connect, and then into the frame, pushing as much cable as possible.
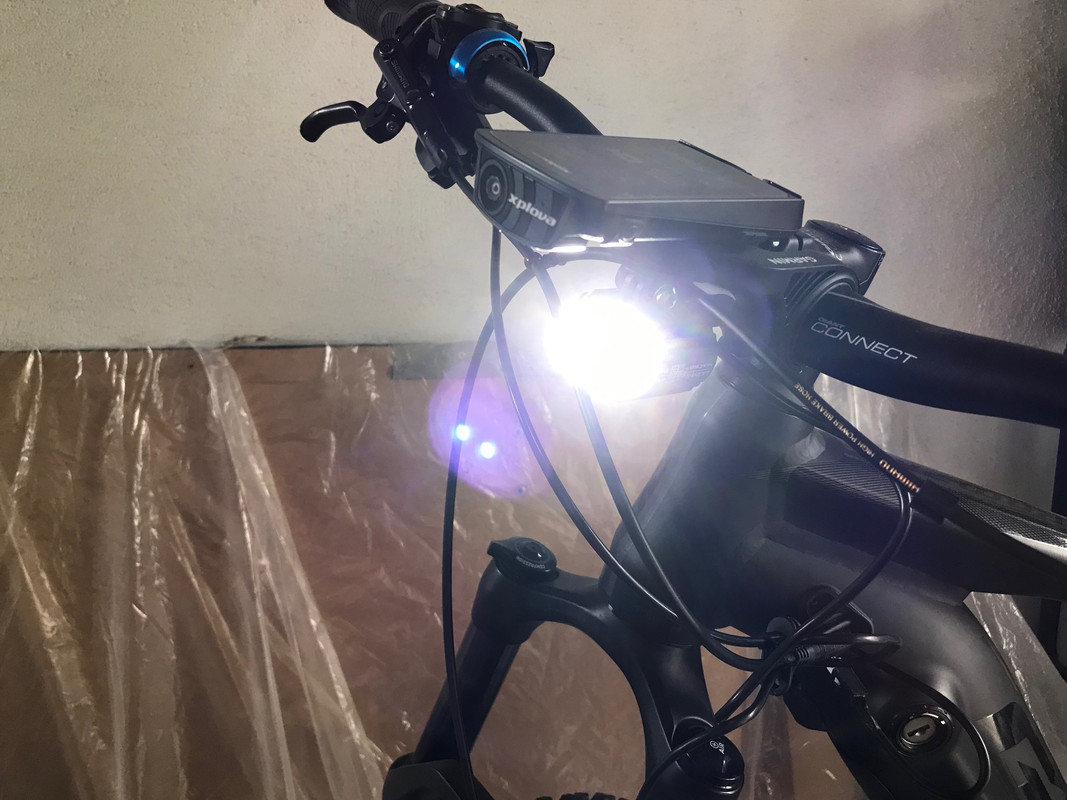
7- Enjoy! The new ant+ control allows me to get all bike measurements (speed, cadence, power, battery, level, autonomy, etc...) from my xplova x5 evo!!! (However I think the distance is not well calculated). You will then be able to switch the light on and off using the ride control button (this can be also done on the 2019 model of course). You cannot change the light mode by pressing the light button, this must be done on the light itself, but the last selected mode is remembered.
8- Ask me questions if needed!
Hope this helps someone!

https://i.postimg.cc/prm1mpXM/IMG-3628.jpg
https://i.postimg.cc/FRs6QTMR/IMG-3629.jpg
https://i.postimg.cc/hG0Ywk36/IMG-3630.jpg
https://i.postimg.cc/8zM9dJd1/IMG-3631.jpg
https://i.postimg.cc/ZnXsp4CB/IMG-3632.jpg
https://i.postimg.cc/B6YVZx3C/IMG-3633.jpg
https://i.postimg.cc/BvcW3Lth/IMG-3635.jpg
https://i.postimg.cc/bvPMmyL1/IMG-3636.jpg

IMG-3628.jpg

IMG-3631.jpg

IMG-3633.jpg
 

KuRi

Active member
May 30, 2019
376
185
Spain
Totally recommended, it is very cool to see the exact battery remaining and range on your current dashboard device (if ant+ compatible).

The issue with the xplova x5 evo (device that I love) is that the distance is not correctly calculated when using a combined sensor (speed + cadence). I have emailed them several times with no luck...

P.D: By the way... Once I removed the rubber cover from the frame, I noticed that the brake and shift cables were damaged (a little) because of rubbing against the frame or the cover or both. They were still in working condition so I decided to protect them with some black tape. This is a design problem by Giant, they should be well protected and the cover should be better. I will be swapping them anytime this year ;)
 
Last edited:

Jackware

Fat-tyred Freakazoid
Subscriber
Oct 30, 2018
1,888
2,049
Lancashire
I couldn't afford an Ebike and a 3D printer so I've used heatshrink connectors on my front light installations ;)
 
Last edited:

KuRi

Active member
May 30, 2019
376
185
Spain
Yes it is, I installed the 1000 and it works perfectly. The 500 will work 100% with the fathom e+2 2020.
However you will need to install the right connector by yourself.

Cheers!
 

Fathom2020

New Member
Aug 19, 2020
7
1
Isle of Wight
Yes it is, I installed the 1000 and it works perfectly. The 500 will work 100% with the fathom e+2 2020.
However you will need to install the right connector by yourself.

Cheers!

thanks for the reply! I’ve got the 500 and the JST connector you linked in your original post, however I’m not sure how to make the connection as there seems to be nothing protruding from either of the connectors. I’m thinking of removing the Male connector from the bike and just soldering the light in directly with some heat shrink...
 

KuRi

Active member
May 30, 2019
376
185
Spain
You need to keep searching, there is a jst connector together with the ridecontrol cable. An Y cable that comes from the motor. Sometimes it is well hidden in the compartment above the locking mechanism of the battery
 

Fathom2020

New Member
Aug 19, 2020
7
1
Isle of Wight
Can’t seem to get the light to work at all now even when putting the wires straight into the little red connector, is it possible I’ve blown a fuse in the light? (I did see a spark)
 

KuRi

Active member
May 30, 2019
376
185
Spain
That looks exactly like you need! The red connector together with the white connector... you have to attach the light cables to the white connector.

did you first check where the positive and negative go? If you did not and you reversed the cables you might have blown up the light ( the spark is a very bad sign) :(

is the bike still working? ?
 

vickriz

New Member
Nov 5, 2020
7
4
West Coast Canada
@KuRi Can you please comment on the light's usefulnees for trail riding? Here in the Pacific Northwest it gets dark in the bush. I'm considering Macro 1000 in addition to my usual helmet mount light. Have you riddent in teh bush with yours?
 

KuRi

Active member
May 30, 2019
376
185
Spain
Hi! Yes, Yesterday!!!

I was amazed how well I could see the trails, and it was a rough one. It also depends on your dexterity and speed but I have been bikes for trail roads for some years at night with several light models and this is the best I have tried. It is not as white as others I have tested (it is a bit yellow) but having two leds gives you a wide well illuminated area. 100% recommended!
 

vickriz

New Member
Nov 5, 2020
7
4
West Coast Canada
Thanks very much.

And BTW, my Giant LBS says they stock these lights and will install for labour fee. They say no warranty issues with installing it direct to the battery. So looks like an approved solution all around.
 

Fathom2020

New Member
Aug 19, 2020
7
1
Isle of Wight
DA580385-3112-4809-9615-A38186A4DAFF.png

Here is what I believe is the JST connector kit most people might need to make the connection. The last time I tried I didn’t realise you need the metal terminals to make the connection. No wonder I was having problems... I’m going to have another go at this ?
 

Fathom2020

New Member
Aug 19, 2020
7
1
Isle of Wight
B84AAF76-9538-47C4-B5E2-F1A2C18BA9DA.jpeg

so, it turns out that there are two different connectors tucked inside the downtube... one is red and the other is white on the Fathom E+2 2020.I checked the red with a multimeter and it read a consistent 41.1V and so this explains why the light blew up last time! Make sure to check the voltage on both connectors, the white one is 6V.
 

TheLob

Member
May 23, 2020
35
29
Northern Ireland
Thanks for that information, I’ve been gathering the bits and pieces together to fit a light to my 2019 Fathom E+3 29er. Was able to purchase the JST Female housing (pack of 5) and the metal Contacts (pack of 100) from RS Components. So have a few spares to play with. I have found the white male connector okay and checked it was 6volts?. Just have to decide which light to fit, Lezyne or Spanninga.
Also thought it might’ve worth mentioning the little rubber grommet that the cables go through is held in with an Allan head countersunk screw, I hadn’t noticed until I had removed the grommet with the aid of a screwdriver, luckily no damage done.
 

Fathom2020

New Member
Aug 19, 2020
7
1
Isle of Wight
Thanks for that information, I’ve been gathering the bits and pieces together to fit a light to my 2019 Fathom E+3 29er. Was able to purchase the JST Female housing (pack of 5) and the metal Contacts (pack of 100) from RS Components. So have a few spares to play with. I have found the white male connector okay and checked it was 6volts?. Just have to decide which light to fit, Lezyne or Spanninga.
Also thought it might’ve worth mentioning the little rubber grommet that the cables go through is held in with an Allan head countersunk screw, I hadn’t noticed until I had removed the grommet with the aid of a screwdriver, luckily no damage done.
Nice! I haven’t got any knowledge of Spanninga but the Lezyne 1000 works really well and the mount is very solid. I stupidly only bought one pair of contacts which I mucked up so instead of waiting weeks for more I decided to do a wire-to-wire solder followed by heat shrink which worked well. Would’ve worked even better if I’d had more practise doing electrical things like this! FYI in my case the white wire was positive and grey negative. Hope this helps.
 

EMTB Forums

Since 2018

The World's largest electric mountain bike community.

521K
Messages
25,659
Members
Join Our Community

Latest articles


Top